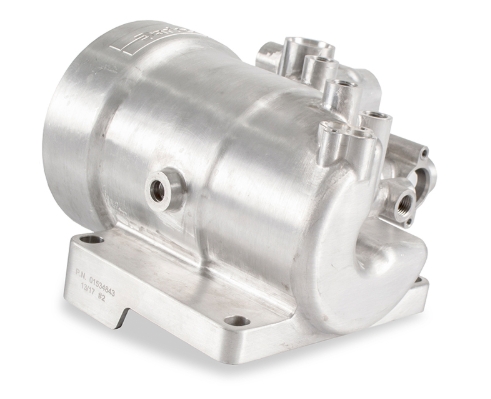
In the competitive world of product development, the bridge between a digital concept and a market-ready product is the prototype. For engineers and procurement specialists, CNC box prototype machining is the gold standard for creating complex, high-precision enclosures. Whether you are developing a gearbox housing, an engine casing, or an industrial equipment enclosure, the “box” is rarely just a box—it is a sophisticated protector of internal systems.
Traditional manual machining often falls short when faced with the tight tolerances and intricate internal structures these parts demand. Computer Numerical Control (CNC) technology, however, delivers the automated consistency required to meet modern performance standards. This guide explores the specialized world of box prototypes, providing actionable insights to help you reduce waste, avoid delays, and ensure your final parts are flawless.
1. What Is CNC Box Prototype Machining?
Before we dive into the technical workflow, it is important to define what sets this process apart. CNC box prototype machining involves creating specialized parts that serve as the structural “skeleton” or protective shell for internal components like gears, shafts, and circuit boards.
What Defines a “Box” Prototype?
These components are characterized by three distinct challenges:
- Complex Internal Structures: Unlike flat plates, box prototypes feature multiple faces, internal cavities, and grooves with varying depths.
- Ultra-High Precision: Critical features, such as hole alignment for bearing seats, often require tolerances as tight as ±0.01mm.
- Challenging Materials: To ensure durability, many box prototypes are made from gray cast iron or cast steel. While strong, these materials require expert handling to avoid tool breakage.
Why Choose CNC Over Manual?
A manual machinist might spend 8 to 10 hours struggling to align holes on a single gearbox housing, with no guarantee that the second part will be identical. With CNC box prototype machining, the same part is often finished in under 3 hours, with every dimension replicated to a precision of ±0.005mm.
2. Pre-Machining: Why Is Planning 70% of the Work?
Success in the machine shop is decided in the office. This phase focuses on mapping out the “DNA” of the part to prevent expensive errors once the cutting starts.
2.1 Design Planning: Mapping the Sequence
Design planning translates a 2D drawing into a logical “attack plan.”
- Operation Sequence: You must decide which face to cut first. For a gearbox, we always rough-machine the outer faces before drilling internal holes. This prevents “positional drift” caused by material stress relief.
- Machine Selection: A standard 3-axis mill handles simple enclosures. However, if your design has angled holes or undercut grooves, a 5-axis CNC machine is non-negotiable to avoid constant manual repositioning.
- Fixture Strategy: Fixtures hold the part steady. For a box prototype, a standard vice often isn’t enough. We frequently use custom modular fixtures that apply pressure evenly across the casting to prevent deformation.
Expert Case Study: An industrial pump manufacturer was losing 30% of their prototypes to “shifting” during the drilling phase. By designing a custom modular fixture specifically for their housing, they eliminated part movement and achieved 10 consecutive flawless runs.
2.2 Material Selection: Balancing Strength and Cost
Choosing the right material impacts everything from the weight of the prototype to how fast the machine can run.
| Material Type | Key Properties | Best Use Case | Machinability |
| Gray Cast Iron (HT200) | Vibration damping, rigid | Gearboxes, engine blocks | 5/10 |
| Ductile Iron (QT450) | High strength, ductile | Heavy-duty enclosures | 4/10 |
| Carbon Steel (45#) | Wear-resistant, tough | Small sensor housings | 6/10 |
Pro Tip: Always inspect your raw material for “porosity.” Castings can have hidden air bubbles. We recommend ultrasonic testing for critical prototypes to ensure the blank won’t crack mid-machining.
3. Core Stages of CNC Box Prototype Machining
The machining process follows a strict hierarchy, moving from aggressive material removal to microscopic refinement.
3.1 Roughing: Creating the Foundation
The goal here is speed. We remove the “machining allowance”—usually the outer 3–5mm of raw material—to reveal the basic box shape.
- The Approach: Use high feed rates (200–300 mm/min) and deep passes.
- Warning: If your tools are dull, they will cause “chatter” (vibration). This leaves a wavy surface that makes the finishing stage much harder.
3.2 Hole Processing: The Precision Hub
Holes are the most difficult part of any box prototype. They are often numerous and must align perfectly for assembly. We follow a three-step process:
- Drilling: Creating the initial hole slightly smaller than the target.
- Boring: This “trues up” the hole, ensuring it is perfectly round and aligned with the machine axis.
- Reaming: The final touch. A carbide reamer provides a mirror-like finish (Ra 1.6 μm) and hits the final diameter exactly.
3.3 Finishing: The Final 0.1mm
Finishing refines the walls to their final thickness.
- Thermal Control: Cast iron generates significant heat. In precision finishing, even a slight temperature rise can cause the metal to expand. We often pause the machine every 15 minutes to let the part reach room temperature before the final pass.
3.4 Inspection: The Gatekeeper
We use a Coordinate Measuring Machine (CMM) to map the prototype in 3D. If a wall is too thick by 0.05mm, we can perform a “skin pass” to correct it. However, if a hole is bored too large, the part is scrap. This is why we measure twice and cut once.
4. Post-Machining: Protecting Your Investment
Once the metal is cut, the part is vulnerable. Raw steel and iron can begin to rust within hours if the environment is humid.
- Degreasing: We use industrial degreasers to flush out every metal chip from deep internal holes.
- Rust Prevention: A phosphate coating or anti-rust oil is applied to seal the surface.
- Aesthetics: For customer demos, we apply epoxy paint to give the prototype the look and feel of a mass-produced product.
Yigu Technology’s View on Precision
At Yigu Technology, we have spent over a decade perfecting CNC box prototype machining. We understand that for our aerospace and automotive clients, “good enough” doesn’t exist. We utilize 5-axis milling to handle complex geometries in a single setup, which reduces human error by 40%.
Our engineering team doesn’t just execute drawings; we look for ways to optimize them. We’ve helped clients simplify internal groove designs to reduce machining time by 25% without sacrificing part strength. To us, a high-quality box prototype is the fastest way to prove your design works and get your product to market.
FAQ
How long does CNC box prototype machining take?
It depends on complexity. A simple electronic enclosure takes 3–4 hours. A complex gearbox with 20+ precision holes can take 8–10 hours. Batching multiple parts can reduce the per-unit time significantly.
What is the most common mistake in box prototypes?
Skipping the boring step for bearing holes. Many shops try to simply drill and ream, but this often results in holes that are slightly “tilted” or out of position. Boring is essential for alignment.
Can I machine a box prototype from plastic?
Yes. For early-stage “fit checks” where weight and heat aren’t factors, ABS or Polycarbonate is much faster and cheaper to machine. We recommend plastic for version 1 and metal for functional testing.
Why does cast iron “chatter” so much?
Cast iron is brittle. If the tool isn’t sharp or the machine isn’t rigid, the tool will “bounce” off the surface rather than cutting it. Using carbide tools with specific rake angles solves this.
Is 5-axis machining necessary for every box?
No. If all your holes and features are on the top and bottom faces, a 3-axis mill is more cost-effective. 5-axis is only required for parts with features on multiple angled planes.
Discuss Your Projects with Yigu Rapid Prototyping
Do you have a complex housing or enclosure that needs to be perfect? At Yigu Rapid Prototyping, we bring 10 years of CNC box prototype machining expertise to your project. Our team is ready to help you refine your design, select the best materials, and deliver a precision prototype that exceeds your expectations.
Would you like me to review your 3D model and suggest the most efficient machining sequence for your enclosure?