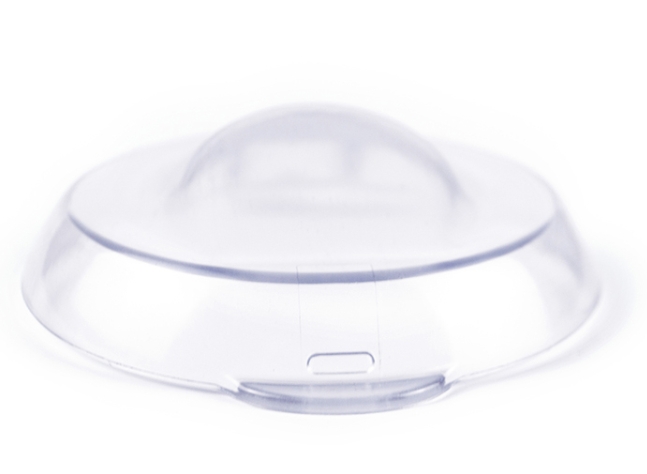
If you are a product engineer or a procurement professional, you know that first impressions matter. Whether you are building display cases, medical housings, or consumer electronics, a CNC acrylic prototype must look flawless. Acrylic (PMMA) is famous for its natural clarity. However, the CNC machining process often leaves behind tool marks, burrs, and a dull, “frosted” surface.
To turn a rough-cut block into a crystal-clear masterpiece, you need a professional brightening strategy. This guide provides a step-by-step workflow to help you achieve a mirror-like finish. By following these industry-tested methods, you can ensure your prototype looks professional, functions perfectly, and impresses every stakeholder.
Why Is Brightness Critical for Your Prototype?
Before we start the work, we must understand why a “bright” finish is non-negotiable. It is not just about looking good; it is about performance and perception.
- Aesthetics and Branding: A bright, glossy finish looks high-end. If you show a dull prototype to a client, they may think the final product will look cheap.
- Light Transmission: For functional parts like light guides or display covers, scratches and dull spots block light. Maximum brightness ensures the light flows evenly.
- Perceived Quality: Smooth surfaces are easier to clean and feel better in the hand.
The Cost of “Dullness”: A startup once presented a retail display prototype to a major investor. The part was dim and frosted because they skipped the final polish. The investor questioned the material quality, assuming it was cheap plastic. After the team used the brightening steps below, the “new” prototype looked like glass, and the project was funded immediately.
How Do Acrylic Properties Affect Brightness?
Acrylic, also known as PMMA, is a unique engineering plastic. You cannot treat it like metal. If you use the wrong tools, you will melt the surface or create deep scratches that never go away.
| Acrylic Property | Impact on Brightness | How to Adapt |
| Soft Surface | Scratches very easily with coarse tools. | Use fine sandpaper (400+ grit) and light pressure. |
| High Transparency | Shows every internal flaw and swirl mark. | Use uniform, circular motions during the polish. |
| Heat Sensitivity | Melts at 80-100°C due to friction. | Keep tool speeds low and use water for cooling. |
Step-by-Step Guide to a Bright Finish
Making a CNC acrylic prototype to be bright requires five sequential steps. Each step prepares the surface for the next level of shine.
1. Grinding Away Machining Flaws
The CNC mill leaves “tool paths” on the material. Grinding smooths these out. Start with coarse paper and work your way up to a fine finish.
- 240-400 Grit: Use this for deep tool marks. Apply medium pressure (1-2 kg).
- 600-800 Grit: This removes the scratches left by the first pass.
- 1000-1200 Grit: This creates a uniform, hazy surface. It should feel smooth to the touch.
Expert Tip: Always use wet sanding. Adding a little water lubricates the surface and washes away dust. This prevents “pills” of acrylic from scratching the part as you work.
2. Polishing for a Mirror Shine
This is where the magic happens. Polishing removes the micro-scratches from the 1200-grit paper to reveal the shine.
- Supplies: Use an acrylic-specific polish like Novus #2. Avoid metal polishes, as they contain harsh chemicals that can “craze” or crack the plastic.
- Tools: A soft microfiber cloth is best for small parts. For large parts, use a foam pad on a low-speed drill.
- Speed Control: Keep your drill at 500-800 RPM. If you go faster, the friction will generate enough heat to melt the acrylic, creating a “wavy” surface.
3. Thorough Washing
Polishing paste contains oils and abrasives. If you leave these on, the part will eventually look cloudy.
- Mix a small amount of mild dish soap with warm water.
- Gently wash the part and rinse with clean water.
- Dry with a lint-free microfiber cloth. Avoid paper towels, as they can leave tiny scratches on a freshly polished surface.
4. Optional Varnishing
If the prototype will be handled a lot by testers, you can “lock in” the shine with a clear varnish.
- Use a water-based acrylic varnish.
- Apply in a thin, even coat.
- Allow 24 hours to dry in a dust-free environment. Even one speck of dust can ruin a mirror finish.
5. Surface Protection
A bright finish is fragile. Protect your hard work during shipping or testing.
- Apply a low-tack protective film (like 3M Scotchgard) once the part is completely dry.
- Store the part in a soft, padded bag rather than a cardboard box to avoid “paper scuffs.”
Common Mistakes That Ruin Brightness
Even experienced engineers make mistakes when they are in a rush. Watch out for these three “shine killers”:
- Skipping Sandpaper Grits: If you jump from 400 grit directly to 1000 grit, the 1000 grit will never be able to reach the bottom of the 400-grit scratches. You will end up with a shiny surface that has “ghost lines” underneath.
- Too Much Pressure: Pressing too hard does not make it go faster. It just creates heat. This causes the acrylic to “smear,” ruining the optical clarity.
- Using Dirty Cloths: A single grain of sand on a polishing cloth will act like a knife. Always use a fresh, clean cloth for every stage of the process.
Yigu Technology’s Approach to Brightness
At Yigu Technology, we have helped hundreds of clients get their CNC acrylic prototype to be bright. We know that time is money in product development. Many teams struggle because they try to polish by hand for hours.
Our solution is a “Grind-to-Gloss” standard. We use automated polishing stations for high-volume orders to ensure every part has the same level of clarity. For complex prototypes with deep internal cavities, we use vapor polishing—a process that uses a chemical gas to melt the surface smooth in seconds. This ensures that even the hardest-to-reach spots are crystal clear. By optimizing this workflow, we reduce post-processing time by 30% for our clients.
Conclusion
Getting a CNC acrylic prototype to be bright is a mix of science and patience. By moving through the grinding stages methodically and keeping your tools cool during the polish, you can achieve a finish that looks like high-end glass. Remember: start wet, go slow, and always use clean materials. With these steps, your next prototype will be the star of the boardroom.
FAQ
How long does it take to make a CNC acrylic prototype bright?
A small part (the size of a phone) usually takes 1-2 hours of active labor. For large display pieces, expect 3-4 hours. If you add a varnish coat, you must wait 24 hours for it to dry.
Can I use a car buffer to speed up the process?
No. Most car buffers run at 1500+ RPM, which is much too fast for acrylic. It will melt the surface. Stick to a low-speed drill or a dedicated plastic polisher at 500-800 RPM.
What if my prototype has internal holes that are dull?
Internal holes are tricky. Use a small felt bob on a Dremel tool at its lowest setting with a little polishing paste. For the best results on complex internal shapes, consider vapor polishing.
Does polishing change the dimensions of the part?
Yes, but only by a tiny amount. Grinding and polishing typically remove 0.01mm to 0.05mm of material. If your tolerances are extremely tight, you should account for this during the CNC machining stage.
Discuss Your Projects with Yigu Rapid Prototyping
Do you have a project that needs a crystal-clear finish? At Yigu Technology, we specialize in high-precision CNC machining and expert post-processing. Our engineers can guide you on the best material grades and finishing techniques to ensure your project shines.
Would you like me to provide a custom quote or a DFM (Design for Manufacturability) analysis for your acrylic project? Let’s make your vision bright.