In the world of 3D printed prototypes, functionality often takes the front seat. But what about when aesthetics and user experience are just as critical? Imagine a prototype for a smart speaker with a softly glowing status indicator, a wearable device with a body-conforming light guide, or a medical instrument housing that diffuses internal LEDs for a calming effect. This is where translucent resin shines—literally and figuratively. It occupies a unique middle ground between opaque solids and crystal-clear transparency, offering a soft, light-diffusing quality that can elevate a prototype from a mere proof-of-concept to a compelling product vision. However, working with translucent materials presents distinct challenges and opportunities that differ from standard resins. This guide delves into everything you need to know, from material science and printing best practices to advanced finishing techniques, empowering you to harness the full potential of translucent resin for your projects.
What Makes Translucent Resin a Unique and Valuable Prototyping Tool?
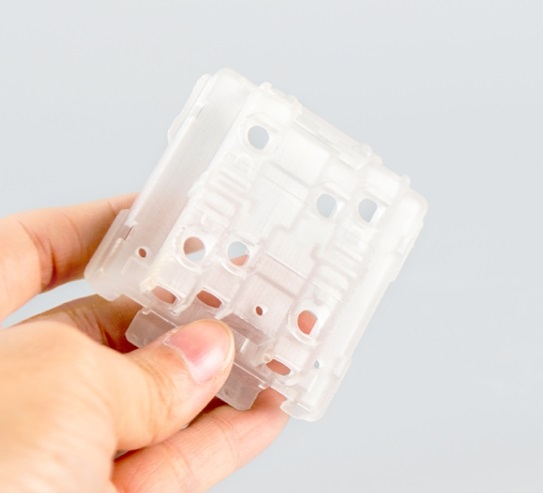
Translucency is not simply “less clear” transparency; it’s a specific optical property resulting from light scattering within the material. This scattering creates a uniform, frosted glow that hides internal structures while still transmitting light, offering both aesthetic and functional benefits.
Beyond Aesthetics: The Functional Advantages of Light Diffusion
The primary superpower of translucent resin is its ability to homogenize light. This solves several common prototyping challenges:
- Eliminating Hotspots: For prototypes with internal LEDs or light sources, translucent resin diffuses point sources into a smooth, even glow. This is invaluable for user interface (UI) elements, indicator lights, and backlit panels, providing a professional look that opaque prototypes cannot.
- Masking Internal Components: It allows designers to suggest internal sophistication while concealing the messy wiring, PCBs, or rough assembly common in early-stage prototypes. This is crucial for investor presentations or user testing where the focus should be on form and interaction, not internal guts.
- Simulating Production Materials: Many end-use products use light-diffusing plastics like polycarbonate blends or frosted acrylic. Translucent resin prototypes can accurately mimic the look, feel, and light behavior of these materials, providing a more truthful representation than a clear or solid-colored model.
Case in Point: A client developing a high-end kitchen faucet with a touch-sensitive LED temperature strip needed a prototype for user testing. Using a translucent, blue-tinted resin, we printed the handle section. The resin perfectly diffused the internal LED strip, creating a continuous, elegant band of light that clearly indicated water temperature, while the translucent body gave a premium, solid-state feel that opaque plastic could not achieve.
How Do You Select and Handle the Right Translucent Resin?
Not all “clear” or “translucent” resins are created equal. Their performance hinges on chemical formulation, viscosity, and UV reactivity.
Decoding Resin Specifications for Optimal Results
When evaluating resins, look beyond the label. Key properties include:
| Property | What It Means | Why It Matters for Translucency |
|---|---|---|
| Haze & Transmittance | Haze (%) measures light scattering; Transmittance (%) measures total light passed. | A high haze (>90%) with moderate transmittance (50-70%) creates a strong diffused effect. A “clear” resin may have high transmittance but low haze, making it more transparent. |
| Viscosity | The resistance of the resin to flow. | Lower viscosity resins (e.g., 250-350 cP) drain better from internal cavities and allow finer feature replication, crucial for consistent wall thickness and light diffusion. |
| Wavelength Compatibility | The optimal UV wavelength for curing. | Must match your printer’s light source (typically 385nm or 405nm). Mismatch leads to under-curing (weak, sticky parts) or over-curing (yellowing, brittleness). |
| Post-Cure Dimensional Stability | How much the part shrinks/warps after final UV curing. | High-stability resins are critical for prototypes requiring precise fit with other components. Look for shrinkage values below 0.5%. |
Professional Tip: Always request a Technical Data Sheet (TDS) and Material Safety Data Sheet (MSDS) from the supplier. For a recent project requiring biocompatible prototypes for a skin-contact device, we selected a translucent resin with ISO 10993-5 & -10 certification, ensuring it was non-cytotoxic and suitable for sensitization testing.
The Critical Role of Printer Calibration and Environment
Translucent resins can be more sensitive to printing parameters than standard resins.
- Exposure Calibration is Non-Negotiable: Use the AmeraLabs Town or Box of Calibration test print. The goal is to find the lowest exposure time that achieves perfect dimensional accuracy and feature replication without over-curing. Over-exposure turns translucent resin milky and opaque.
- Environmental Control:
- Temperature: Resin performs best at a consistent 25-30°C (77-86°F). Cold resin increases viscosity, affecting layer recoating and leading to print artifacts.
- Humidity: Maintain relative humidity below 50%. As noted, moisture is a hidden enemy. In a project with hollow, sealed prototypes, we encountered “water-clear” resin that later developed internal fogging and micro-cracks. The culprit was ambient humidity being trapped and condensed inside the sealed cavity during temperature swings. The solution was to add tiny vent holes (<0.5mm) during design to allow air exchange.
What Are the Best Practices for Printing and Post-Processing?
Achieving perfect translucency is a two-part process: impeccable printing followed by strategic finishing.
Optimizing Print Orientation and Supports for Clarity
- Orientation for Minimal Support Scarring: Always orient the model so that critical light-emitting or viewing surfaces face away from supports. Support contact points leave blemishes that scatter light unevenly. For a light diffuser, print it vertically or at an angle so the large face is built smoothly layer-by-layer, not supported.
- Hollowing Strategy: To save material and reduce cure times for thick parts, hollow your model. However, you must include drainage holes. More critically, the interior surface will be rough, causing unwanted internal light scattering. For the best optical performance, design parts to be solid if they are thin (<5mm), or plan to smooth the interior if hollowing is necessary.
A Strategic Post-Processing Pipeline for Translucent Parts
The goal is to enhance, not destroy, the inherent light-diffusing quality.
- Initial Cleaning: After printing, wash parts thoroughly in two stages of 99% Isopropyl Alcohol (IPA). The first bath removes bulk resin; the second ensures a perfectly clean surface. For water-washable resins, use distilled water to prevent mineral deposits.
- Support Removal & Light Sanding: Carefully remove supports. For any minor blemishes, use very fine grit sandpaper (800-1000 grit) or a fiberglass pen with a light touch. The aim is not to polish to clarity, but to remove artifacts.
- The “Water Cure” Secret: For a more uniform cure and enhanced clarity/diffusion, post-cure the part while submerged in water. Place the cleaned part in a clear container of water and put it in your UV curing station. Water reduces oxygen inhibition at the surface, leading to a more complete and consistent cure. This often yields a more homogeneous translucent appearance.
- Advanced Finishing (Optional):
- For a slightly smoother, more consistent frost, apply a light coat of a clear, matte spray lacquer.
- To achieve gradients or colored translucency, airbrushing with highly transparent, dye-based inks (like those used for polycarbonate RC car bodies) can yield stunning effects without turning the part opaque.
How Does Translucent Resin Compare to Transparent and Opaque Options?
Making the right material choice requires a clear understanding of the spectrum.
| Criterion | Opaque Resin | Translucent Resin | Transparent/Clear Resin |
|---|---|---|---|
| Primary Function | Hides internals, shows color/form. | Diffuses light, suggests internals. | Reveals internals, allows clear view-through. |
| Post-Processing Need | Low. Primarily for paint prep. | Moderate. Cleaning, light finishing. | Very High. Sanding, polishing, coating for clarity. |
| Light Management | Blocks light. | Scatters and softens light. | Transmits light with minimal distortion. |
| Best Prototype Uses | Structural parts, enclosures, form studies. | Light guides, status indicators, premium housings, diffusers. | Lenses, windows, fluidic channels, displays. |
| Common Pitfall | Can look “cheap” or unfinished. | Inconsistent diffusion from poor printing. | Yellowing, scratches, difficult to achieve true clarity. |
Conclusion
Translucent resin is far more than a cosmetic choice; it’s a powerful functional material that bridges the gap between solid form and illuminated function. Success with it demands a shift from standard prototyping thinking to an optical engineering mindset. By meticulously selecting the right resin based on haze and transmittance data, controlling your printing environment to prevent moisture issues, and employing a finishing process that respects the material’s light-scattering nature, you can produce prototypes that are not only visually striking but also rich with user experience insights. It enables you to prototype the experience of light within a product, a capability that can fundamentally shape better design decisions and create more compelling product demonstrations.
FAQ
Is translucent resin easier to print with than transparent resin?
Yes, generally. Translucent resin forgives minor surface imperfections because its function is to scatter light. Transparent resin requires near-perfect surfaces to achieve optical clarity, necessitating extensive post-processing like sanding, polishing, and clear-coating. Translucent resin achieves its intended aesthetic directly from a well-tuned printer.
Can translucent resin prototypes be used for functional testing?
Absolutely, but within defined limits. They are excellent for form, fit, light diffusion, and assembly testing. They can also be used for basic mechanical testing if you choose an “engineering” or “tough” translucent formulation. However, they are typically not suitable for high-stress structural tests or long-term environmental exposure without verifying the specific resin’s datasheet properties.
How do I prevent moisture issues (cracking/fogging) in hollow translucent prototypes?
The key is pressure equalization and thorough drying. 1) Always design at least two drainage/vent holes in opposing corners of hollow sections. 2) After washing, force dry the interior with compressed air through these holes. 3) Let the part fully air-dry for 24 hours in a low-humidity environment before final UV curing. 4) Store finished prototypes with silica gel desiccant packs if in humid climates.
Can I dye or color translucent resin?
Yes, but you must use transparent dyes or pigments designed for UV resins. Opaque pigments will destroy the translucency. Start with a drop per 100g of resin and mix thoroughly. Test-print small samples. Transparent dyes can create beautiful tinted translucent effects (e.g., amber, smoke, blue) for branding or status indication.
What’s the best way to achieve a perfectly even, matte translucent finish?
Consistency comes from the print process. Ensure stable printer temperature, perfectly calibrated exposure times, and uniform UV lamp output. For finishing, the “water cure” method often yields the most uniform result. For a final touch, a light spray with a flat/matte clear acrylic coat can unify the surface sheen.
Discuss Your Projects with Yigu Rapid Prototyping
Mastering the nuances of translucent resin printing—from material science to environmental control—requires dedicated expertise and equipment. When your prototype’s success depends on that perfect diffused glow or professional light-piped effect, partnering with specialists ensures a flawless outcome.
At Yigu Rapid Prototyping, we treat translucent prototyping as a specialty. Our capabilities are engineered for optical-quality results:
- Controlled Printing Environment: Our resin printing labs maintain tightly controlled temperature and humidity, eliminating the environmental variables that cause fogging, cracking, or inconsistent curing.
- Advanced Resin Library & Testing: We stock a curated selection of high-performance translucent and transparent resins, from standard diffusing resins to engineering-grade and biocompatible options. We pre-test each batch for optimal exposure settings.
- Precision Post-Processing: Our finishing department is skilled in the specific techniques for translucent materials, including ultrasonic cleaning, water-submersion curing, and precision painting/coating to achieve custom optical effects.
Ready to bring your luminous prototypes to life with confidence? Submit your 3D model for a free design for manufacturability review focused on optical performance. Let Yigu’s expertise illuminate your path from concept to stunning, functional prototype.