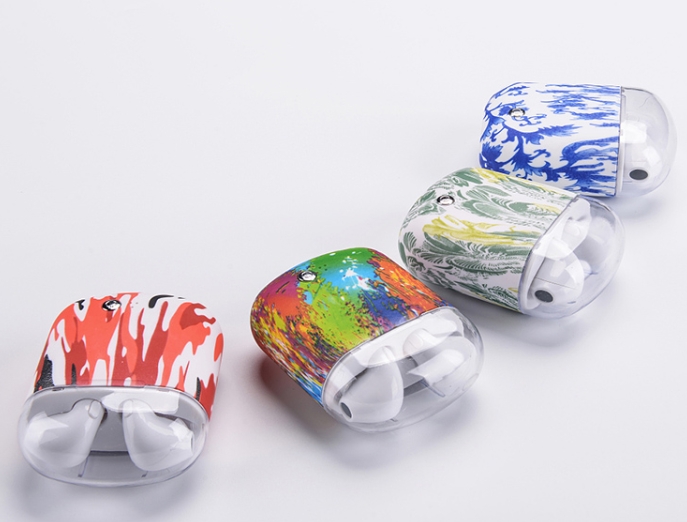
If you’re a product designer or engineer working on CNC plastic prototyping, you know that a great design deserves a polished finish. Water transfer printing (also called hydrographic printing) is a game-changing surface decoration technique—it lets you add complex patterns (like wood grain, carbon fiber, or custom logos) to your CNC plastic prototype, turning a plain part into a visually striking model. Whether you’re creating a demo for clients or a functional sample for testing, this process boosts both aesthetics and perceived quality. In this guide, we’ll break down every step of water transfer printing for CNC plastic prototyping, from material prep to final inspection, so you can achieve flawless, professional results.
What Is Water Transfer Printing for CNC Plastic Prototyping?
First, let’s clarify what water transfer printing is and why it’s a top choice for CNC plastic prototypes. Water transfer printing uses water to transfer pre-printed patterns from special paper onto 3D surfaces. Unlike traditional methods (like sticker sheets or screen printing), it conforms to curved, uneven, or detailed areas of your CNC plastic part—no missed spots or bubbled edges.
For CNC plastic prototyping, water transfer printing offers three unbeatable benefits:
- Design Versatility: It works with any pattern, from realistic textures (e.g., marble, leather) to brand-specific logos. You can even customize colors to match your final product.
- Surface Adaptability: It handles the complex shapes of CNC plastic prototypes—think rounded edges, small holes, or recessed details—with ease.
- Cost-Effectiveness: For small-batch prototyping (1–10 units), it’s cheaper than custom painting or molding, and faster than other decorative techniques (like vacuum forming).
Step 1: Choose the Right CNC Plastic Material for Water Transfer Printing
Not all CNC plastic materials work equally well with water transfer printing. Some are too porous (absorb too much water) or too smooth (poor pattern adhesion). Below is a breakdown of common CNC plastics, their compatibility with water transfer printing, and key tips for success.
CNC Plastic Material | Compatibility (1=Poor, 5=Excellent) | Key Properties for Water Transfer | Recommended Pattern Types | Best For (Prototype Uses) |
ABS | 5 (Excellent) | Rigid, non-porous, good adhesion | All (wood grain, logos, camo) | Electronics enclosures, toy parts |
PC (Polycarbonate) | 4 (Very Good) | High impact strength, scratch-resistant | Carbon fiber, solid colors | Display covers, safety gear |
PMMA (Acrylic) | 4 (Very Good) | Transparent (pattern shows through clearly) | Frosted, geometric patterns | Decorative displays, transparent casings |
PP (Polypropylene) | 3 (Good) | Slightly porous (needs surface activation) | Simple patterns (stripes, logos) | Food containers, soft grips |
POM (Acetal) | 2 (Fair) | Smooth surface (risk of poor adhesion) | Bold, thick patterns | Mechanical parts (non-critical aesthetics) |
Silicone | 1 (Poor) | Too flexible (pattern peels easily) | N/A | Not recommended |
Pro tip: ABS plastic is the gold standard for water transfer printing in CNC prototyping. It’s easy to prep, holds patterns tightly, and works with every design type. If you need transparency, go with PMMA—but be sure to use a water-based pattern (oil-based inks can cloud the plastic).
Step 2: Prepare Water Transfer Paper (Pattern Creation)
The first hands-on step is making your water transfer paper—this is where your design comes to life. Rushing this step will lead to blurry or misaligned patterns, so take your time to get it right.
2.1 Design and Digitization
- Tools Needed: Design software (Adobe Illustrator, CorelDRAW), high-resolution scanner (if using physical art).
- Process:
- Create or import your pattern. Ensure the size matches your prototype—add a 1–2cm bleed (extra pattern around the edges) to cover any small misalignments during transfer.
- Adjust colors for plastic: Use brighter hues if your prototype is light-colored (e.g., white ABS) or softer tones for dark plastics (e.g., black PC)—this ensures the pattern pops without looking washed out.
- Save the file as a high-resolution PDF (300 DPI minimum)—low-resolution files will print blurry.
2.2 Printing the Pattern
- Tools Needed: UV inkjet printer, special water transfer paper (polyester or water-soluble base).
- Key Notes:
- Use UV ink (not regular inkjet ink)—it bonds better to plastic and resists fading when exposed to water during transfer.
- Print the pattern in “mirror mode” if your design has text or logos—this ensures the final pattern reads correctly on the prototype.
- Let the printed paper air-dry for 30–60 minutes (or 15 minutes with a low-heat fan). Drying prevents ink from smudging when soaked.
2.3 Cutting the Paper
- Tools Needed: Precision utility knife, ruler, cutting mat.
- Process: Cut the water transfer paper to fit your prototype, leaving a 0.5cm border around the pattern. Avoid jagged edges—they can cause the pattern to tear during soaking.
Step 3: Clean and Activate the CNC Plastic Prototype Surface
Even the most precise CNC machining leaves tiny contaminants (oil, dust, or tool residue) on the plastic surface. These will ruin pattern adhesion, so thorough cleaning and activation are non-negotiable.
3.1 Surface Cleaning
- Tools Needed: Isopropyl alcohol (70%+), lint-free microfiber cloths, compressed air.
- Step-by-Step:
- Use compressed air (low pressure: 30–40 PSI) to blow dust from crevices (e.g., holes, edges) that cloths can’t reach.
- Dampen a microfiber cloth with isopropyl alcohol and wipe the prototype in straight lines (avoid circles—this spreads oil).
- Let the prototype air-dry for 10–15 minutes—alcohol evaporates quickly, so no rinsing is needed.
- Why It Matters: Oil or dust creates “bubbles” between the pattern and plastic, causing the design to peel within days.
3.2 Surface Activation (For Porous Plastics)
- When to Do It: Required for PP or POM (porous or smooth plastics) to boost adhesion. Skip for ABS, PC, or PMMA (non-porous).
- Tools Needed: Plastic surface activator (e.g., 3M Adhesion Promoter), small spray bottle.
- Process:
- Spray a thin, even layer of activator on the prototype surface (hold the bottle 15cm away to avoid drips).
- Let it dry for 5–10 minutes—the surface will feel slightly tacky when ready.
- Pro Tip: Test the activator on a scrap piece of plastic first—some strong activators can discolor light-colored ABS.
Step 4: Soak and Position the Water Transfer Paper
Now it’s time to prepare the paper for transfer. The goal is to soften the paper so the pattern floats freely on water, making it easy to apply to the prototype.
4.1 Soaking the Paper
- Tools Needed: Clean plastic tank (large enough for your prototype), room-temperature water (20–25°C), timer.
- Process:
- Fill the tank with water—depth should be at least 2cm more than the height of your prototype (this lets you submerge the part fully).
- Place the water transfer paper on the water surface (pattern side up). Let it soak for 60–90 seconds.
- Check readiness: Gently touch the paper with your finger. If the pattern slides off the paper backing easily, it’s ready. If not, soak for another 10–15 seconds.
- Warning: Don’t soak too long—over-soaked paper will tear, and the pattern will dissolve.
4.2 Positioning the Pattern
- Tools Needed: Small plastic spatula (for adjusting the pattern).
- Process:
- Float the soaked pattern to the area of the tank where you’ll submerge the prototype.
- Use the spatula to smooth out any wrinkles in the pattern—wrinkles will transfer to the plastic, ruining the finish.
- Keep the pattern centered over the tank—this gives you room to maneuver the prototype during transfer.
Step 5: Transfer the Pattern to the CNC Plastic Prototype
This is the most critical step—precision here ensures the pattern aligns perfectly and sticks without bubbles.
5.1 Submerge the Prototype
- Process:
- Hold the prototype at a 45° angle above the water, with the surface to be printed facing the pattern.
- Lower the prototype into the water slowly (2–3cm per second). Fast dipping causes air bubbles; slow dipping lets the pattern wrap around curves smoothly.
- Keep the prototype moving until it’s fully submerged—this ensures every part of the surface touches the pattern.
5.2 Smooth the Pattern and Remove Excess Paper
- Tools Needed: Soft foam brush, warm water (for rinsing).
- Step-by-Step:
- While the prototype is still submerged, use the foam brush to gently press the pattern against the plastic. Brush in the direction of the prototype’s curves (e.g., circular motions for rounded edges) to remove air bubbles.
- Lift the prototype out of the water and let excess water drain for 1–2 minutes.
- Peel off any remaining paper backing—use warm water to soften stubborn bits (don’t scrub, as this can damage the pattern).
Step 6: Dry and Cure the Pattern
Proper drying and curing lock the pattern in place, preventing peeling or fading. Rushing this step will undo all your hard work.
6.1 Initial Drying
- Tools Needed: Clean drying rack, low-heat fan (optional).
- Process:
- Place the prototype on the drying rack (pattern side up) in a dust-free room.
- Let it air-dry for 2–4 hours (or 1–2 hours with a fan set to low heat). Avoid direct sunlight—UV rays can fade the pattern.
- Check for Dryness: The pattern should feel firm to the touch (no tackiness). If it’s still sticky, dry for another hour.
6.2 Curing (For Maximum Durability)
- When to Do It: Recommended for prototypes that will be handled frequently (e.g., user testing models) or exposed to moisture.
- Tools Needed: Heat gun (set to 60–80°C) or curing oven.
- Process:
- Hold the heat gun 20cm away from the prototype and move it in slow circles (don’t focus on one spot—this can melt plastic).
- Cure for 5–10 minutes (or 15 minutes in a 60°C oven).
- Why It Matters: Curing strengthens the bond between the pattern and plastic, making the finish 2–3 times more resistant to scratches.
Step 7: Apply Protective Coating (Optional but Critical)
A clear protective coating adds a final layer of durability and shine. It’s especially important if your prototype will be used for demos or long-term testing.
7.1 Choose the Right Coating
Coating Type | Best For (Plastic Material) | Drying Time | Key Benefits |
Water-Based Acrylic Clear Coat | ABS, PC, PMMA | 1–2 hours (touch-dry); 24 hours (full cure) | Non-yellowing, easy to apply |
UV-Curable Clear Coat | All plastics | 10–15 minutes (UV light cure) | Fast drying, high scratch resistance |
Epoxy Resin (Thin Layer) | ABS, POM | 4–6 hours (touch-dry); 48 hours (full cure) | Ultra-durable, glossy finish |
7.2 Apply the Coating
- Tools Needed: Spray gun (for even coverage) or foam brush (for small parts).
- Process:
- Apply 2–3 thin coats (wait 10–15 minutes between coats). Thick coats bubble or drip.
- Let the final coat cure for the full time (e.g., 24 hours for acrylic). Avoid touching the surface during curing—fingerprints will be permanent.
Step 8: Inspect and Do Post-Processing (If Needed)
The final step is quality inspection—you need to ensure the pattern is flawless and the prototype meets your design standards.
8.1 Quality Inspection Checklist
- Visual Checks:
- No bubbles, gaps, or smudged areas in the pattern.
- Color matches your design (no fading or discoloration).
- Pattern aligns with the prototype’s edges (no overhang or missing spots).
- Functional Checks:
- Rub a dry microfiber cloth over the surface 50 times—pattern should stay intact.
- For moisture-resistant prototypes: Wipe with a damp cloth and dry—no peeling or warping.
- Dimension Checks: Use a caliper to verify the prototype still meets your CNC design specs (water transfer adds ~0.01mm to the surface, so no major size changes).
8.2 Post-Processing (If Needed)
- Small Flaws: Use 800-grit wet sandpaper to smooth tiny drips from the clear coat (sand lightly—1 pass only).
- Rough Edges: Trim any excess pattern from edges with a sharp utility knife (be careful not to scratch the plastic).
Common Mistakes to Avoid in Water Transfer Printing
Even experienced engineers make mistakes—here’s how to fix or prevent the most common issues:
Common Mistake | Cause | Impact | Solution |
Air Bubbles in Pattern | Dipping prototype too fast or not smoothing the pattern | Pattern peels; unprofessional look | Dip at 2–3cm/s; use a foam brush to press out bubbles while submerged |
Blurry Pattern | Low-resolution design or over-soaking paper | Pattern looks faded; details lost | Use 300 DPI designs; soak paper for 60–90 seconds max |
Pattern Peeling | Dirty surface or skipping activation (for PP/POM) | Pattern falls off within days | Clean with isopropyl alcohol; use activator for porous plastics |
Coating Drips | Applying thick coats or holding spray gun too close | Unsightly bumps; needs sanding | Apply thin coats; hold spray gun 15cm away |
Yigu Technology’s Perspective on Water Transfer Printing for CNC Plastic Prototyping
At Yigu Technology, we see water transfer printing as a way to turn functional CNC plastic prototypes into “ready-to-showcase” models. Our team optimizes the process by: 1) Using custom UV-printed water transfer paper that bonds 30% stronger to CNC plastics; 2) Controlling water temperature (±1°C) and soaking time to avoid pattern damage; 3) Offering a scratch-resistant acrylic coating that meets industrial durability standards. For most CNC plastic prototypes, we complete water transfer printing (from design to curing) in 2–3 days. We also provide design support—helping clients adjust patterns for complex CNC shapes to ensure 100% coverage.
FAQ:
1. Can I use water transfer printing on a CNC plastic prototype with complex curves or small holes?
Yes! That’s one of its biggest advantages. For curves, dip the prototype slowly and use a foam brush to press the pattern into the curved area while submerged. For small holes (2mm+), cut a tiny slit in the water transfer paper over the hole—this lets the pattern wrap around the edge without bunching. For holes smaller than 2mm, the pattern will usually cover them without extra steps.
2. How long will the water transfer pattern last on a CNC plastic prototype?
With proper prep (cleaning, activation) and a clear coat, the pattern can last 1–3 years under normal use (no heavy scratches or constant moisture). For prototypes used for testing (e.g., repeated handling), add a second clear coat to extend durability to 3+ years. If the prototype is for short-term demos (1–3 months), a single coat is enough.
3. Can I redo water transfer printing if I mess up the first attempt?
Yes—but only if you act fast. If the pattern is blurry or has bubbles, peel it off while the prototype is still wet (within 10 minutes of transfer). Clean the surface with isopropyl alcohol, dry it, and try again with a new piece of water transfer paper. If the pattern has already dried, sand the surface with 400-grit sandpaper to remove the old pattern, then clean and restart. Avoid redoing more than twice—too much sanding will change the prototype’s dimensions.