Introduction
Rapid prototyping molds bridge the gap between a single prototype and full mass production. They let you make tens or hundreds of parts without the weeks of waiting and tens of thousands of yuan that steel molds require. Instead of machining metal for weeks, you create a mold from silicone, epoxy, or 3D-printed resin in days. You pour in polyurethane or epoxy, and within hours you have functional parts ready for testing, user feedback, or limited production. Rapid prototyping molds are not for making millions of parts. They are for when you need speed, flexibility, and low upfront cost. This article explains the types of rapid molds, how to make them step by step, and when to use each for maximum benefit.
Core Definitions: Rapid Prototyping Molds vs. Traditional Molds
Understanding what makes rapid molds different helps you choose the right tool for your stage of development.
| Aspect | Rapid Prototyping Molds | Traditional Steel Molds |
|---|---|---|
| Mold material | Silicone, epoxy, 3D-printed resin | Hardened steel, aluminum |
| Production time | 1 to 5 days | 2 to 4 weeks |
| Upfront cost | 1,500 to 15,000 CNY | 40,000 to 400,000+ CNY |
| Batch size | 10 to 500 parts | 10,000 to millions of parts |
| Detail retention | Captures 0.05mm to 0.1mm features | Excellent, but complex details add cost |
| Design flexibility | Easy to modify, new mold in days | Changes require expensive rework |
When to choose rapid molds:
- You need 10 to 500 parts for testing, user trials, or limited releases.
- Your design is not yet frozen and may change.
- You want to validate market demand before investing in production tooling.
- Speed matters more than per-part cost.
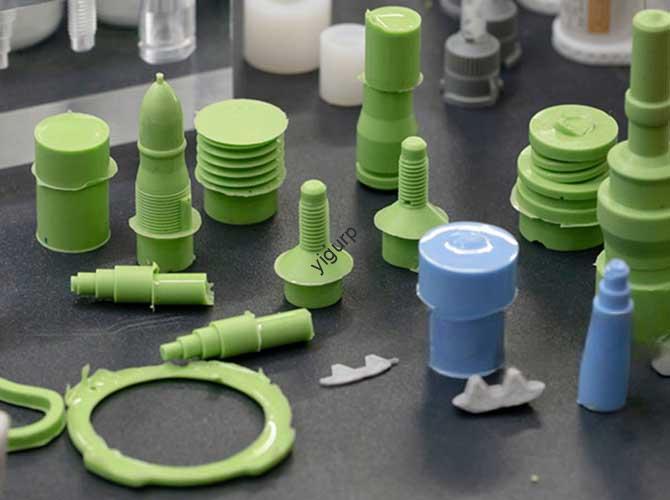
Types of Rapid Prototyping Molds: Match to Your Needs
Three main types of rapid molds cover most prototyping needs. Each has strengths for specific applications.
| Mold Type | Key Characteristics | Curing Requirements | Best Applications |
|---|---|---|---|
| Silicone molds | Flexible, captures fine details, reusable 20 to 50 times | Room temperature 4-8 hours, or 50-60°C for 2-3 hours | Small batches of complex parts like remote buttons, medical device shells, toy components |
| Epoxy molds | Hard, holds tight tolerances, reusable 30 to 80 times | Room temperature 8-12 hours plus 80°C post-cure | High-precision parts like aerospace conduits, electronic housings, structural brackets |
| 3D-printed resin molds | Ultra-fast to make, low cost, short life of 5 to 10 cycles | UV cure during printing, post-cure 1 hour | Emergency replacements, testing simple shapes, one-off parts |
Real example: A dental lab uses silicone molds to produce 20 custom tooth crown prototypes for a patient. Each mold captures the unique shape of the patient’s gum line. If adjustments are needed, a new mold is ready in two days.
An automotive supplier uses epoxy molds to test 50 structural bracket prototypes. The hardness of epoxy maintains dimensional accuracy across the batch, giving reliable data before committing to steel molds.
Step-by-Step Workflow: From Prototype to Finished Parts
Making rapid prototyping molds follows a repeatable process. Each step affects the quality of your final parts.
Stage 1: Prototype Preparation – The Master Model
The part you use to create the mold must be accurate and well-finished. Imperfections in the master transfer directly to every cast part.
Choose a master production method:
| Method | Precision | Surface | Best For |
|---|---|---|---|
| SLA 3D printing | ±0.05mm | Smooth, Ra 0.8μm | Complex parts with fine details like medical components, jewelry patterns |
| FDM 3D printing | ±0.1 to 0.3mm | Visible layer lines | Functional prototypes where surface finish matters less, like brackets or gears |
| CNC machining | ±0.01mm | Excellent | High-precision masters for epoxy molds, parts requiring flatness |
Critical preparation steps:
- Clean the master thoroughly with isopropyl alcohol to remove dust and oils.
- Apply a release agent. For plastic or metal masters, use silicone spray. For printed resin, a thin layer of petroleum jelly works.
- Inspect for any defects. A scratch on the master becomes a raised line on every cast part.
Stage 2: Mold Production
The process varies slightly by mold material, but the principles are the same.
For silicone molds (most common) :
- Frame setup: Place the master in a plastic or wooden frame. Leave 5mm to 10mm space around all sides. Seal the bottom edges with tape to prevent silicone leakage.
- Silicone mixing: Combine base and curing agent at the specified ratio—usually 10:1 for condensation silicone or 1:1 for platinum-cure silicone. Stir slowly for two to three minutes to minimize bubbles.
- Vacuum degassing: Place the mixture in a vacuum chamber at -0.1MPa for one to two minutes. This removes trapped air that would otherwise create bubbles on the mold surface.
- Pouring and curing: Pour silicone slowly over the master. Tilt the frame to 45 degrees to let silicone flow evenly and reduce air entrapment. Cure at room temperature for six hours, or at 60°C for three hours for faster results.
- Demolding: Gently peel the flexible silicone away from the master. Trim any excess flash with a sharp knife.
For epoxy molds:
- Mix epoxy resin and hardener at the specified ratio, typically 2:1. Stir for five minutes. Uneven mixing creates soft spots.
- Pour into the frame and tap gently to release surface bubbles. Epoxy is less viscous than silicone, so fewer bubbles are trapped.
- Cure at room temperature for 10 hours, then post-cure at 80°C for one hour to achieve full hardness.
- Demold using release agent. Epoxy is rigid, so you may need to pry gently.
Stage 3: Part Casting and Finishing
With the mold ready, you can start producing parts.
Choose casting material based on part requirements:
| Material | Properties | Curing | Best Applications |
|---|---|---|---|
| Polyurethane resin | Flexible or rigid options, Shore A 30-80, low cost | 1-2 hours at room temperature | Toy parts, gaskets, phone cases |
| Epoxy resin | High strength, heat resistant to 180°C, low shrinkage | 2 hours at 60°C | Structural parts, medical device handles, aerospace prototypes |
| Polyester resin | Very low cost, fast curing, easy to color | 30-60 minutes with accelerator | Decorative parts, sculptures, low-stress components |
Pouring tips:
- Mix casting material thoroughly according to instructions.
- Pour slowly to avoid trapping air. For complex molds, pour in a thin stream or use a syringe for precise placement.
- For bubble-sensitive parts, place the filled mold in a pressure pot at 0.2 to 0.3 MPa during curing. This collapses any trapped bubbles.
Finishing:
- Trim flash with scissors or a sharp blade.
- Sand with 400 to 800 grit sandpaper for smooth surfaces.
- For gloss, apply clear coat or polish.
Key Application Fields
Rapid prototyping molds excel where speed, customization, and small batches matter.
Industrial Product Development
Design verification: Automakers use silicone molds to produce 50 to 100 samples of new dashboard buttons. Assembly testing reveals fit issues early, cutting development time by 30%.
Functional testing: Electronics companies cast 20 to 30 remote control prototypes from silicone molds. If users report poor button feel, a new mold with adjusted design is ready in two days.
Medical Device Manufacturing
Customization: Dental labs create patient-specific crown prototypes using silicone molds made from 3D-printed tooth models. Each crown fits perfectly.
Small-batch production: Hearing aid manufacturers use epoxy molds to produce 100 to 200 custom shells monthly. Steel molds would be uneconomical for these low volumes.
Aerospace and Defense
Prototype testing: Engineers cast small-batch components like engine conduits in epoxy molds for pressure and heat testing. Rapid mold turnaround lets them iterate designs five times faster than with traditional machining.
Consumer Goods
Limited editions: Toy companies produce 500 to 1,000 limited-edition figurines using silicone molds. They can switch designs quickly without retooling, meeting niche market demand.
Advantages and Limitations
Core Advantages
- Speed: Reduce time to market by 50% to 70%. Launch a product in four weeks instead of eight.
- Cost savings: Cut upfront tooling costs by 80% for small batches. A silicone mold for 5,000 CNY versus a steel mold for 50,000 CNY.
- Flexibility: Modify designs and remake molds in days, not weeks.
- Detail retention: Capture features as small as 0.1mm without expensive machining.
Limitations to Consider
- Mold life: Silicone lasts 20 to 50 cycles, epoxy 30 to 80 cycles. Steel molds last 100,000 cycles. For batches over 500 units, traditional molds become more cost-effective.
- Part strength: Cast parts have 10% to 20% lower mechanical strength than injection-molded parts. A PU resin part might achieve 40 MPa tensile strength versus 60 MPa for molded ABS.
- Production speed: Manual pouring and demolding limit output to 1 to 10 parts per hour. Injection molding does hundreds per hour.
Conclusion
Rapid prototyping molds fill the critical gap between single prototypes and mass production. They let you make tens or hundreds of parts in days, not weeks, at a fraction of the cost of steel molds. Silicone molds work for complex shapes and moderate batches. Epoxy molds deliver higher precision and longer life. 3D-printed resin molds provide ultimate speed for emergency needs. The process is straightforward: create an accurate master, build a mold around it, and cast parts in materials that match your requirements. Rapid molds are not for making millions, but for developing products, testing markets, and producing limited runs, they are the most efficient tool available.
Frequently Asked Questions
Can I use rapid prototyping molds for high-temperature parts exposed to 150°C?
Yes, but choose materials carefully. Use high-temperature silicone rated for 200°C to 300°C for the mold. Cast parts in heat-resistant epoxy resin cured at 120°C to 180°C. Test a sample at 150°C for 24 hours to confirm no deformation. Standard silicone and polyurethane resin cannot handle these temperatures.
How can I extend the life of my silicone rapid prototyping mold?
Clean the mold with mild soap and water after each use. Avoid harsh solvents like acetone that degrade silicone. Apply a thin layer of silicone oil before pouring to reduce friction. Store molds flat in a cool, dry place below 60% humidity. For heavy use, reinforce mold edges with fiberglass cloth.
Are parts made from rapid prototyping molds suitable for food contact?
Only if you use food-grade materials. Choose FDA-certified food-safe silicone for the mold. Use food-grade casting resins approved by FDA or EU standards. Regular materials may leach chemicals. Always test the final part for compliance with relevant food contact regulations.
What is the largest part I can make with a rapid prototyping mold?
Size is limited by your equipment. For silicone molds, you need a vacuum chamber large enough to degas the material and an oven if you accelerate curing. Parts up to 300mm by 300mm are common. Larger parts require more silicone, which becomes heavy and difficult to handle. For very large parts, consider splitting the design into multiple molds.
Can I produce clear transparent parts with rapid prototyping molds?
Yes, but transparency requires care. Use clear casting resin formulated for optical clarity. Degas thoroughly to remove every bubble. Polish the mold surface to a mirror finish—any imperfection shows in the cast part. Pour slowly to avoid introducing new bubbles. Post-cure according to specifications for maximum clarity.
How do I choose between silicone and epoxy for my mold?
Choose silicone for parts with undercuts, complex shapes, or delicate features. Silicone’s flexibility lets you demold without damage. Choose epoxy for parts requiring tight dimensional accuracy, flat surfaces, or high production volumes up to 80 cycles. Epoxy holds its shape better but cannot release undercuts without adding mold splits.
Discuss Your Projects with Yigu Rapid Prototyping
At Yigu Technology, we help product teams move from single prototypes to small-batch production using rapid prototyping molds. Our capabilities include silicone molds for complex parts, epoxy molds for precision components, and 3D-printed resin molds for emergency needs. We guide you through material selection, master production, and casting to ensure your parts meet requirements. Located in Shenzhen’s manufacturing hub, we combine technical expertise with competitive pricing and fast turnaround. If you need 20, 50, or 200 parts for testing, user trials, or limited release, reach out to us. Let’s discuss how rapid prototyping molds can accelerate your development and get your product to market faster.