Introduction
So, you have a great idea for a new product. Maybe it’s a sleek new bike mount, a critical component for a medical device, or a durable housing for industrial sensors. You have the design on your screen, but now you face the big question: How do you turn that digital file into a real, touchable object you can actually test? This is where prototype machining becomes your best friend. In simple terms, prototype machining is a group of manufacturing processes used to create small batches of functional parts from solid materials like metal, plastic, or wood. Unlike 3D printing which builds parts layer by layer, this is a subtractive manufacturing method. It starts with a solid block of material and precisely cuts away everything that isn’t your part using tools like drills, mills, and lathes. The main goal is simple: to help you move from a concept to a physical part you can hold, test, and improve before spending a lot of money on mass production.
The real power of prototype machining lies in de-risking your project. It lets you validate the three most important aspects of your design: form, fit, and function. Does it look right? Does it connect correctly with other parts? Will it work under real-world stress? Finding and fixing a problem at the prototype stage costs a tiny fraction of what it would cost to fix a mistake in a fully tooled production run. It’s the smartest investment you can make in your product’s success.
What Are the Main Types of Prototype Machining?
Not every prototype is made the same way. The best process for your part depends on its shape, what material it’s made from, and what you need to test. Here are the most common methods used by machine shops today.
CNC Milling: The Workhorse for Complex Parts
CNC milling uses rotating cutting tools to remove material from a stationary block. Think of it as a highly precise, computer-controlled carving machine. It’s the go-to choice for parts with complex 3D shapes, flat surfaces, pockets, holes, and threads.
- Best For: Housings, enclosures, brackets, gears, and parts with intricate details.
- Real-World Example: A team designing a new action camera needed a prototype for its waterproof case. The design had a complex curve for the lens, a tight seal groove for the gasket, and small holes for the buttons. Using CNC milling on a block of polycarbonate plastic, they had 5 testable cases in just three days. This allowed them to check if the lens fit snugly, if the buttons were easy to press, and most importantly, if the prototype could survive a dunk in water. They found the seal groove was slightly too shallow, fixed the CAD file, and machined a new, watertight version immediately.
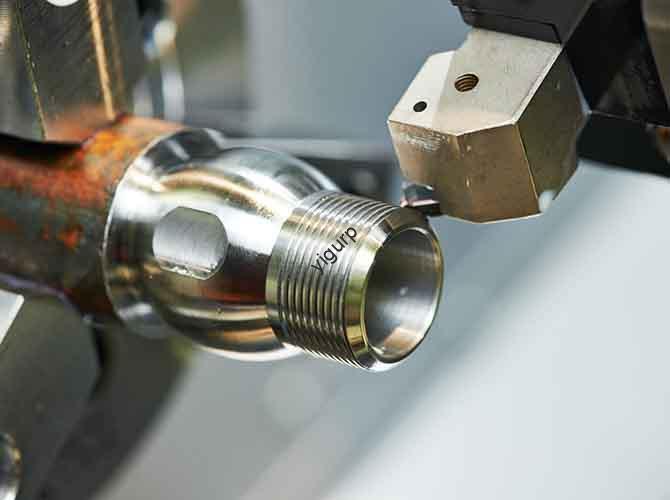
CNC Turning: Precision for Round Parts
If your part is cylindrical, CNC turning is usually the most efficient process. In this method, the raw material spins rapidly while a stationary cutting tool moves along it, shaving material away. This is perfect for creating parts that need to be perfectly round.
- Best For: Shafts, pins, bushings, rollers, and connectors.
- Key Fact: A skilled machine shop can achieve incredible precision with turning, often holding tolerances as tight as ±0.0005 inches. This level of accuracy is critical when your prototype needs to fit inside a bearing or press-fit into another component.
Wire EDM: Cutting the Hardest Materials
Wire Electrical Discharge Machining (EDM) is a specialized process that uses a thin, electrically charged wire to “cut” through conductive materials. It works by creating sparks that erode the material, allowing for extremely precise cuts without touching the part. It’s ideal for hard metals and complex shapes that would be impossible for a milling cutter.
- Best For: Hardened tool steels, titanium, and parts with very fine details or sharp internal corners.
- Case Study: A company developing a new fuel injector for a high-performance engine needed a prototype with a precisely shaped hole just 0.008 inches wide. Traditional drilling was too inaccurate. They turned to Wire EDM, which created the tiny, complex shape perfectly in a block of hardened steel. This prototype allowed them to accurately test the fuel spray pattern, a critical factor for engine performance, and make adjustments before committing to expensive production tooling.
How to Select the Right Prototype Machining Service?
Choosing a partner to make your prototype is a big decision. It’s not just about who gives the lowest price. You need a partner who understands your goals. Here is a simple guide to help you make the right choice.
Step 1: Define Your Primary Goal
Before you even start looking for a shop, be very clear about what you want the prototype for. This will guide all your other decisions.
- Functional Testing: Are you testing if a metal bracket can hold a specific weight without bending? You need a service that specializes in high-strength materials like aluminum or steel and can hold tight tolerances.
- Appearance Modeling: Are you showing a model of a new consumer product to investors? You might prioritize a service that offers a variety of finishing options like painting, anodizing, or polishing to make the plastic or metal look like the final product.
- Fit-Checking: Do you need to see if a complex assembly of five different parts comes together correctly? You need a service that can machine all the parts from the exact materials you plan to use, ensuring they match perfectly.
Step 2: Verify Material and Process Experience
Not all machine shops are created equal. A shop that makes thousands of simple aluminum brackets might not be the best choice for a complex medical part made from a specialty plastic.
- Key Question to Ask: “We’re using [Your Material, e.g., PEEK plastic or Titanium Grade 5] . Can you share examples of similar projects you’ve machined, and what challenges did you overcome?” This shows you their true experience level.
Step 3: Confirm Their QC Process
How do you know the part you get will match the one in your CAD file? A trustworthy shop has a clear Quality Control (QC) process.
- Look For:
- Use of precision measuring tools like CMMs (Coordinate Measuring Machines) or 3D scanners.
- A willingness to provide an inspection report with your prototype, showing that all critical dimensions are correct.
- Industry Data: A recent survey found that transparency in quality control is now the number one factor for 78% of product teams when selecting a machining partner, ranking even higher than cost.
Step 4: Discuss Turnaround and Communication
Time is money in product development. You need a service that can work at your pace.
- Rapid Prototyping: Look for shops that specifically offer “rapid prototyping” services, promising turnaround times of 1 to 5 business days for small batches.
- Communication is Key: Choose a partner who asks questions. If they receive your CAD file and just start machining without any discussion, that’s a red flag. A good partner will look for potential manufacturing issues (like areas that are too thin) and talk to you about them before cutting any material.
Prototype Machining vs. 3D Printing: Which One Is Right for You?
This is one of the most common questions in product design. Both have their place, but they serve different needs. The table below breaks down the key differences to help you decide.
| Feature | Prototype Machining | 3D Printing |
|---|---|---|
| Materials | Wide choice: Almost any metal (aluminum, steel, titanium) or engineering plastic (ABS, Nylon, Polycarbonate). | More limited: Mostly resins and thermoplastics. Some high-end machines can do metals, but it’s costly. |
| Part Strength | Excellent: Parts are cut from solid stock, making them dense, strong, and just like production parts. Ideal for functional testing. | Varies: Parts can be brittle or have weak points between layers. Best for visual models and basic fit checks. |
| Precision | Very High: Can achieve tolerances as tight as ±0.0005 inches, ensuring parts fit and work as intended. | Good, but lower: Typical tolerances are around ±0.005 inches for plastic parts. |
| Surface Finish | Smooth: Machined surfaces are clean. Post-processing can make them look perfect. | Noticeable layer lines: Usually needs sanding or coating for a smooth finish. |
| Cost & Speed | Better for larger, simple parts or when you need a few strong, precise parts. Setup cost is higher, but per-part cost drops with quantity. | Best for one-off, complex plastic parts with organic shapes. Very fast for a single piece, but slow for multiples. |
The Bottom Line: Use 3D printing early in the design phase for quick, cheap visual aids. Switch to prototype machining when you need parts that are strong, accurate, and made from your final choice of material for serious testing.
Common Pitfalls in Prototype Machining and How to Avoid Them
Even with a perfect design on screen, things can sometimes go wrong in the real world. Knowing these common problems can save you time and frustration.
| The Challenge | Why It Happens | How to Prevent It |
|---|---|---|
| Parts Don’t Fit Together | The CAD design didn’t account for subtle material changes, or the tolerances specified were too loose for the application. | Specify critical tolerances on your drawing (e.g., “this hole diameter must be ±0.001 inches”). Ask the shop to do a test assembly of your parts before shipping. |
| Thin Walls Crack or Warp | The material was too thin for the stresses of machining, or the cutting generated too much heat. | Consult with your machining partner early. They can suggest a minimum wall thickness for your chosen material. For prototypes, you might even specify a slightly thicker wall to ensure it survives the machining process. |
| Surface Finish Looks Rough | The shop used a standard machining program that left visible tool marks, or they skipped the final polishing step. | Be very specific about your finish requirements in your purchase order. Use terms like “matte finish, no visible tool marks” or “mirror polish on this surface.” If possible, ask for a sample of the finish on a similar material. |
- Real-World Fix: A team developing a new electric skateboard had a problem. Their machined aluminum trucks (the part that holds the wheels) kept snapping during stress tests. The issue wasn’t the design, but micro-fractures caused by aggressive machining. By talking with the shop, they adjusted the cutting speeds and tool paths to be gentler on the metal. The next batch of prototypes was strong enough to handle the real-world pounding of the skateboard, proving the design worked.
Conclusion
Bringing a new product to life is a journey full of critical decisions. Prototype machining is one of the most powerful tools you can use on this path. It provides the bridge between a digital concept and a physical reality, allowing you to touch, test, and refine your ideas with confidence. By creating parts that accurately represent the materials, strength, and precision of your final product, you can identify and fix design flaws early, saving enormous time and money down the line. Whether you choose CNC milling for a complex housing or wire EDM for a delicate medical tool, the goal is the same: to learn, improve, and ultimately build a better, more successful product. The right prototype doesn’t just show what your product will look like; it proves that your product will actually work.
FAQ About Prototype Machining
1. Is prototype machining expensive?
The cost varies based on part complexity, material, and quantity. For a simple plastic bracket, a prototype might cost $100-$300. For a complex metal part requiring high precision and tight tolerances, it could range from $500 to $1500 or more. Think of it as an insurance cost against the much larger expense of a production failure.
2. How long does it typically take to get a machined prototype?
For most projects, you can expect a lead time of 3 to 7 business days. Simple parts can be done in 1-2 days, while very complex parts or those requiring specialized processes like Wire EDM might take 7-10 days.
3. What file format do I need to provide?
Machine shops almost universally work with STEP files (.stp or .step) as this format preserves the exact 3D geometry without losing data. They can also work with IGES or Parasolid files. It’s always a good idea to check with your chosen service first.
4. Can machined prototypes be made from the same material as my final product?
Yes, absolutely. This is one of the biggest advantages of machining. You can prototype with the exact same aluminum alloy, steel grade, or engineering plastic you plan to use for mass production, giving you highly accurate test results.
5. What if my prototype needs to be assembled with other parts?
That’s no problem. A good prototyping service can machine multiple components of an assembly for you. Be sure to let them know that fit is critical so they can pay extra attention to the tolerances on mating surfaces and possibly do a trial assembly for you.
Discuss Your Projects with Yigu Rapid Prototyping
At Yigu Rapid Prototyping, we understand that your prototype is more than just a part; it’s a critical milestone for your entire project. We combine years of hands-on experience with a wide range of advanced machining capabilities—from high-speed CNC milling and turning to specialized Wire EDM. We don’t just cut metal and plastic; we partner with you. Our team takes the time to review your CAD file, identify potential issues, and offer suggestions to optimize your design for manufacturability without compromising your vision. We believe in clear communication and complete transparency, which is why every prototype we ship includes detailed quality reports. Whether you need a single complex part for a medical trial or a small batch of aluminum housings for field testing, we are ready to help you turn your idea into a reality. Contact Yigu today to discuss your project and get a free quote.