Creating a high-performance vacuum cleaner is an exercise in precision engineering. It is not just about suction power; it is about how parts fit, how the air flows, and how the device feels in a user’s hand. The CNC machining vacuum cleaner prototype process is the critical bridge that turns a digital blueprint into a physical reality.
By using Computer Numerical Control (CNC) technology, engineers can produce functional prototypes that mimic the final product’s strength, aesthetics, and mechanical integrity. This guide walks you through the professional workflow—from the first line of code to the final assembly—ensuring your design is market-ready.
1. Why Is Preliminary Preparation Vital?
Before a single chip of plastic or metal is cut, the foundation must be set. In my experience, 80% of machining errors are actually design or material errors that could have been caught in the “Pre-Pro” phase.
How to Optimize 3D Modeling for CNC?
We don’t just draw a pretty shape; we design for manufacturability. Using parametric software like SolidWorks or UG NX is essential because vacuum cleaners involve complex internal air paths and ergonomic curves.
- Ergonomics: For a handheld model, we typically target a handle diameter of 30–35mm. A deviation of even 1mm can make the unit feel “off” to a consumer.
- Wall Thickness: We maintain a wall thickness of 1.2–1.5mm. If it’s too thin, the part vibrates during machining; too thick, and the prototype becomes unnecessarily heavy.
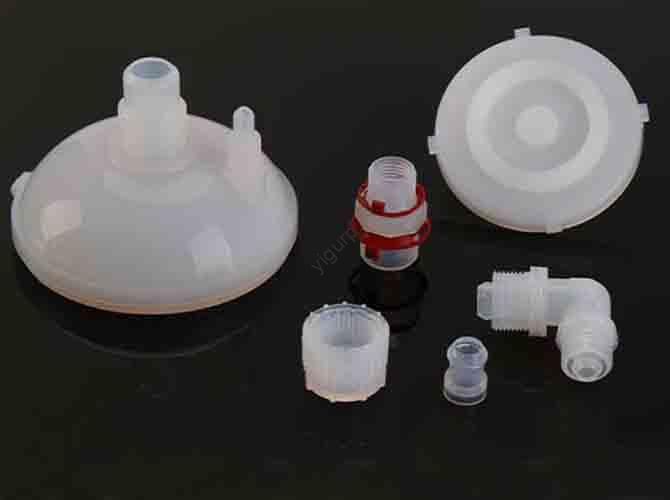
- Assembly Logic: We design with detachable components. This means reserving M3 screw holes and designing snap-fits for the dust box.
Expert Insight: Skipping a dedicated wiring hole for the motor might seem like a small oversight, but it can increase your rework costs by 20–25% and stall your timeline by several days.
Which Materials Best Suit Vacuum Parts?
A vacuum cleaner is a multi-material machine. You cannot use the same plastic for a structural handle as you do for a clear dust box.
| Component | Recommended Material | Key Reason | Surface Finish |
| Main Body | ABS Plastic | High impact resistance | Matte PU Paint |
| Dust Box | Transparent Acrylic | 90%+ light transmission | High Polish |
| Wheel Frames | Aluminum 6061 | Rigidity & lightweight | Anodized |
| Control Panel | ABS + PC Blend | Heat resistance (up to 80°C) | Silk-screened |
2. How Does the CNC Machining Phase Unfold?
This is where the heavy lifting happens. We transition from “bits” to “atoms” using high-precision three-axis or multi-axis machines.
What Tools Are Best for Plastic and Metal?
Because a vacuum cleaner uses both polymers and alloys, tool selection is a science. We use carbide milling cutters for roughing to remove bulk material quickly, and ball nose cutters to achieve the smooth, ergonomic sweep of the handle.
Is Programming Simulation Necessary?
Absolutely. We run every toolpath through Mastercam or PowerMill before hitting “Start.” We are looking for two things: Interference (preventing the tool from crashing into the fixture) and Overcutting. For a dust box, keeping a wall thickness tolerance of ±0.05mm is the difference between a sealed system and a leaky one.
How Do We Handle Clamping and Parameters?
Plastics like ABS are prone to heat deformation. If the spindle spins too fast without the right feed rate, the plastic melts rather than cuts.
- For ABS: We use compressed air for cooling and a finishing speed of 1500–2000 rpm.
- For Acrylic: We keep speeds below 500 rpm. Why? High heat causes acrylic to “cloud” or crack, ruining the transparency required for the dust bin.
3. Why Is Post-Processing the “Secret Sauce”?
A raw CNC part looks like a prototype; a post-processed part looks like a product. This stage is about aesthetics and airtight functionality.
How to Achieve a “Retail-Ready” Look?
- Deburring: We use 1200-mesh sandpaper to smooth out the “steps” left by the CNC bit.
- Painting: A matte PU coating on the ABS body gives that premium, soft-touch feel found in high-end brands.
- Transparency: For the acrylic dust box, we use specialized polishes and apply an anti-scratch film, which reduces surface damage by nearly 40% during testing.
Does Assembly Impact Performance?
Yes. A vacuum cleaner prototype is only as good as its seals. We follow a strict order:
- Core Fit: Mount the handle and test for 360° smooth rotation.
- Sealing: Install the dust box and check for gaps. In a professional lab, we aim for no gaps larger than 0.1mm.
- Pressure Test: We use a basic air pressure test. If the pressure drop is ≤0.01MPa over 5 minutes, the prototype is considered airtight.
4. What Are the Critical Precautions?
To ensure the success of your CNC machining vacuum cleaner prototype, we watch for these “silent killers” of quality:
- Tool Wear: A dull bit increases dimensional error by 0.05mm. We replace finishing tools every 50 hours of use to maintain the tight tolerances required for filter grooves.
- Segmented Machining: For large ABS parts, we don’t cut for hours straight. We use segmented processing (15-minute intervals) to allow the material to cool, preventing the “warping” effect.
- CMM Inspection: We don’t just use calipers. We use a Coordinate Measuring Machine (CMM) to verify the complex curves of the nozzle and handle, ensuring they match the CAD file within ±0.02mm.
Discuss Your Projects with Yigu Rapid Prototyping
At Yigu Technology, we don’t just “cut parts”—我们 validate your vision. We specialize in high-precision vacuum cleaner prototypes, using 5-axis machining to ensure your ergonomic designs feel perfect. By integrating 3D scanning and rigorous airtightness testing, we help our clients reduce rework by 25% and hit the market faster.
FAQ
How long does the entire CNC machining vacuum cleaner prototype process take?
The full cycle generally takes 9–13 working days. This includes 2 days for setup, 4 days for machining, and 3 days for professional painting and assembly.
Can I replace acrylic with ABS plastic for the dust box?
We advise against it. ABS is opaque. A key user experience (UX) feature of modern vacuums is seeing the dust level. Acrylic also offers better impact resistance for this specific component.
What causes air leaks in the dust box, and how to fix it?
Usually, it’s a 0.05mm+ deviation in the filter groove or wall thickness. We fix this by re-machining the groove with a precision slot mill to restore the airtight seal.
Is CNC better than 3D printing for vacuum prototypes?
For functional testing, yes. CNC allows you to use “real” production-grade ABS and Acrylic, providing much higher strength and better surface clarity than 3D printing.
Would you like me to provide a detailed material compatibility report for your specific vacuum cleaner components?