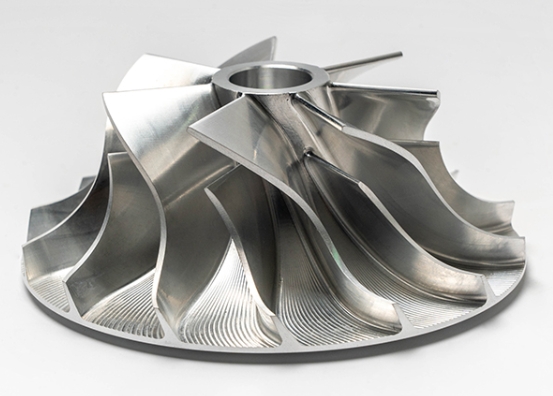
Whether you are a product engineer developing life-saving medical devices or a procurement specialist sourcing durable food-grade components, stainless steel prototypes CNC machining is the bridge between a digital concept and a high-quality physical part. Stainless steel is prized for its strength and corrosion resistance, but its toughness makes it a “beast” to machine.
This guide breaks down every step of the professional workflow. We will share real-world cases, technical data, and expert tips to help you avoid common pitfalls. Our goal is simple: to help you get prototypes that meet your exact standards on the very first run.
Why Is Design the Foundation of Every Prototype?
In the world of stainless steel prototypes CNC machining, the battle is often won or lost at the computer screen. Before any metal is cut, you must lay a digital foundation that accounts for the material’s unique behavior.
3D Modeling for Functionality
Engineers first use CAD software like SolidWorks or AutoCAD to build a detailed 3D model. Consider a team developing a stainless steel valve for a high-end beverage machine. Every thread, port, and seal groove must be modeled to exact food-grade standards. If a seal groove is off by just 0.05 mm, the entire prototype might leak during pressure testing.
Smart CAM Programming
Next, you convert the model into G-code using CAM software like Fusion 360. This is where expertise matters. Stainless steel has a high tensile strength and a tendency to work-harden (it gets tougher as you cut it).
When machining a 304 stainless steel sensor housing, a smart programmer will set a feed rate of roughly 100–150 mm/min. In contrast, aluminum can handle 200+ mm/min. Pushing stainless steel too fast leads to tool overheating and a ruined finish.
Expert Insight: Always share your STEP or IGES files with your CNC partner early. They can flag “un-machineable” features, like ultra-tight internal corners, before you waste a single dollar on production.
How Do You Match Steel Grades to Your Needs?
Choosing the right grade of stainless steel is a balance of performance and budget. Not all stainless steel is created equal, and neither are the tools used to cut them.
Common Stainless Steel Grades Comparison
| Grade | Key Properties | Typical Applications | Recommended Tools |
| 304 | Great corrosion resistance; food-safe. | Kitchen equipment, beverage valves. | Carbide end mills (2–12 mm) |
| 316 | Resists saltwater and chemicals. | Surgical instruments, marine parts. | HSS drills + Carbide inserts |
| 410 | Hard, magnetic, easy to machine. | Industrial fasteners, pump parts. | Solid carbide tools |
Case Study: A medical device company recently developed a surgical retractor prototype. They chose 316 stainless steel for its biocompatibility. To machine the thin, curved edges without deforming the metal, they used a 4 mm carbide end mill. The result was a rigid, sterile-ready part that passed hospital trials.
Why Is Stability the Key to Precision?
Stainless steel is dense and heavy. If the material vibrates or moves even slightly during the stainless steel prototypes CNC machining process, the dimensions will drift.
Securing the Workpiece
- Rigid Fixtures: For thick blanks (like a 20 mm block of 410 steel), we use heavy-duty vice clamps.
- Vacuum Tables: For large, flat parts like a food-grade tray (500×300 mm), a vacuum table is better. It distributes pressure evenly, preventing the thin plate from warping or “bowing” in the middle.
Calibration and Zeroing
Before the first cut, we “zero” the machine. Even a 0.1 mm offset can ruin a small part, such as a 2 mm diameter sensor pin. We use laser probes to ensure the tool starts at the exact coordinate defined in the CAM program.
Common Mistake: Using flimsy fixtures. If the setup isn’t rock-solid, you will get “chatter” marks. This results in a rough surface finish (Ra > 1.6 μm) when you likely need a smooth finish (Ra < 0.8 μm).
How Do You Balance Speed and Precision?
The machining process is split into two distinct stages: Roughing and Finishing. Mastering the transition between them is what separates amateurs from experts.
Roughing: Removing Excess Material
The goal here is speed. We want to get to the “near-net shape” of the part as fast as possible.
- Example: Making a 316 stainless steel gear (100 mm diameter). A large 12 mm carbide mill removes 80% of the waste in under 20 minutes.
- Parameters: Cutting speeds are kept between 100–200 m/min to prevent the tool from melting.
Finishing: The Final Touch
Finishing is where we achieve the final size and the “mirror-like” look.
- Example: A 304 stainless steel bottle cap needs a leak-proof seal. We use a 3 mm fine carbide mill with shallow passes (0.1–0.5 mm depth).
- Data Point: By slowing the feed rate to 80–120 mm/min, we achieve a surface roughness of Ra 0.4 μm, ensuring the threads are smooth and the seal is perfect.
What Happens After the Machine Stops?
The prototype isn’t finished until it is verified and treated. Quality Control is the most critical step for high-stakes industries like medical and aerospace.
Comprehensive Inspection Steps
- Visual Check: We look for “blueing” or discoloration. This is a sign of overheating, which can change the material’s properties.
- Dimensional Testing: We use CMM (Coordinate Measuring Machines) to confirm accuracy. For a 50 mm bolt, we ensure the thread pitch is accurate within ±0.02 mm.
- Surface Testing: We use a profilometer. For food-grade parts, the surface must be smoother than Ra 0.8 μm to prevent bacteria from hiding in microscopic grooves.
Essential Post-Processing
- Passivation: A chemical bath for 304/316 steel that removes “free iron” from the surface, massively boosting corrosion resistance.
- Cryogenic Deburring: Using extreme cold to snap off tiny metal burrs, which is vital for medical prototypes to ensure they don’t scratch a patient.
- Electropolishing: A process that makes the part incredibly shiny and even more resistant to chemicals.
Yigu Technology’s Perspective
At Yigu Technology, we have successfully supported over 500 clients with their stainless steel prototypes CNC machining needs. We have seen everything from simple 304 brackets to complex 316 fluidic devices with 2 mm internal channels.
The biggest challenge we see in the industry is the “speed vs. cost” trap. Many shops rush the roughing stage to save time, only to end up with warped parts that require expensive rework. Our approach is different: we customize parameters for every specific grade of steel. By using high-quality carbide tools and slower, more deliberate feed rates for 316 steel, we ensure our prototypes meet specs on the very first try. For our clients, this means faster testing cycles and lower overall development costs.
FAQ: Common Questions About Stainless Steel Prototypes
How long does it take to machine a stainless steel prototype?
It varies by complexity. A simple 304 washer might take 30–60 minutes. A complex 316 medical bracket with multiple holes and curved surfaces usually takes 4–6 hours.
Which stainless steel grade is the most cost-effective?
304 stainless steel is usually the cheapest. It is widely available and much easier to machine than the chemical-resistant 316 grade. If your part doesn’t need to survive saltwater or harsh acids, 304 is your best bet.
Can CNC machining create internal channels in stainless steel?
Yes. Using 5-axis CNC machines, we can create complex internal features, such as 2 mm fluid channels. However, you must design these with tool access in mind—avoid internal corners tighter than 30 degrees where a tool cannot reach.
Why did my stainless steel prototype turn “blue” during machining?
This is caused by excessive heat. It usually means the cutting speed was too high or the coolant flow was insufficient. Blueing can weaken the steel and make it more likely to rust.
Is stainless steel better than aluminum for prototypes?
It depends on the goal. Aluminum is faster to machine and lighter. However, if your final product needs to be biocompatible, fire-resistant, or used in food processing, a stainless steel prototype is necessary for accurate testing.
Discuss Your Projects with Yigu Rapid Prototyping
Are you ready to bring your stainless steel designs to life? At Yigu Technology, our engineers are experts in stainless steel prototypes CNC machining. We combine advanced 5-axis technology with a deep understanding of metallurgy to deliver parts that are precise, durable, and ready for testing.
Would you like a free DfM (Design for Manufacturability) analysis for your next stainless steel project? Contact us today, and let’s build something exceptional together.