Introduction
Have you ever spent hours creating a silicone mold, only to have it tear after just a few uses? You’re not alone. Silicone molds are essential tools in rapid prototyping, small-batch production, and artistic reproduction. They help creators make exact copies of prototypes, sculptures, and industrial parts. But here’s the truth: working with silicone comes with challenges. Many people face problems like short mold life, sticky surfaces, or burned spots. The good news? Most of these issues have simple fixes. In this guide, we’ll walk through the silicone mold production process, explore why things go wrong, and give you practical solutions that actually work.
What Are Silicone Molds and Why Use Them?
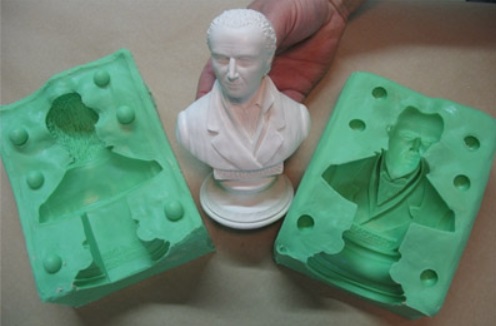
Silicone molds are flexible tools used to duplicate objects with high precision. Unlike hard plastic or metal molds, silicone can bend and stretch. This makes it perfect for capturing complex shapes and fine details.
Key benefits include:
- Excellent flexibility: You can remove parts easily without damaging them
- No draft angle needed: Rigid molds need sloped sides for part removal. Silicone doesn’t
- Cost-effective for small runs: One mold typically makes 10-30 pieces
- Detail reproduction: Captures textures as fine as human hair
Industries from toy manufacturing to medical device prototyping rely on silicone molds. They bridge the gap between a one-off prototype and full production.
How Do You Make a Silicone Mold Step by Step?
Preparing the Master Model
The master model is your original part. Its quality determines your mold quality.
Start by cleaning the master thoroughly. Any dust, oil, or fingerprint will transfer to the mold. Use isopropyl alcohol and a lint-free cloth. For greasy surfaces, mild soap works well.
Next, check for surface flaws. Small scratches on the master become raised lines on mold surfaces. If you need a glossy finish, polish the master. For textured surfaces, ensure patterns are clean and deep enough.
Finally, apply release agent. This step matters more than most people think. Without it, silicone can stick permanently to the master. Use petroleum jelly or specialized mold release spray. Apply thinly, wait 30 minutes, then buff off excess.
Setting Up Your Mold Box
The mold box holds liquid silicone around your master.
Build walls using wood, plastic, or LEGO bricks. The box should be at least 1/4 inch larger than your master on all sides. Seal all seams with clay or hot glue. One small gap will leak silicone everywhere, ruining your work.
Position your master in the center. Secure it with clay or double-sided tape so it doesn’t float during pouring. For complex parts, consider vent holes to let air escape.
Mixing Silicone Correctly
This is where many mistakes happen.
Measure carefully by weight, not volume. Use a digital scale for accuracy. Most silicones need 2-3% catalyst by weight. That means 2-3 grams of catalyst for 100 grams of silicone base.
Mix thoroughly but gently. Stir in a figure-eight pattern for 3-5 minutes. Scrape the bottom and sides. If you mix too fast, you trap air. If you mix too little, spots won’t cure.
Vacuum degassing removes trapped air. Place the mixed silicone in a vacuum chamber at -0.1 MPa for 2-3 minutes. Watch the bubbles rise and pop. When they stop, degassing is complete. No vacuum? Pour from height in a thin stream to break bubbles.
Pouring and Curing Techniques
Pour silicone slowly onto the lowest point of your master. Let it flow upward naturally. This pushes air ahead of the liquid, preventing bubbles.
For detailed masters, use a soft brush to paint the first thin layer into crevices. Then pour the rest. This ensures every detail fills completely.
Apply silicone in layers for large molds. A single thick pour generates heat and may cure unevenly. Two to three layers work better. Place reinforcing fabric like nylon gauze between the second and third layers. This strengthens the mold dramatically.
Curing takes 18-24 hours at room temperature (70-75°F). Don’t rush this. Heat speeds curing but can weaken the silicone.
Demolding and Finishing
Once cured, remove the mold box carefully. Cut along pre-marked parting lines using a sharp scalpel. Cut slowly and steadily. Rushing tears the silicone.
Remove the master gently. If it sticks, use compressed air to blow between master and mold. Never pull hard.
Clean the finished mold with mild soap and water. Remove any release agent residue. Your mold is now ready for casting.
What Are the Main Types of Silicone Molds?
Pour Mold vs Brush-On Mold
Pour molds are the most common. You build a box, place the master inside, and pour silicone over everything. Best for simple shapes with one flat side. Quick and straightforward.
Brush-on molds use layers painted directly onto the master. No box needed. Perfect for large objects or vertical surfaces. Takes more time but uses less silicone.
Two-Part Mold vs Block Mold
Two-part molds split down the middle. You build a clay wall around the master’s center line, pour one side, let it cure, remove clay, then pour the second side. Ideal for complex 3D objects with undercuts.
Block molds encase the master completely. You cut the mold open to remove the master. Simple but destroys the mold if cuts are poorly planned.
| Mold Type | Best For | Production Time | Key Advantage |
|---|---|---|---|
| Pour Mold | Simple shapes, flat-backed parts | 1-2 hours setup | Fastest method |
| Brush-On Mold | Large objects, wall art | 3-4 hours layering | Uses less silicone |
| Two-Part Mold | Complex 3D parts, undercuts | 2-3 hours setup | Easy part removal |
| Injection Mold | Thin, detailed parts | 1 hour setup | No bubbles, high detail |
Why Do Silicone Molds Fail So Quickly?
Short Lifespan and Low Turnover
Your mold should last for 20-30 castings. If it fails after 5-10, something’s wrong.
Common causes include:
- Too much silicone oil added to thin the mixture
- Wrong hardness choice for your application
- Poor catalyst mixing
Real-world example: A toy company making small figurines used soft 20A silicone. Their molds tore after 8-10 parts. Switching to 40A silicone extended life to 35 parts per mold.
Solution: Match silicone hardness to your project. Use 20-30 Shore A for fine details. Use 40-50 Shore A for larger, simpler parts. Limit added oil to 5% maximum.
Mold Burning and Heat Damage
Symptom: Discolored, sticky, or melted spots on mold surfaces after casting resin.
Why it happens: Resin curing creates heat through exothermic reaction. Temperatures can reach 180°F. If you leave resin in the mold too long, this heat damages the silicone.
Solution: Remove cast parts within 3-5 minutes of resin curing. For production runs, use two or three molds in rotation. Let each mold cool completely before reusing. Consider heat-resistant silicone formulated specifically for resin casting.
Sticky Surfaces That Never Cure
Problem: Your mold feels tacky even after 24 hours.
Cause: Most silicones are condensation-cure, meaning they need moisture from air to cure fully. If your workshop is too dry, or if you stored silicone in sealed containers too long, it can’t absorb enough moisture.
Solution: Lightly mist the sticky mold with water. Place it in a plastic bag for 24 hours. The trapped humidity often completes curing. For future batches, store silicone at 40-60% humidity and check expiration dates.
Poor Tear Strength
Problem: Mold tears easily when you remove cast parts.
Cause: Excessive silicone oil weakens molecular bonds. Cheap silicones also have lower tear strength ratings.
Solution: Reduce or eliminate silicone oil. Add a reinforcing layer of nylon mesh during mold making. Choose silicone with tear strength above 20 kN/m. Yes, it costs more, but it lasts 3-4 times longer.
Oily Residue on Mold Surface
Problem: Greasy film appears on new molds and transfers to cast parts.
Cause: Using mineral oil instead of pure silicone oil. Mineral oil doesn’t chemically bond with silicone. It slowly leaches out over time.
Solution: Always use high-purity silicone oil designed for mold making. Clean new molds with isopropyl alcohol before first use. Avoid bargain-brand silicones that cut corners with cheap additives.
Surface Imperfections and Marks
Problem: Visible lines, rough spots, or bubbles on mold surfaces.
Causes include:
- Poorly polished master model
- Uneven release agent application
- Air bubbles trapped during pouring
- Dust or debris on master
Solution: Polish masters to at least 400-grit finish. Apply release agent in thin, even coats. Vacuum degas thoroughly. Work in a clean room or use a dust tent.
How Can You Extend Silicone Mold Life?
Choosing the Right Silicone Material
Not all silicones are equal. Match properties to your needs.
For high-detail work: Use low-viscosity silicone (around 15,000 cps). It flows into tiny features easily.
For production runs: Use high-tear-strength silicone (above 25 kN/m). It withstands repeated demolding.
For food contact: Use platinum-cure silicone. It’s safer and doesn’t shrink.
For high-temperature casting: Use tin-cure silicone with heat stabilizers.
Proper Storage Between Uses
Mold storage matters as much as mold making.
Clean molds thoroughly after each use. Remove all casting material residue. Wash with mild soap and water. Dry completely.
Dust with talcum powder before storage. This prevents surfaces from sticking together.
Store flat in cool, dark places. Sunlight degrades silicone over time. Stack molds with paper between them.
Temperature and Humidity Control
Curing conditions affect final properties significantly.
Ideal temperature: 70-80°F (21-27°C). Below 65°F, curing slows dramatically. Above 90°F, curing accelerates but may weaken the mold.
Ideal humidity: 40-60%. Too dry and condensation-cure silicones won’t cure fully. Too humid and moisture can cause bubbles.
Real-world tip: One manufacturer kept molds in an unheated garage. Winter temperatures dropped to 50°F. Cure times doubled, and molds failed early. Moving molds to a heated room solved both problems.
What Do Industry Experts Recommend?
Quality Over Cost
Cheap silicone saves money upfront but costs more in the long run. Premium silicone costs 30-50% more but lasts 2-3 times longer. For production work, this math makes sense.
Documentation Matters
Keep records of:
- Silicone brand and type used
- Catalyst ratio and mixing time
- Curing temperature and humidity
- Number of parts produced
This data helps you reproduce good results and avoid past mistakes.
Test Before Production
Always make a test mold with a small sample first. Check for:
- Cure time and completeness
- Detail reproduction quality
- Release characteristics
- Any unexpected reactions
One test saves wasting materials on a full production mold that fails.
Conclusion
Silicone mold production doesn’t have to be frustrating. Most common problems have straightforward solutions. Short mold life usually means wrong hardness or too much oil. Sticky surfaces point to humidity issues. Tearing indicates weak material or missing reinforcement.
The key is understanding why these problems happen, not just treating symptoms. Match your silicone to your project requirements. Control your environment. Take time with master preparation. Add reinforcement layers. Track your results.
With these practices, your molds will last longer, produce better parts, and save you money. The difference between frustration and success often comes down to small details done right.
Frequently Asked Questions
How many castings can I expect from one silicone mold?
Most quality silicone molds produce 20-30 parts with proper care. High-durability silicones can reach 50+ parts for simple shapes. Factors like part complexity, casting material, and demolding technique all affect lifespan.
Can I repair small tears in my silicone mold?
Yes, small tears can be repaired with silicone sealant or liquid silicone. Clean the area, apply sealant, and let cure fully. However, repairs may affect detail accuracy. For critical parts, replacement is better.
What’s the difference between tin-cure and platinum-cure silicone?
Tin-cure silicone is cheaper and works with most materials but may inhibit cure with some sulfur-containing clays. Platinum-cure silicone costs more, has less shrinkage, and cures faster. Choose platinum for food contact and precision work.
Why does my silicone sometimes not cure at all?
Inhibition is the likely cause. Certain materials like latex, sulfur-based clays, or some 3D printed resins prevent silicone curing. Test a small amount on your master material first. Switch to platinum-cure silicone if inhibition occurs.
How do I remove bubbles without a vacuum chamber?
Pour silicone from height in a thin stream. Let it sit for 10-15 minutes before pouring into mold. Use a heat gun or torch carefully on the surface after pouring to pop surface bubbles. For deep bubbles, pressure casting works better than vacuum.
Discuss Your Projects with Yigu Rapid Prototyping
Need help with silicone mold production? At Yigu Rapid Prototyping, we’ve solved thousands of molding challenges across industries. Our team combines 15+ years of hands-on experience with advanced facilities to deliver consistent, high-quality results.
Whether you need prototype validation, small-batch production, or full manufacturing support, we’re here to help. We offer:
- Material selection guidance based on your specific needs
- Design for manufacturing reviews to prevent issues early
- Quality control at every production stage
- Fast turnaround without cutting corners
Contact Yigu today to discuss your project. Let’s turn your concepts into reality with molds that work right the first time.