Introduction
You have a product idea. You have sketches, notes, and maybe even a napkin drawing. Now comes the moment where your idea starts to become real: building a prototype.
But where do you start? The prototype making process can feel overwhelming if you have never done it before. There are design decisions, material choices, manufacturing methods, and testing steps. Miss one, and you could end up with a prototype that doesn’t tell you anything useful.
This guide breaks down the entire prototype making process into clear, manageable stages. You will learn what happens at each step, which tools and materials to use, and how to avoid common pitfalls. We include data, real examples, and practical tips to help you navigate from digital design to physical prototype.
By the end, you will have a complete roadmap for turning your idea into a prototype you can hold, test, and learn from.
Step 1: Design Phase: Lay the Groundwork with Precise Digital Models
Every great prototype starts with a great digital design. This phase is where your idea becomes a structured, measurable plan. Rushing through it is the fastest way to cause problems later.
Industry data shows that rushing the design phase leads to 40% of prototype reworks. Take the time to get it right now, and you save days or weeks later.
What Tools Should You Use for 3D Modeling?
Your design needs to exist as a 3D digital model before anyone can make it. The software you choose matters.
| Software | Best For | Key Advantage |
|---|---|---|
| CAD (Computer-Aided Design) | 2D sketches and 3D models of mechanical parts | Industry standard for precision engineering |
| SolidWorks | Complex 3D designs with moving components | Handles assemblies and motion well |
| Fusion 360 | Startups and small teams | Combines modeling, simulation, and collaboration |
Data spotlight: About 85% of professional product developers use SolidWorks or CAD for 3D modeling. These tools reduce design errors by 35% compared to basic or free software.
If you are new to 3D modeling, Fusion 360 is a good starting point. It is powerful enough for most prototypes but easier to learn than traditional CAD tools.
What Should You Include in Your Model?
A complete 3D model includes:
- Exact dimensions for every feature
- Tolerances where parts need to fit together
- Wall thicknesses that are manufacturable (generally at least 0.8mm for plastic)
- Draft angles if the part might eventually be molded
- Assembly relationships if your product has multiple parts
Why You Need Design Reviews
Before sending your design to be made, gather feedback. Share your model with engineers, designers, and potential users. Ask specific questions:
- “Does this meet all technical requirements?”
- “Are there features that will be hard to manufacture?”
- “Will this be easy to test?”
Pro tip: Conduct 2 to 3 design reviews. Each review catches an average of 10 to 15 small flaws that would otherwise ruin your prototype.
Real-world example: A team designing a new electric toothbrush did a design review and realized the handle was 3mm too thick for an average adult hand. The CAD model looked fine, but the review caught the issue. They adjusted the design before making any prototypes, saving a week of wasted work.
Step 2: Material Selection: Choose the Right Material for Your Goals
The material you choose affects everything—how your prototype looks, how strong it is, how it feels, and how much it costs.
Common Prototype Materials Compared
| Material | Key Properties | Best For | Cost Per kg | Processing Difficulty |
|---|---|---|---|---|
| ABS | Strong, impact-resistant, easy to paint | Electronics prototypes, phone cases, housings | (2.50-)4.00 | Low (works with CNC and 3D printing) |
| PC (Polycarbonate) | Heat-resistant, transparent, shatterproof | Clear parts, lamp shades, safety goggles | (3.80-)5.50 | Medium (needs higher temps for 3D printing) |
| Nylon | Flexible, wear-resistant, chemical-resistant | Moving parts, gears, zippers | (4.20-)6.00 | Medium (absorbs moisture, needs pre-drying) |
| Aluminum | Lightweight, strong, corrosion-resistant | Metal prototypes, laptop frames, tool bodies | (2.00-)3.50 | Medium (CNC machining, needs finishing) |
How to Choose
Match your material to your prototype’s purpose:
- For visual approval only: ABS or basic resin. Cheap and easy to work with.
- For functional testing of moving parts: Nylon. It handles wear and flexing.
- For heat exposure: PC or aluminum. They won’t deform.
- For clarity: PC or acrylic. You need to see through it.
- For strength testing: Match the final production material as closely as possible.
Real-world example: A team prototyping a new wireless speaker chose ABS. It was affordable, easy to machine, and let them test the enclosure’s acoustic properties. If they had chosen a cheaper but weaker plastic, the prototype might have cracked during sound testing, giving false data.
Step 3: Processing Stage: Turn Digital Models into Physical Prototypes
This is where your design becomes a real object you can hold. The method you choose depends on what you need to learn.
Hand Making: Fast and Cheap for Early Concepts
Best for: Simple prototypes, foam models, early shape studies
Typical time: 1 to 2 days
Tolerance: ±1mm to ±3mm
Hand making uses basic tools—scissors, knives, sandpaper, glue—to shape materials by hand. It is fast and cheap but not precise.
Use hand making when you need a quick “proof of concept” to see if an idea has merit. Don’t use it for functional testing where accuracy matters.
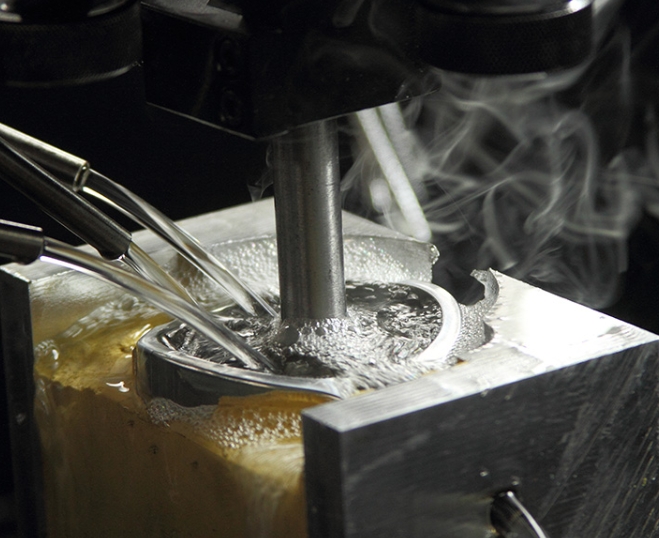
CNC Machining: Precision for Functional Prototypes
Best for: High-precision parts, functional testing, metal prototypes
Typical time: 3 to 5 days
Tolerance: ±0.01mm or better
CNC machining uses computer-controlled tools to carve parts from solid blocks of material. It is the most popular method for functional prototypes because it produces parts that behave like final products.
Key benefits:
- Precision: Tolerances as tight as ±0.01mm—critical for parts that must fit together.
- Versatility: Works with all common materials—plastics, metals, wood.
- Speed: Faster than 3D printing for large parts.
Data note: CNC machining produces 60% of functional prototypes because it mimics production processes better than other methods.
Hand Grinding: Smoothing Rough Edges
After machining, parts often have small burrs or tool marks. Hand grinding removes these.
Use sandpaper from 180 grit (coarse) to 600 grit (fine) . Start coarse to remove major imperfections, then move to fine for a smooth finish.
This step improves appearance and prevents scratches during testing.
Assembly: Putting It All Together
If your prototype has multiple parts, assembly is critical. Use the right joining method:
- Screws: For parts that need to be taken apart later.
- Adhesives: For permanent bonds.
- Snap fits: For parts that click together (like a battery cover).
Warning: Poor assembly causes 25% of prototype failures. Always test that parts fit properly before finalizing.
Step 4: Surface Treatment: Enhance Aesthetics and Functionality
A raw prototype is useful for testing, but a finished one is better for presentations and user feedback. Surface treatments make your prototype look and feel like a real product.
Common Surface Treatments
| Treatment | How It Works | Best For | Time |
|---|---|---|---|
| Grinding | Smoothing with sandpaper or machines | Matte finishes, better grip | 1-2 hours |
| Spraying | Applying paint with a spray gun | Color matching, brand identity | 2-3 hours plus drying |
| Electroplating | Adding a thin metal layer (chrome, nickel) | Metal appearance, corrosion resistance | 1-2 days |
| Anodizing | Creating protective oxide layer on aluminum | Durability, color, scratch resistance | 1 day |
| Silk Screen Printing | Transferring patterns or text | Labels, logos, control markings | 3-4 hours |
| Laser Engraving | Carving permanent designs | Serial numbers, unique identifiers | 1-2 hours |
Which Treatment Should You Choose?
- For user testing, combine spraying (for color) and silk screen printing (for labels). This makes the prototype feel like a real product, leading to more accurate feedback.
- For metal prototypes that will be handled, add anodizing or electroplating for durability.
- For clear parts, skip heavy treatments—the clarity is the feature.
Pro tip: Combining 2 to 3 treatments makes prototypes feel production-ready. A phone case prototype might be CNC machined, then painted, then silk-screened with the brand logo.
Step 5: Inspection and Testing: Validate Your Prototype
Before you declare success, you need to prove that your prototype actually meets your goals. Inspection checks dimensions. Testing checks function.
Quality Inspection
Compare your prototype against the original design specs:
- Size: Use calipers or a ruler. Does it match the CAD dimensions?
- Appearance: Are there scratches, uneven surfaces, or color mismatches?
- Material: Is it the material you specified? (Sometimes factories substitute.)
Standard: A good prototype should meet 95% of design specs. Small deviations (like 0.1mm in a non-critical area) are usually acceptable.
Functional Testing
Test how well the prototype performs its intended job:
- For a phone case: Drop it from 1.5 meters with a dummy phone inside. Does it protect?
- For a water bottle: Fill it and check for leaks. Does the lid seal?
- For a mechanical part: Cycle it 1,000 times. Does it wear or break?
Data point: 70% of prototypes fail their first functional test. This is normal and valuable. Each failure tells you what to improve.
Real-world example: A team testing a new folding chair prototype discovered that the locking mechanism failed after 50 cycles. They strengthened the design, made a new prototype, and it passed 1,000 cycles. Without that test, they would have launched a chair that broke after a few weeks of use.
Step 6: Packaging and Delivery: Protect and Transport
Once your prototype passes inspection and testing, it needs to reach its destination safely—whether that’s your office, a client, or a testing lab.
Packaging Steps
- Wrap the prototype: Use bubble wrap or foam. Pay extra attention to fragile parts.
- Choose the right box: Pick a rigid box that is 2 to 3 inches larger than the prototype on all sides.
- Fill empty space: Use packing peanuts or crumpled paper to prevent movement.
- Label clearly: Add “Fragile” and “Handle with Care” stickers. Include a packing slip with details.
Delivery Tips
- For local delivery: Use a courier with same-day or next-day service. Less time in transit means less risk of damage.
- For international delivery: Choose a service with tracking and insurance. International shipping takes 5 to 7 days, and insurance covers loss or damage.
How Long Does the Entire Process Take?
Timelines vary based on complexity and method.
| Prototype Type | Typical Timeline |
|---|---|
| Simple hand-made model (foam, cardboard) | 2 to 3 days |
| 3D printed plastic part | 3 to 7 days |
| CNC machined plastic part | 5 to 10 days |
| CNC machined metal part | 7 to 14 days |
| Complex assembly with multiple parts | 2 to 4 weeks |
Most prototypes fall into the 1 to 2 week range for functional parts.
Common Mistakes to Avoid
Mistake 1: Skipping Design Review
Skipping review to save a day often causes weeks of rework. A design review takes hours. Fixing a bad prototype takes days or weeks.
Mistake 2: Choosing the Wrong Material
Material affects everything. Using a cheap plastic for a strength test gives you useless data. Match the material to your test goals.
Mistake 3: Ignoring Surface Treatment for User Tests
A rough, unfinished prototype leads to biased feedback. Users focus on the roughness instead of the actual design. A finished prototype yields more useful input.
Mistake 4: Not Testing Enough
One test is rarely enough. Test early, test often. Each test reveals something new.
Mistake 5: Moving to Production Too Soon
Prototypes exist to find flaws. If your first prototype works perfectly, you probably didn’t test it hard enough. Find the flaws now, when fixing them is cheap.
Yigu Technology’s Perspective
At Yigu Technology, we guide product teams through the prototype making process every day. We have seen what works and what leads to frustration.
Our advice is simple: invest in the early stages. The design and material selection phases determine everything that follows. A well-designed prototype made from the right material will give you useful data. A rushed prototype made from the wrong material will waste your time.
We also emphasize surface treatment for user testing. A prototype that looks like a real product yields better feedback. Users focus on the design, not the rough edges.
For most functional prototypes, we recommend CNC machining. It delivers the precision and material properties needed for meaningful testing. For complex shapes, we add 3D printing. For early concepts, hand making works fine.
The key is matching the method to your goal. What do you need to learn? Let that guide every decision.
Conclusion
The prototype making process transforms ideas into physical objects you can test, refine, and improve. It follows a clear sequence:
- Design your product in 3D software, with complete details and multiple reviews.
- Select materials that match your test goals and final production intent.
- Process using hand methods, CNC machining, or 3D printing to create the physical part.
- Treat surfaces to improve appearance and function for testing.
- Inspect and test to validate that the prototype meets requirements.
- Package and deliver safely to its destination.
Each step builds on the last. Skipping or rushing any step increases risk and leads to wasted time and money.
But when you follow the process, prototypes become powerful tools. They reveal flaws while fixes are cheap. They generate feedback while changes are easy. They prove concepts before big investments.
A well-executed prototype is not the end of development. It is the beginning of real learning.
Frequently Asked Questions
How long does the entire prototype making process take?
Most prototypes take 1 to 2 weeks from design to delivery. Simple hand-made models can be ready in 2 to 3 days. Complex metal parts with tight tolerances may take 2 to 4 weeks. Get a specific timeline from your manufacturing partner based on your design.
Can I skip the design review stage to save time?
No—skipping design review almost always costs more time than it saves. Design reviews catch issues that would require starting over later. A 2-hour review can save 2 weeks of rework. Always build in time for at least one review.
Which surface treatment is best for user testing?
Combine spraying (for color) and silk screen printing (for labels) . This makes the prototype look like a real product, so users give feedback on the design rather than the unfinished appearance. For metal prototypes, add anodizing to prevent wear during repeated handling.
How many prototypes should I make?
Start with 2 to 3 prototypes. One for your own testing, one for user feedback, and one as a backup. If your product has multiple configurations, you may need more. Plan for multiple rounds—most products need 2 to 3 prototype iterations before final design.
What if my prototype fails testing?
Celebrate. Seriously. Failing in prototyping is cheap. Failing in production is catastrophic. Every failure tells you exactly what to fix. Analyze why it failed, update your design, and make another prototype. Repeat until it passes.
Discuss Your Projects with Yigu Rapid Prototyping
At Yigu Rapid Prototyping, we have helped hundreds of product teams navigate the prototype making process. We know the pitfalls, the shortcuts that work, and the ones that don’t.
Our services cover every stage:
- Design support: We review your models and suggest improvements for manufacturability.
- Material guidance: We help you choose the right material for your test goals.
- CNC machining and 3D printing: We deliver precision prototypes in days, not weeks.
- Surface treatment: We finish prototypes to look and feel like real products.
- Inspection and testing: We verify that every prototype meets specifications.
We do not just make parts. We partner with you to ensure your prototypes give you the information you need to move forward with confidence.
Ready to start your prototype? Contact Yigu Rapid Prototyping today for a free consultation and quote. Let’s turn your idea into something you can hold.