Introduction
Standard parts don’t always fit your design. Maybe your product needs a specific shape that isn’t on any supplier’s shelf. Or you’re testing a new idea and can’t find existing components that match your vision. Non-standard prototype sheet metal forming solves this problem. It creates custom metal parts tailored exactly to your requirements—no compromises, no forcing your design to fit existing options. This guide walks you through the process, materials, and decisions involved in getting custom metal prototypes made right.
How Is Non-Standard Different From Standard Forming?
The core difference
Standard sheet metal forming produces parts based on fixed industry specifications. Hole sizes, bend radii, and dimensions follow established norms. Non-standard forming starts with your unique requirements—whatever dimensions, shapes, or features your design needs.
Comparison at a glance
| Aspect | Non-Standard Forming | Standard Forming |
|---|---|---|
| Design basis | Your specific needs | Industry standards |
| Production volume | 1–500 parts typically | 1,000+ parts |
| Flexibility | High—any shape possible | Low—fixed configurations |
| Lead time | 1–4 weeks | 4–12 weeks (tooling) |
| Per-part cost | Higher for single parts | Lower at volume |
| Best for | Prototypes, custom equipment | Mass production |
Real example: A medical device startup needed a housing for a new surgical tool. Standard enclosures were too large and lacked required mounting points. Non-standard forming created exactly what they needed in 2 weeks for $1,200. Redesigning the tool to fit a standard box would have taken months and compromised functionality.
What Steps Are Involved in Custom Prototype Forming?
Step 1: Design and modeling
Everything starts with a 3D CAD model. This isn’t just a sketch—it’s a complete digital definition of your part.
What the model includes:
- All dimensions with tolerances
- Bend locations and angles
- Hole sizes and positions
- Surface finish requirements
- Material specifications
Design review is critical at this stage. Engineers check:
- Manufacturability: Can we actually make this? Is that bend radius too tight for the material?
- Functionality: Will the part do what you need? Does that bracket actually support the expected load?
A client once designed a bracket with a bend radius of 0.5mm in 3mm steel. Physical impossible. The design review caught this before any metal was cut, saving a week of wasted effort.
Step 2: Material selection and preparation
Choose material based on what the prototype must do.
Common material choices:
- Steel: Strong, affordable, welds well. Good for structural prototypes.
- Stainless steel: Corrosion-resistant, easy to clean. Medical and food equipment.
- Aluminum: Lightweight, good strength-to-weight ratio. Aerospace, automotive, consumer goods.
- Copper: Excellent electrical conductivity. Electrical components, heat exchangers.
- Brass: Decorative appearance, machinable. Hardware, decorative parts.
Material preparation before forming:
- Deburring: Remove sharp edges from raw sheets
- Cleaning: Eliminate oil, dust, and surface rust
- Flattening: Ensure sheets are perfectly flat
Real example: A robotics company needed lightweight arms for a drone prototype. They chose 6061 aluminum—strong enough for flight loads but one-third the weight of steel. Material preparation included precision flattening to ±0.1mm tolerance.
Step 3: Cutting the basic shape
With design and material ready, cutting begins. CNC-controlled cutting ensures accuracy.
Cutting options:
- Laser cutting: Best for intricate shapes, tight tolerances (±0.1mm), thin materials
- Plasma cutting: Faster for thick materials, rougher edge quality
- Waterjet cutting: No heat, good for thick or heat-sensitive materials
- Punching: Fast for simple shapes, needs tooling
Selection guide:
- Complex curves, small features → Laser
- Thick steel (over 10mm) → Plasma or waterjet
- Heat-sensitive materials → Waterjet
- Simple repeated shapes → Punching
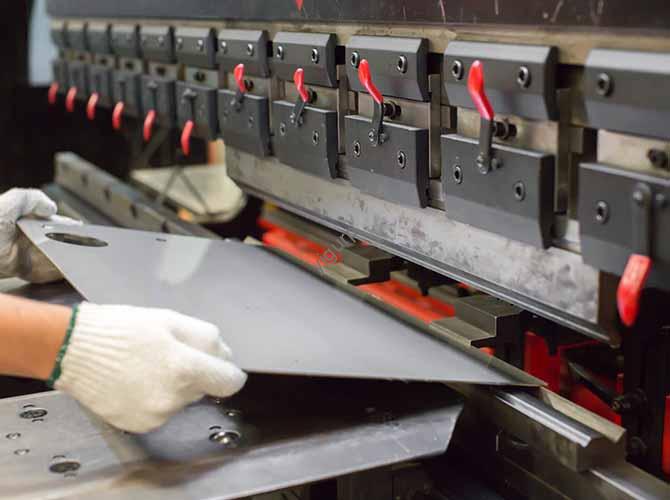
Step 4: Bending and forming
Now the flat cutout becomes a 3D part. CNC press brakes do the work.
What happens:
- The part positions against backgauges
- The punch descends, pushing metal into the die
- Metal bends to programmed angle
- Springback compensation built into program
Critical factors:
- Bend radius: Must be at least 1× material thickness for most metals
- Grain direction: Bending across grain reduces cracking risk
- Tooling selection: Die opening affects bend quality
Real example: A custom enclosure needed four 90° bends with holes lining up perfectly after forming. CNC press brake held ±0.3° on every bend. All holes aligned within 0.2mm.
Step 5: Welding and assembly
Multi-part prototypes need joining. Welding creates permanent connections.
Common welding methods:
- TIG welding: Precise, clean, good for stainless and aluminum
- MIG welding: Faster, good for steel
- Spot welding: Quick for overlapping sheets
Assembly considerations:
- Weld sequence matters—wrong order causes distortion
- Fixtures hold parts in correct position during welding
- Post-weld cleaning removes discoloration
Real example: A custom exhaust prototype required 12 separate pieces welded into one assembly. Custom fixtures held every component in place. The first prototype fit the vehicle perfectly—no rework needed.
Step 6: Surface finishing
Finishing improves appearance and performance.
Common finishes:
- Grinding and sanding: Smooth welds and cut edges
- Polishing: Creates smooth, reflective surface
- Painting: Adds color and corrosion protection
- Powder coating: Durable color finish, chip-resistant
- Anodizing: For aluminum—hard, corrosion-resistant surface
- Plating: Zinc, chrome, or other metal coatings
Selection guide:
- Consumer products → Polish or powder coat
- Industrial parts → As-is or simple paint
- Medical devices → Passivation or electropolish
- Outdoor equipment → Powder coat or anodize
Step 7: Quality inspection
Final verification ensures the prototype matches your design.
Inspection methods:
- Dimensional check: Calipers, CMM, optical comparators
- Visual inspection: Surface defects, weld quality
- Functional testing: Does it do what it should?
Typical tolerances:
- Cut dimensions: ±0.1mm
- Bend angles: ±0.5°
- Hole positions: ±0.1mm
- Flatness: ±0.2mm over 300mm
Real example: A custom bracket for a racing car needed ±0.05mm on mounting hole positions. CMM inspection verified every hole. The bracket installed without modification—critical when you’re replacing parts between race heats.
Why Choose Non-Standard Over Standard Prototypes?
Faster product development
Standard parts require searching for something “close enough.” Then you redesign your product to fit available components. Non-standard forming puts your design first. You get exactly what you need in weeks, not months spent compromising.
Time comparison:
- Find standard part: 1–3 weeks searching + redesign time
- Make non-standard prototype: 2–4 weeks total
Reduced risk in production
Prototypes exist to find problems. If your prototype isn’t exactly what you plan to produce, you’re not testing the real design. Non-standard forming creates prototypes that match your production intent. What you test is what you’ll manufacture.
Cost of finding issues late:
- Design flaw caught in prototype: $500 fix
- Same flaw caught in production tooling: $15,000 fix
Perfect for unique requirements
Sometimes standard parts simply don’t exist for what you need. Custom medical devices. Specialized industrial equipment. One-off research apparatus. Products with novel features. Non-standard forming is the only path forward.
Real example: A research lab needed a custom chamber for high-vacuum experiments. No standard box would work. Non-standard forming created a welded aluminum chamber with all required ports. The experiment succeeded on first attempt.
What Challenges Come With Non-Standard Forming?
Higher per-part cost for single pieces
Making one custom part costs more per piece than buying 1,000 standard ones. Tooling setup, programming time, and skilled labor get spread across fewer parts.
Cost reality:
- Simple bracket, one piece: $200–$500
- Same bracket in quantity 1,000: $5–$15 each
But compare to the alternative—redesigning your product to use standard parts—and the math often favors custom.
Longer lead time than off-the-shelf
You can’t call a supplier and have a custom part tomorrow. Design, programming, and fabrication take time.
Typical timelines:
- Simple part: 3–5 days
- Moderate complexity: 1–2 weeks
- Complex assembly: 2–4 weeks
Requires clear specifications
“Make it like this” doesn’t work. You need drawings, models, and specifications. Vague requirements lead to parts that don’t meet your needs.
What you must provide:
- 3D CAD model (STEP, IGES, or native format)
- 2D drawing with critical dimensions and tolerances
- Material specification
- Finish requirements
When Should You Use Non-Standard Prototype Forming?
Ideal situations
New product development
You’re designing something new. No existing parts match your vision. Non-standard forming creates the first physical version of your idea.
Design validation testing
You need to test a specific design before committing to production tooling. The prototype must match exactly what you plan to manufacture.
Custom equipment
You’re building a one-off machine, fixture, or apparatus. Standard parts won’t fit your unique configuration.
Low-volume specialized products
Your product sells in small quantities—50 units per year. Production tooling for stamping makes no economic sense. Non-standard forming at low volumes works perfectly.
Less ideal situations
Simple parts available off-the-shelf
If a standard bracket exists that does the job, buy it. Don’t reinvent the wheel.
Extremely tight budgets for single parts
If you literally cannot spend $500 on a prototype, consider design adjustments to use standard components.
Immediate need (tomorrow)
Custom fabrication takes time. If you need parts today, look for stock items or consider in-house rapid prototyping.
What Makes a Good Non-Standard Prototype Partner?
Technical capabilities
Look for:
- CNC press brakes with足够的 tonnage for your material
- Laser, plasma, or waterjet cutting appropriate for your parts
- Welding expertise in your materials (aluminum welding is different from steel)
- CMM or other inspection equipment to verify dimensions
- CAD/CAM capabilities to work from your models
Experience matters
Ask potential partners:
- Have you made parts like mine before?
- What materials do you work with most?
- What’s your typical turnaround time?
- Can you help with design for manufacturability?
Communication
The best partners ask questions. They don’t just take your order—they review your design, suggest improvements, and clarify ambiguities. If they accept your files without comment, they might not be paying attention.
Conclusion
Non-standard prototype sheet metal forming creates custom parts tailored exactly to your needs. The process follows clear steps: design and modeling, material selection, cutting, bending, welding, finishing, and inspection. It costs more per part than mass-produced standards but saves enormous time and money by letting you test your actual design before production. Choose non-standard forming when you need design validation, have unique requirements, or are developing new products. Provide clear specifications, plan for 2–4 week timelines, and work with partners who ask good questions. Your prototype should match your vision—not force your vision to match available parts.
FAQ About Non-Standard Prototype Sheet Metal Forming
How long does it take to get a custom sheet metal prototype?
Timelines depend on complexity. Simple flat brackets with few bends: 3–5 days. Parts requiring cutting, multiple bends, and welding: 1–2 weeks. Complex assemblies with finishing: 2–4 weeks. Rushed service may be available for additional cost—some shops can deliver in 24–48 hours for simple parts.
Is non-standard prototype forming expensive?
For a single part, yes—$200 to $2,000+ depending on complexity. But consider the alternative: designing your product around standard parts adds engineering time (easily $5,000–$10,000) and may compromise functionality. The prototype cost is small insurance against much larger production problems.
What materials work best for custom prototypes?
Choose based on your needs:
- Steel: Strong, affordable, easy to weld—best for structural parts
- Stainless steel: Corrosion-resistant, clean appearance—medical, food, outdoor
- Aluminum: Lightweight, good strength—aerospace, automotive, consumer goods
- Copper: Excellent conductivity—electrical, thermal applications
- Brass: Decorative, machinable—hardware, artistic pieces
Can I make changes after seeing the first prototype?
Yes—that’s the whole point of prototyping. Most projects go through 2–3 revision cycles. The first prototype reveals issues. You adjust the design. The second prototype validates the changes. Some projects need more iterations; some get it right the first time. Plan for at least one revision cycle in your timeline and budget.
What file formats do I need to provide?
STEP (.stp or .step) is the most universal format—almost all CAD systems can export it. Also provide a PDF drawing with critical dimensions and tolerances clearly marked. Include material specification and finish requirements. If you don’t have CAD files, some shops can work from detailed drawings, but this adds time and potential for misinterpretation.
How accurate are custom sheet metal prototypes?
Typical tolerances:
- Cut dimensions: ±0.1mm (laser/waterjet)
- Bend angles: ±0.5°
- Hole positions: ±0.1mm
- Overall flatness: ±0.2mm over 300mm
Tighter tolerances are possible but increase cost. Discuss your specific requirements with your fabrication partner.
What if my design has features that are hard to form?
Good fabrication partners will identify challenging features during design review and suggest alternatives. Common issues:
- Tight bend radii that cause cracking → suggest larger radius
- Holes too close to bend lines → suggest moving holes or adding relief
- Welded joints in high-stress areas → suggest design changes
Listen to their suggestions—they’ve made thousands of parts and know what works.
Discuss Your Projects with Yigu Rapid Prototyping
Need a custom metal prototype for your unique design? At Yigu Rapid Prototyping, we specialize in non-standard sheet metal forming for clients across industries. We’ve created custom enclosures for medical device startups. We’ve formed aerospace brackets for drone manufacturers. We’ve built specialized equipment for research laboratories. Tell us about your project—share your CAD files, material requirements, and timeline. Our engineers will review your design, suggest improvements if needed, and provide a detailed quote within 24 hours. Contact us today to turn your custom design into a physical prototype.