Introduction
Building a great electric razor starts with the hand plate—the part you hold and the structure that holds the cutting system. It needs to feel right in your hand, keep the blade and knife mesh at the perfect gap, and house all the electronics securely. Before you spend money on injection molds, you need a precise prototype to test your design. The CNC machined electric razor hand plate prototype is the best way to get there. But how do you actually make one? This article walks you through the entire process. We will cover the design prep, the machining steps, the surface finishing, and how to fix common problems. By the end, you will know exactly how to turn your idea into a physical, testable hand plate.
What Design Prep Work Ensures a Successful Hand Plate Prototype?
Before any cutting happens, you must get the design right. This stage sets the foundation for everything that follows. A well-prepared design saves time and prevents mistakes during machining.
Understanding Your Product Demands
First, think about what your razor needs to do. It has a motor that spins at thousands of RPMs. You need space for that motor, the battery, and a modern Type-C charging port. The hand plate must be lightweight and have a non-slip grip. You also need to decide on the tool head design. Will it be detachable or integrated into the body? The gap between the knife mesh and the blade is a critical number. It should be between 0.1mm and 0.2mm. Too wide, and it pulls hair. Too narrow, and the blades might rub and dull quickly.
Choosing the Right Materials
The material you choose for the prototype should match what you plan to use in mass production. This makes testing more accurate. Here is a quick guide:
- For the Hand Plate Housing: ABS plastic is a common choice. It is lightweight, easy to machine, and takes dye well. For a more premium feel, you might use aluminum alloy. If you need a clear window for an indicator light, use PC or acrylic.
- For the Tool Head Parts: The knife mesh needs to be rust-resistant and thin. Use stainless steel or nickel alloy. The moving blades are often made of ceramic or hardened metal.
- For Internal Supports: Use ABS or acrylic to create brackets that hold the motor and circuit board securely.
Creating Your 3D Model
Use CAD software like SolidWorks or UG to build a detailed 3D model. Include every key dimension: the hand plate thickness, the tool head diameter, and the size of the battery compartment. Mark the positions for the switch, indicator lights, and charging port. Add internal ribs and supports to hold the motor firmly and reduce vibration. Once the model is done, you will export files—like STL for 3D printing or DXF for CNC machining—to guide the next steps.
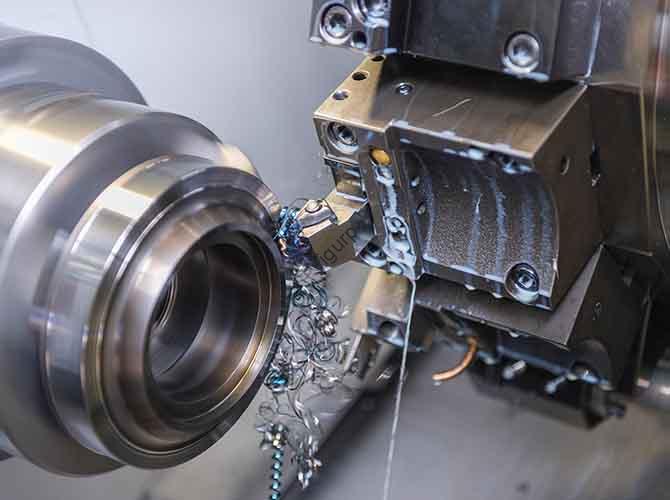
How Does the Core CNC Machining Process Work for Hand Plates?
This is where your digital design becomes a physical object. The CNC machining process for an electric razor hand plate is a step-by-step journey that requires careful planning and control.
Step 1: Preparing Your Materials
First, you get your raw materials ready. For plastic parts like the housing, you will use ABS sheets or rods, typically 2-3mm thick. For metal parts, you might use aluminum alloy sheets for a high-end housing or stainless steel sheets (1-2mm thick) for the knife mesh. These are cut into blanks that are slightly larger than your final part.
Step 2: Programming and Path Planning
You bring your 3D model into CAM software like Mastercam. Here, you program the tool paths.
- For the hand plate housing, you start with a large flat cutter (like an 8mm one) to remove bulk material quickly. Then, you switch to tiny tools, like a 0.3mm ball cutter, to machine fine details like the switch hole and the edges of the charging port.
- For the tool head parts, you set a very high precision, with a tolerance of ±0.05mm. This is crucial for that perfect blade-to-mesh gap.
Step 3: Clamping and Setting Up the Machine
You must hold the material perfectly still. A vise or a vacuum cup works well. For hand plates with curved edges, you might need a 4-axis or 5-axis CNC machine to reach all the angles. You carefully set the machine’s zero point, especially for symmetrical parts like a dual-tool head design.
Step 4: Machining the Parts
Now, the machine starts cutting.
- For the Housing: It mills the outer shape, creates the holes for the switch and indicators, and carves the battery compartment. It also adds small grooves on the grip for a non-slip texture.
- For the Internal Structure: It mills precise slots for the motor to sit in and creates the card slots for the circuit board.
- For the Tool Head Interface: This is a critical step. The machine cuts the groove where the knife mesh will sit, ensuring it is perfectly flat and square. It also drills and taps small M2 threaded holes to screw the blade holder in place.
Step 5: Critical Process Control
During machining, you must watch two things closely.
- Tolerance Control: The gap for the tool head must be held to ±0.02mm. The overall size of the housing can be a bit looser, at ±0.1mm, but still must be accurate for all the internal parts to fit.
- Surface Smoothness: The areas where the user’s hand will grip need a smooth finish, around Ra 1.6μm. All sharp edges should be broken with a small 0.5mm chamfer for comfort and safety.
What Post-Machining Steps Turn Parts into a Prototype?
Machining gives you the raw parts. Now, you need to finish them and put everything together.
Applying the Right Surface Treatment
Different materials get different treatments to improve their look and feel.
| Part Type | Treatment Method | Purpose and Effect |
|---|---|---|
| Plastic Hand Plate Housing | Spraying | Apply a matte paint for a non-slip grip, or a glossy piano paint for a high-end look. Common colors are black or silver. |
| Visible Areas (Any Material) | Silk Screen Printing | Print your brand logo, power symbols, and battery level marks clearly on the surface. |
| Metal Tool Head (Knife Mesh) | Polishing | Smooth the surface to prevent skin irritation and remove any machining scratches. |
| Metal Blades | Quenching & Hardening | Heat-treat the blades to reach a hardness of HRC 55-60. This keeps them sharp for a long time. |
| Aluminum Alloy Housing | Anodization / Sandblasting | Anodization adds a corrosion-resistant layer. Sandblasting creates a soft, fingerprint-proof texture. |
Testing and Assembling the Prototype
Before you put everything together, test the key functions.
- Install the motor and run it. Check that the tool head spins at the right speed (often 3000-5000 RPM) and that there is no strange vibration.
- Connect the Type-C charging port and make sure the LED lights work correctly (red for charging, green for full).
- Press the switch. It should have a nice feel, with a travel of about 1-1.5mm, and should not get stuck.
Then, you assemble the prototype.
- Fix the motor, circuit board, and battery onto their internal mounts. Use small cable ties to secure the wires so they don’t vibrate loose.
- Attach the knife mesh to the tool head. Make sure the gap between it and the blade is the correct 0.1-0.2mm. Secure the blade holder with the M2 screws.
- Finally, snap or screw the hand plate housing together. If your design needs to be washable, you might use ultrasonic welding to seal the seams or add a silicone gasket.
How Do You Optimize the Prototype Based on Testing?
Once you have a working prototype, you test it with real users. Their feedback tells you what to improve. Here are common problems and how to fix them.
| Problem Found During Testing | Improvement Action |
|---|---|
| The tool head vibrates too much, making it uncomfortable. | Add small silicone shock-absorbing pads under the motor. Add more ribs inside the housing to make the structure stiffer. |
| The shave is uneven because the knife mesh and blade are misaligned. | Re-check the CNC program for the tool head grooves. Use a laser measurement tool to calibrate the gap perfectly before the next assembly. |
| The hand plate feels slippery or too heavy. | Add rubber non-slip strips to the grip areas. Consider switching to a lightweight PC plastic to reduce the total weight by 10-15%. |
| The charging port gets damaged after a few plugs. | Redesign the port to be recessed by 1-2mm into the housing. Or, add a small rubber protective cover over it. |
What Are Common Technical Difficulties and Their Solutions?
Even with a good process, you might run into these technical issues. Here is how to solve them.
- Uneven Knife Mesh-Blade Gap: Use 4-axis CNC machining to cut the tool head grooves. After machining, use a feeler gauge to check the gap. If it is off, you can add thin shims to adjust it.
- Motor Vibration Causes Noise: Strengthen the internal mounts. Switch from a plastic motor bracket to a metal one. Add foam damping pads around the motor to soak up the noise.
- Plastic Hand Plate Warps After Machining: Switch to a stronger material, like fiber-reinforced ABS, which is 20% stronger. Also, add small stiffening ribs along the edges of the part in your design.
- Charging Port Hole is Misaligned: When programming the CNC machine, set a very tight positional accuracy of ±0.03mm for that hole. Double-check its position on the 3D model before cutting.
Conclusion
Manufacturing a precise CNC machined electric razor hand plate prototype is a detailed but straightforward process. It starts with careful design, where you define the material and the critical 0.1-0.2mm blade gap. It moves through precise CNC machining, where you control tolerances and surface finish. It finishes with post-processing, assembly, and testing. By following this step-by-step guide and knowing how to fix common problems like vibration or misalignment, you can create a prototype that truly represents your final product. This allows you to test, get feedback, and improve your design with confidence, saving time and money before mass production.
FAQ
What is the ideal gap between the knife mesh and blade in a CNC machined electric razor hand plate prototype, and how is it achieved?
The ideal gap is 0.1 to 0.2mm. This prevents skin irritation while ensuring a close shave. It is achieved by setting a tight CNC machining tolerance of ±0.05mm for the tool head grooves, using 4-axis machining for flatness, and then verifying the gap with a feeler gauge after machining.
Can CNC machined electric razor hand plate prototypes be used directly for small-batch production?
No, they are not meant for that. CNC prototypes are for design testing and validation. For small-batch production, you should switch to injection molding (for plastic parts) or die-casting (for metal parts). These methods are faster and cheaper for making many units. You can use the data from your CNC prototype to help design these production molds.
How long does it take to produce a CNC machined electric razor hand plate prototype?
The timeline depends on the design’s complexity. For a standard hand plate with a plastic housing and a simple metal tool head, it typically takes 5 to 8 days. This includes design finalization, machining, post-processing, and assembly. For a more complex design with curved surfaces or waterproofing, it might take 10 to 12 days.
Discuss Your Projects with Yigu Rapid Prototyping
Are you developing a new electric razor and need a precise, reliable prototype? At Yigu Rapid Prototyping, we specialize in the CNC machined electric razor hand plate prototype process. Our team of experienced engineers can help you with material selection, design for manufacturability, and precision machining. We understand the importance of that perfect blade gap and a comfortable, ergonomic grip. We will work with you to create a functional prototype that you can test and refine, helping you avoid costly mistakes down the line.
Contact Yigu Rapid Prototyping today to discuss your electric razor project. Let’s work together to bring your vision to life.