Introduction
If you are wondering how to get clean, precise, and efficient results with CNC cutting aluminum, the short answer is this: focus on proper material preparation, choose the right cutting tools and parameters, and follow best practices for machine setup and maintenance. Aluminum’s unique properties—like its high thermal conductivity and relative softness—make it trickier to machine than metals like steel. However, with the right approach, you can easily avoid common issues like rapid tool wear, unwanted burrs, and a poor surface finish. In this guide, we will break down everything you need to know, from choosing the right aluminum alloy to troubleshooting common problems, so you can tackle any CNC aluminum cutting project with complete confidence.
What Are the Basics and Key Properties of Aluminum for CNC Cutting?
Before diving into machine setup, it is critical to understand why aluminum behaves the way it does during CNC cutting. Unlike steel, aluminum is a non-ferrous metal with a low density of about 2.7 g/cm³. It also has excellent thermal conductivity, meaning the heat generated from cutting spreads through the material very quickly. This can be both an advantage, as it helps with faster chip evacuation, and a challenge, as it risks overheating the cutting tool if not managed correctly.
For most CNC projects, you will be working with aluminum alloys, because pure aluminum is simply too soft for most structural uses. The two most popular alloys for CNC cutting are:
- 6061-T6 Aluminum: This is often called the “workhorse” alloy. It is strong, resistant to corrosion, and very easy to machine. It is ideal for parts like brackets, enclosures, and prototypes. In my eight years of running a CNC shop, 6061-T6 accounted for about 70% of all our aluminum projects. Its consistency makes it a reliable choice for both hobbyists and professionals.
- 7075-T6 Aluminum: This is a high-strength alloy often used in the aerospace industry. It is harder than 6061 but also more difficult to machine, as it can cause faster tool wear. We once used 7075-T6 for a drone frame project and had to reduce our feed rates by about 15% to avoid breaking tools.
Here is a quick look at how aluminum’s key properties impact the CNC cutting process:
| Property | Impact on CNC Cutting |
|---|---|
| Thermal Conductivity | Heat spreads very fast, so you need coolant to protect the tool and prevent the material from warping. |
| Softness | Aluminum is prone to “galling,” where the material sticks to the tool, especially if cutting speeds are too low. |
| Ductility | It produces long, stringy chips. You need an effective chip evacuation strategy to avoid clogging. |
How to Choose the Right Tools for CNC Cutting Aluminum?
The tools you use will absolutely make or break your CNC cutting aluminum project. Unlike steel, aluminum requires tools with specific coatings, geometries, and materials to handle its softness and how it conducts heat.
Tool Materials
- Carbide Tools: These are the gold standard for CNC aluminum cutting. Carbide is much harder than high-speed steel (HSS) and can easily withstand the heat generated. We switched all our aluminum projects to carbide tools about five years ago, and our tool life increased by 300%. It was a huge cost saver.
- HSS Tools: These are cheaper but are not ideal for high-volume work. HSS dulls very quickly when cutting aluminum, which leads to rough finishes. Only use HSS if you are doing a small, one-off project and are on a very tight budget.
Tool Coatings
Coatings help reduce friction and heat, which extends tool life significantly. For aluminum, the best options are:
- TiAlN (Titanium Aluminum Nitride) : Works well for general aluminum cutting. It handles moderate heat well and resists wear.
- ZrN (Zirconium Nitride) : Better for high-speed cutting. ZrN has low friction, which is critical for preventing galling on soft alloys like 6061.
- DLC (Diamond-Like Carbon) : This is the top choice for high-precision projects. DLC coatings have ultra-low friction, but they are more expensive. We use DLC-coated tools for medical parts where the surface finish is absolutely non-negotiable.
Tool Geometry
The shape of your tool’s flutes and cutting edge matters a great deal.
- Number of Flutes: For aluminum, 2 or 3 flutes are best. Fewer flutes mean more space for chips to escape, which reduces clogging. We use a 2-flute end mill for roughing cuts and a 3-flute for finishing.
- Flute Helix Angle: Aim for 30 to 45 degrees. A steeper angle of 45 degrees helps with chip evacuation, while a shallower angle of 30 degrees provides more stability for deep cuts.
- Cutting Edge Radius: A small radius of about 0.005 to 0.010 inches helps prevent chipping the aluminum’s surface. You should avoid tools with sharp edges, as they can cause burrs.
How to Set Up Your CNC Machine for Cutting Aluminum?
Even the best tools will not work well if your machine isn’t set up correctly. Here is a step-by-step guide to get your CNC ready for aluminum.
1. Secure the Material Properly
Aluminum is soft, so it can shift during cutting if it is not clamped tightly enough. Use these methods:
- Vise Clamps: These are great for small to medium parts. Make sure the vise jaws are clean and use soft jaws, made of aluminum or plastic, to avoid marring the material.
- Vacuum Tables: These are excellent for large, flat parts, like sheets for signs. We use a vacuum table for our 4×8 ft aluminum sheet projects—it holds the material evenly without leaving any marks.
- Double-Sided Tape: This is a quick option for very small parts. Use a high-strength tape like 3M VHB, and clean both the table and the material surface with isopropyl alcohol first.
2. Adjust Cutting Parameters
Getting the cutting speed, feed rate, and depth of cut right is critical. The wrong settings can lead to tool breakage or poor results. Below is a table of recommended starting parameters for common aluminum alloys, using a carbide tool.
| Aluminum Alloy | Cutting Speed (SFM) | Feed Rate (IPM) | Depth of Cut (DOC) |
|---|---|---|---|
| 6061-T6 | 1000–1500 | 10–20 | 0.1–0.2 inches |
| 7075-T6 | 800–1200 | 8–15 | 0.05–0.15 inches |
| 5052-H32 | 1200–1800 | 12–25 | 0.1–0.2 inches |
Note: These are just starting points. You should always adjust based on your specific machine’s rigidity and the quality of your tool.
3. Use Coolant or Lubricant
Aluminum’s high thermal conductivity means heat builds up quickly in the cutting zone. Using coolant or lubricant does three essential things:
- It cools the tool to prevent overheating and dulling.
- It reduces friction to avoid galling.
- It flushes away chips to prevent clogging.
For aluminum, flood coolant is the most effective for high-volume work. Use a water-soluble coolant with a 10-15% concentration. Avoid oil-based coolants, which can leave a sticky residue.
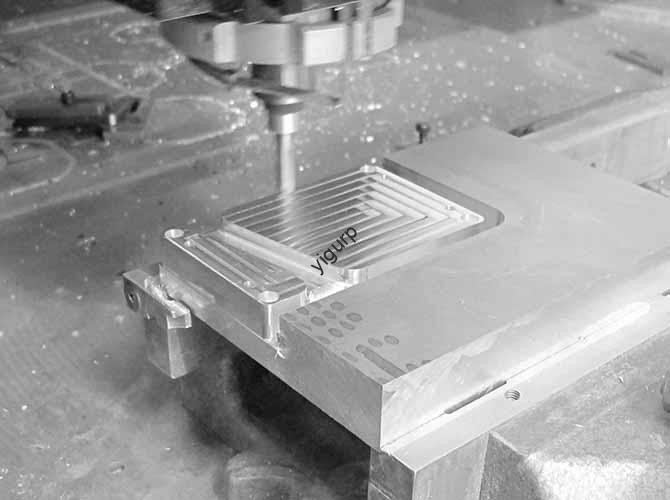
A Step-by-Step Guide to CNC Cutting Aluminum
Now that your machine is set up, let’s walk through a typical CNC cutting aluminum project. We will use a 6061-T6 aluminum block that is 4x4x1 inches to make a simple bracket. This is a common project for both beginners and professionals.
- Step 1: Prepare the CAD/CAM File. Use CAD software to design your bracket. In your CAM software, select the “Aluminum 6061-T6” material preset. Choose a 2-flute carbide end mill (0.25 inches diameter) for roughing and a 3-flute end mill (0.125 inches) for finishing.
- Step 2: Load the Material and Tool. Clean the machine table with alcohol and clamp the aluminum block securely in a vise with soft jaws. Make sure it is perfectly level. Install the 2-flute end mill into the spindle and measure its length.
- Step 3: Run the Roughing Cut. Start with a small test cut to check your feed rate and coolant flow. Then, let the machine run the full roughing toolpath. Check the chips regularly. They should be small and curly. If they are long and stringy, increase the feed rate by about 10%.
- Step 4: Switch to the Finishing Cut. Replace the roughing tool with the 3-flute finishing end mill and re-measure its length. Run the finishing cut at a slower feed rate for a smooth surface finish.
- Step 5: Post-Cutting Cleanup. Carefully remove the part from the vise. Use a deburring tool or fine sandpaper to remove any small burrs. Finally, wipe the bracket with a cloth and isopropyl alcohol to remove any coolant residue.
What Are Common Problems and How Do You Fix Them?
Even with the best setup, issues can happen. Here are the most common problems we have faced and how to solve them.
- Tool Wear (Dulling) : If you notice a rough surface finish or chips that are turning black from overheating, your tool may be dull. The fix is to reduce your cutting speed by 10-15%, check your coolant flow, or switch to a coated tool like ZrN or DLC.
- Burrs on the Part: Burrs are sharp, raised edges on the cut surface. This is often caused by a dull tool, a feed rate that is too low, or incorrect tool geometry. Try replacing the tool, increasing the feed rate by 5-10%, or using a tool with a small cutting edge radius.
- Material Warping: If your aluminum part bends or twists after cutting, it is likely due to too much heat or uneven clamping. Use flood coolant, reduce your cutting speed, or add more clamps to distribute the pressure more evenly.
- Chip Clogging: If chips get stuck in the flutes of your tool, causing it to jam, you may be using a tool with too many flutes. Switch to a 2-flute tool, increase your feed rate, or use an air blast to blow chips away.
Conclusion
Mastering CNC cutting aluminum is a skill that combines the right knowledge with careful practice. By understanding the key properties of aluminum, such as its softness and high thermal conductivity, you can choose the correct tools—like carbide end mills with ZrN coatings. Proper machine setup, including secure workholding and the use of coolant, is essential for success. Following a clear, step-by-step process and knowing how to troubleshoot common issues like tool wear or burrs will allow you to produce high-quality, precise aluminum parts consistently and efficiently.
FAQ
Can I use HSS tools for CNC cutting aluminum?
Yes, you can, but they are really only suitable for small, low-volume projects. HSS tools dull very quickly when cutting aluminum, so for any kind of production work, carbide tools are a much better and more cost-effective choice.
What is the best coolant for CNC cutting aluminum?
A water-soluble coolant mixed to a 10-15% concentration is the best option. It cools the tool effectively, reduces friction, and is easy to clean off the finished part. You should avoid oil-based coolants, as they can leave a sticky residue on the aluminum.
How do I choose between 6061-T6 and 7075-T6 aluminum?
For most general projects, choose 6061-T6. It is easy to machine, strong enough for most uses, and affordable. Only choose 7075-T6 if your project demands maximum strength, like for critical aerospace parts, and be prepared for higher tool wear and slower cutting speeds.
Can I CNC cut thin aluminum sheets, less than 0.05 inches thick?
Yes, but you need to take extra precautions. Use a vacuum table or double-sided tape to hold the sheet perfectly flat. Use a small-diameter tool, 0.125 inches or less, and reduce your depth of cut to just 0.02-0.03 inches. Using a backer board underneath the sheet can also help prevent it from bending.
Discuss Your Projects with Yigu Rapid Prototyping
Are you ready to start your next aluminum project? At Yigu Rapid Prototyping, we have years of experience in CNC cutting aluminum for a wide range of industries. Our team can help you with everything from material selection and design optimization to producing high-quality, precision parts. Whether you need a single prototype or a full production run, we are here to help.
Contact Yigu Rapid Prototyping today to discuss your project. Let’s build something great together.