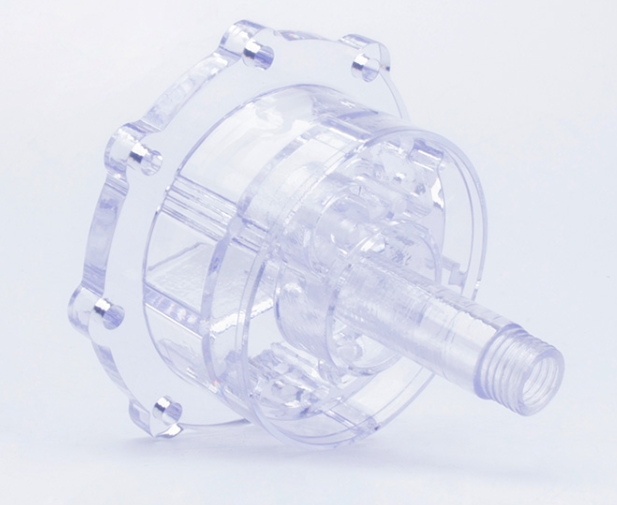
In the world of product design, seeing is believing. When you develop a new medical device, a sleek smartwatch, or a high-end car dashboard, you often need a clear window into the technology. This is where the CNC machining PMMA prototype shell becomes your most valuable tool.
PMMA, commonly known as acrylic, is a remarkable material. it offers 92% light transmission, making it as clear as glass but much tougher. While 3D printing often leaves “cloudy” layers, CNC machining delivers a glass-like finish with industrial-grade precision. This guide explores the full process of creating these transparent shells, helping engineers and buyers avoid common traps like melting or cracking.
What Makes PMMA Ideal for Prototype Shells?
Choosing the right material and method is the first step toward a successful prototype. PMMA stands out because it balances beauty with strength.
The Benefits of Acrylic
- Extreme Clarity: It is the clearest plastic available. It is perfect for display covers or fluid chambers.
- Impact Strength: It won’t shatter like glass if dropped from a desk.
- Clean Cuts: Unlike some “gummy” plastics, PMMA chips away cleanly when handled by a pro.
CNC vs. Other Methods
Many teams try 3D printing first, only to realize the parts are too “fuzzy” for a real display test. CNC machining is the only way to get true transparency and a tolerance of ±0.005mm.
| Feature | CNC Machining | SLA 3D Printing | Laser Cutting |
| Precision | ±0.005–0.01mm | ±0.1–0.2mm | ±0.02–0.05mm |
| Clarity | Glass-like | Translucent/Cloudy | Clear edges only |
| Lead Time | 2–3 Days | 3–5 Days | 1–2 Days |
| Best For | High-precision shells | Concept models | Flat covers |
Experience from the Field: A medical startup recently designed a handheld ultrasound. They used a 3D-printed shell, but the “PMMA-like” resin was too blurry to see the internal screen. After switching to a CNC machined PMMA shell, they achieved a crystal-clear finish (Ra 0.3μm). It even survived ten drops onto concrete, saving their project three weeks of rework.
How to Machine a Perfect PMMA Shell?
Creating a clear shell is an art backed by data. Here is the 7-step process to ensure your CNC machining PMMA prototype shell is flawless.
1. Design and Smart Programming
In transparent parts, every internal flaw is visible. You cannot hide mistakes with paint.
- Wall Thickness: Aim for 2mm to 4mm. If the wall is thinner than 2mm, the vibrating tool might crack the plastic.
- Smooth Corners: Never use sharp 90-degree internal corners. Use a 1mm radius to prevent stress fractures.
- Heat Control: PMMA melts at 160°C. We set the spindle speed high (6,000–8,000 RPM) and the feed rate fast. If the tool lingers too long in one spot, the plastic will turn into a sticky mess.
2. Preparing the Material
Always use cast PMMA for prototypes. It is more stable than “extruded” acrylic, which tends to crack when you cut it. Before we start, we clean the sheet with isopropyl alcohol and a microfiber cloth. Even a tiny grain of sand on the machine bed can scratch your clear shell.
3. Rough Machining
We start by removing the “bulk” of the material. For this, we use a single-flute carbide tool. Why single-flute? Because it provides more room for chips to escape, which carries heat away from the part. We usually cut about 1–2mm deep per pass to keep things cool.
4. Precision Finishing
This is the most critical stage. We switch to a polished carbide tool. A polished tool reduces friction, which prevents that “cloudy” look. By taking very shallow cuts (0.1mm), we ensure the surface is smooth enough to be transparent right off the machine.
5. Post-Treatment for a Glass Finish
Once the shell is machined, it needs a final touch.
- Cleaning: We use compressed air to blow away chips. Never rub dry PMMA with your hand; you will scratch it.
- Wet Sanding: We use 1,000-grit wet pads. The water keeps the dust down so it doesn’t “sandpaper” the clear surface.
- Polishing: For medical-grade clarity, we use a plastic polish and a soft cloth to bring out a deep shine.
6. Rigorous Quality Inspection
We use a Coordinate Measuring Machine (CMM) to check dimensions. But for PMMA, the “eye test” is just as important. We hold the shell against a high-bright LED panel. If we see bubbles, clouds, or tiny “crazing” cracks, the part is rejected.
7. Safe Delivery
Acrylic is very easy to scratch during shipping. We wrap each shell in anti-static film and place it in a custom-cut foam insert.
Pro Tip: If you are shipping during summer, use a climate-controlled carrier. PMMA can soften and warp if left in a hot truck over 40°C.
Insights from Yigu Technology
At Yigu Technology, we have delivered over 500 CNC machining PMMA prototype shell projects. Our secret is using 5-axis CNC machines. Most shops use 3-axis machines and flip the part by hand. Every time you touch or flip a PMMA shell, you risk scratching it. Our 5-axis setup cuts the part from all sides in one go, reducing scratch risks by 60%.
For our procurement partners, we always provide material certificates. We want you to be 100% sure you are getting cast PMMA that meets RoHS or FDA standards. We know that in the medical and automotive worlds, “clear” isn’t just a look—it’s a safety requirement.
Conclusion
The CNC machining PMMA prototype shell is the ultimate choice for engineers who need glass-like clarity and high-strength protection. By following a strict path of high-speed cutting, polished tooling, and wet sanding, you can create a prototype that looks like a final production part. Don’t settle for “translucent” 3D prints when you can have “transparent” CNC results.
FAQ
How much does a CNC machined PMMA shell cost?
A small display cover usually costs between $80 and $150. For a large, complex car instrument panel, prices range from $200 to $400. We offer 15–20% discounts for orders of 5 parts or more.
Will the PMMA shell yellow over time?
Standard PMMA stays clear for a long time indoors. However, for outdoor use, you must ask for a UV-resistant coating. This will keep the shell from yellowing for over two years.
How fast can I get my prototype?
A standard shell takes about 3 to 7 days. If you are in a rush, we can offer 2-day “rush” service for an extra fee.
Can I tap threads into a PMMA shell?
Yes, but be careful. PMMA is brittle. We recommend using coarse threads and a slow tapping speed to prevent the holes from cracking.
What is the difference between cast and extruded PMMA?
Cast PMMA is made in a mold; it is harder and clearer. Extruded PMMA is pushed through a machine; it is cheaper but tends to melt or crack during CNC machining. Always ask for cast for your prototypes.
Discuss Your Projects with Yigu Rapid Prototyping
Is your team working on a project that requires a perfectly clear prototype? At Yigu Rapid Prototyping, we take the stress out of CNC machining PMMA prototype shells. Our advanced 5-axis machines and expert polishing team ensure your designs are turned into stunning, clear realities in days. We understand the high standards of the medical and electronics industries and are ready to meet them.
Would you like me to review your 3D model to see if the wall thickness is optimized for PMMA machining?