1. Pre-CNC Machining: Design and Preparation for Pet Feeder Prototypes
Before initiating Обработка с ЧПУ for the pet feeder prototype, a systematic design and preparation stage is critical to meet functional, безопасность, and pet-friendly requirements. Этот этап следует линейной последовательности, с ключевыми деталями, представленными в таблице ниже.
| Этап проектирования | Ключевые требования | Рекомендуемые материалы |
| Анализ спроса на продукцию | Core functions: Determine feeder type (automatic/manual), target pet (cat/dog), food bin capacity (1-3Л); Additional features: timed dosing (0.5-2g per serving), moisture protection (sealed food bin), water storage compartment (необязательный); Безопасность: No sharp edges (pet mouth protection), нетоксичные материалы; Reserve space for gear transmission system, мотор (DC 6V), панель управления, and power port. | – |
| Структурный дизайн | Split components: Food bin (upper/lower), база, gear box, fixed bracket, control panel shell; Optimize food flow path (no dead corners to avoid clogging); Design sealing grooves (width 2-3mm, depth 1-1.5mm) for moisture protection; Add anti-slip silicone pads (diameter 10mm) on base corners. | – |
| 3D Моделирование & Рисунок | Используйте программное обеспечение CAD (Солидворкс, И nx) to create 3D models (tolerance ±0.1mm for plastic, ±0.05mm for metal); Mark key dimensions: Food bin inner diameter (matches capacity), gear module (0.5-1), motor mounting hole (Φ25mm); Export 2D drawings (DXF) with surface roughness requirements (Ra3.2 for food-contact parts). | – |
| Выбор материала | Prioritize non-toxicity, износостойкость, и механизм, matching mass production standards. | Food Bin/Base: ABS Пластик (нетоксичный, воздействие, thickness 2-3mm) or acrylic (прозрачный, easy to check food level); Gear Box/Fixed Bracket: ABS/PC alloy (Высокая жесткость, износостойкий); Передачи: POM plastic (низкое трение, quiet transmission) or aluminum alloy (тяжелый); Control Panel Shell: ПК Пластик (изоляция, царапина). |
| Material Pretreatment | Cut raw materials into blanks (leave 0.5-1mm machining allowance): ABS/acrylic via laser cutting, aluminum alloy via bandsaw; Anneal aluminum alloy (300-350° C для 1-2 часы) Чтобы уменьшить стресс; Dry ABS/acrylic (80-100° C для 2-3 часы) Удалить влагу (prevents machining bubbles); Clean blanks with alcohol to remove oil. | – |
2. CNC Machining Preparation for Pet Feeder Prototypes
Adequate preparation before formal machining ensures efficiency and precision in Обработка с ЧПУ for pet feeder prototypes. This section covers tool selection, Настройка параметров, and fixture design.
2.1 Выбор материала и инструмента
The choice of materials and tools directly affects machining quality and efficiency. The table below provides detailed recommendations:
| Категория | Specific Options | Сценарии приложения |
| Housing Materials | ABS plate (2-3мм), acrylic plate (2-3мм), ABS/PC alloy plate (1.5-2мм) | ABS for food bins/bases; acrylic for transparent food bins; ABS/PC for gear boxes. |
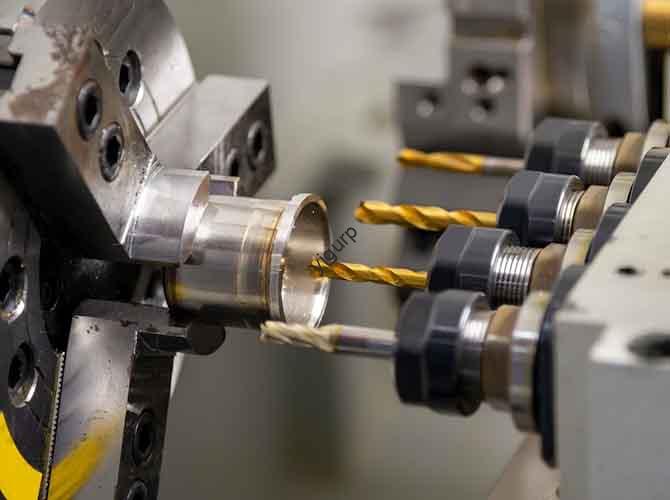
| Transmission Materials | POM rod (diameter 8-12mm), алюминиевый сплав 6061 стержень (diameter 10-15mm) | POM for low-noise gears; aluminum alloy for heavy-duty gears/shafts. |
| Rough Machining Tools | Φ8-10mm flat-bottom cutter (ABS/acrylic), Φ6-8mm flat-bottom cutter (алюминиевый сплав) | Quick material removal for large components (food bin, база). |
| Finishing Tools | Φ3-5mm ball-head cutter (Изогнутые края), Φ1-2mm root-clearing cutter (зубчатые зубы), Φ2-3mm drill bit (монтажные отверстия) | Ensure smooth surfaces (Ra3.2) and precise details (зубчатые зубы, motor holes). |
| Special Tools | M3-M4 taps (резьбовые отверстия), gear milling cutter (module 0.5-1), laser engraver (control panel symbols) | Process assembly threads; machine gear teeth; гравюра “On/Off” или “Dose” символы. |
2.2 Parameter Setting and Fixture Design
Scientific parameter setting and stable fixtures prevent machining errors.
| Link | Ключевые операции | Цель & Эффект |
| Параметры резки | – ABS/Acrylic: Высокоскоростной (10,000-20,000 Rpm), feed rate 100-300mm/min, cutting depth 0.2-0.5mm (избегает растрескивания);- Алюминиевый сплав: Medium speed (5,000-10,000 Rpm), feed rate 50-200mm/min, cutting depth 0.1-0.2mm (предотвращает износ инструмента);- Пома: Высокоскоростной (12,000-15,000 Rpm), feed rate 200-400mm/min, cutting depth 0.3-0.6mm. | Ensure machining efficiency; avoid material damage or poor surface finish. |
| Fixture Design | – ABS/Acrylic: Use vacuum adsorption platform (even pressure, Нет царапин); for curved food bins, use custom jigs with soft pads.- Алюминиевый сплав/ПОМ: Use precision vise with rubber jaws (prevent surface damage); for small gears, use multi-point clamping fixtures.- Long components (НАПРИМЕР., fixed brackets): Use two-end support fixtures to avoid vibration. | Maintain workpiece stability; ensure dimensional accuracy (±0.05mm for key parts). |
3. Core CNC Machining Process for Pet Feeder Prototypes
The formal CNC machining process transforms design models into physical parts, with strict control over each step to ensure functionality and safety.
3.1 Main Component Machining
Different components require targeted machining steps, as detailed below:
| Компонент | Roughing Steps | Finishing Steps |
| Food Bin (ABS/Acrylic) | 1. Mill outer contour (matches design size, retain 0.5mm allowance);2. Mill inner cavity (depth 150-250mm for 1-3L capacity);3. Drill food outlet (Φ10-15mm) and motor mounting hole (Φ25mm). | 1. Smooth inner cavity walls (Ra3.2, prevent food clogging);2. Chamfer all edges (R1mm, pet-safe);3. Machine sealing grooves (width 2mm, depth 1mm) at bin bottom. |
| Gear Box (ABS/PC Alloy) | 1. Mill box shape (retain 0.5mm allowance);2. Mill gear cavity (size matches gear module);3. Cut motor shaft hole (Φ8-10mm). | 1. Smooth cavity walls (Ra3.2, reduce gear friction);2. Tap M3 threaded holes (for cover fixation);3. Deburr shaft hole (prevent gear jamming). |
| Gear (POM/Aluminum Alloy) | 1. Turn rod into cylindrical blank (diameter matches gear outer diameter, retain 0.3mm allowance);2. Rough mill gear teeth (module 0.5-1, leave 0.1mm allowance). | 1. Finish mill gear teeth (tooth profile accuracy ±0.02mm);2. Polish gear surface (Ra0.8, quiet transmission);3. Machine keyway (width 2mm) for shaft connection. |
| Control Panel Shell (ПК) | 1. Mill outer shape (retain 0.5mm allowance);2. Mill button holes (Φ5mm) and display cutout (20×10mm);3. Drill power port cutout (DC 6V size). | 1. Smooth inner walls (Ra3.2, easy to install PCB);2. Chamfer button holes (C0.5mm);3. Laser engrave function symbols (НАПРИМЕР., “Timer”). |
3.2 Key Detail Machining
Critical details directly affect the prototype’s functionality and pet safety:
- Gear Tooth Machining: Use gear milling cutter with spiral interpolation to ensure tooth pitch accuracy (± 0,02 мм); Test meshing with mating gear (no jamming, transmission noise ≤40dB).
- Food Outlet Machining: Taper the outlet (15° угол) to avoid food accumulation; Ensure inner wall smoothness (Ra3.2) to prevent clogging with dry/wet food.
- Sealing Groove Machining: Control groove width (2мм) and depth (1мм) with tolerance ±0.05mm; Ensure groove uniformity (no depth deviation >0.03mm) to fit silicone gaskets (moisture protection, IPX4 standard).
- Edge Chamfering: All pet-contact parts (food bin edges, base corners) must be chamfered (R1mm) or rounded (R2mm) to avoid scratching pets’ mouths or paws.
3.3 Machining Quality Inspection
Conduct in-process checks to ensure quality:
- Проверка размерных: Use digital calipers (outer dimensions, tolerance ±0.1mm for plastic, ±0.05mm for metal) and coordinate measuring machine (ШМ) (зубчатые зубы, sealing grooves, допуск ±0,03 мм).
- Surface Quality Check: Use surface roughness meter (Ra3.2 for food-contact parts, Ra6.3 for non-contact parts); Проверьте царапины (no visible scratches >0.3mm on acrylic) and burrs (нет острых краев).
- Тест безопасности: Verify material non-toxicity (pass RoHS, FDA food-grade certifications); Check gear transmission (no sharp edges on teeth).
4. Post-Processing and Assembly of Pet Feeder Prototypes
Post-processing enhances safety and aesthetics, while precise assembly ensures functionality.
4.1 Поверхностная обработка
Different materials require targeted treatment to meet safety and design goals:
| Материал | Метод обработки поверхности | Цель & Эффект |
| ABS/Acrylic (Food Bin) | Полировка + Anti-Scratch Coating | Polishing improves smoothness (prevents food sticking); anti-scratch coating (5-10мкм) resists daily wear (no scratches after 500 steel wool tests). |
| POM/Aluminum Alloy (Передачи) | Нефтяное покрытие (Food-Grade Lubricant) | Уменьшает трение (продлевает срок службы передач 30%) and transmission noise (≤40dB). |
| ПК (Control Panel Shell) | Silk Screen + UV Curing | Silk screen prints function symbols (clear visibility); UV curing enhances wear resistance (no fading after 10,000 прикосновения). |
| Алюминиевый сплав (Fixed Bracket) | Anodization (Black/Silver) | Улучшает коррозионную стойкость (salt spray test ≥48 hours); enhances texture. |
4.2 Assembly and Functional Testing
Scientific assembly and strict testing ensure the prototype meets pet safety and functional requirements.
4.2.1 Процесс сборки
Follow this sequence to avoid errors:
- Проверка перед сборкой: Inspect all parts for defects (Нет царапин, dimensional deviation ≤0.1mm); Prepare auxiliary materials (silicone gaskets, non-toxic glue, lithium-based grease, винты).
- Установка компонентов:
- Gear Transmission Assembly: Apply lubricant to gears; Install gears into gear box (ensure meshing clearance 0.05-0.1mm); Connect motor to gear shaft (use keyway for fixation).
- Food Bin Assembly: Place silicone gasket in sealing groove; Fix upper/lower food bin with M3 screws (torque 0.8-1N·m); Install food outlet cover (snap-fit).
- База & Control Panel Assembly: Mount gear box and fixed bracket on base (M4 screws, torque 1.2-1.5N·m); Install PCB in control panel shell; Connect motor, отображать, and power port to PCB.
- Final Check: Ensure no loose parts; Verify gear rotation (гладкий, no jamming); Check food bin sealing (нет утечки воздуха).
4.2.2 Функциональное тестирование
Conduct comprehensive tests to validate performance:
- Safety Tests:
- Non-Toxicity Test: Soak food-contact parts in water for 48 часы (heavy metal content ≤0.01mg/L);
- Impact Test: Drop base from 0.5m (foam pad, no structural damage, no sharp edges exposed);
- Moisture Protection Test: Place feeder in 90% humidity environment for 24 часы (no moisture in food bin).
- Функциональные тесты:
- Timed Dosing Test: Set 0.5-2g servings (accuracy ±0.1g); Run 100 цикл (no clogging);
- Gear Transmission Test: Run motor for 2 часы (нет перегрева, transmission noise ≤40dB);
- Power Test: Use DC 6V battery (continuous use time ≥72 hours for automatic mode).
- Pet Experience Tests:
- Food Flow Test: Use dry (3-5mm pellets) and wet food (paste-like) (no clogging);
- Accessibility Test: Simulate pet eating (no difficulty reaching food outlet, height ≤40mm).
5. Application Scenarios of CNC Machined Pet Feeder Prototypes
CNC machined pet feeder prototypes serve multiple purposes in product development and market promotion:
| Сценарий применения | Specific Uses | Advantage of CNC Machining |
| Product Design Verification | Test dosing accuracy, gear transmission, and moisture protection; Optimize structure (НАПРИМЕР., adjust food outlet size for different food types). | Высокая точность (± 0,05 мм) ensures accurate simulation of mass production models; supports rapid iteration (modify 3D models, re-machine in 2-3 дни). |
| Market Research | Display at pet product exhibitions; Collect user feedback on appearance (transparent/non-transparent) и функциональность (timed dosing ease); Adjust mass production plans. | Prototype appearance/functionality match final products; attracts pet owners (pet-safe, high-quality design). |
| Small-Batch Customization | Pet shops (custom logos), high-end pet hotels (large-capacity bins); Produce ≤50 units without opening molds. | Гибкий (adapt to custom sizes/colors quickly); рентабельный (no mold fees, lower than injection molding for small batches). |
| Educational Training | Disassemble to demonstrate gear transmission principles, Процессы обработки с ЧПУ; Suitable for industrial design/pet product development teaching. | Clear internal structure (easy to observe components); безопасный (meets pet safety standards). |
6. Key Precautions for CNC Machining Pet Feeder Prototypes
Чтобы обеспечить качество, безопасность, и эффективность, observe these precautions:
- Safety Priority: All materials must be non-toxic (продовольственный); Avoid sharp edges (chamfer pet-contact parts to R1mm); Gears must have smooth teeth (no burrs to prevent pet injury).
- Точный контроль: Gear tooth tolerance ±0.02mm (ensures smooth transmission); Sealing groove tolerance ±0.05mm (moisture protection); Food outlet size accuracy ±0.1mm (prevents clogging).
- Оптимизация затрат: CNC machining is ideal for ≤100 units; Для массового производства (>1000 units), switch to injection molding (ABS/PC parts) to reduce cost by 50-60%. Simplify complex curves (НАПРИМЕР., replace irregular food bin shapes with cylinders) to shorten toolpaths.
- Защита окружающей среды: Use non-toxic, biodegradable coolants; Recycle metal/plastic scraps (НАПРИМЕР., алюминиевый сплав, АБС).
Точка зрения Yigu Technology
В Yigu Technology, Мы верим CNC machining is the core to developing safe and functional pet feeder prototypes. It enables precise control of critical structures—from gear teeth (Точность ±0,02 мм) to pet-safe chamfers (R1mm)—and supports rapid iteration, which is vital for balancing functionality (timed dosing, quiet transmission) and pet safety (non-toxicity, нет острых краев). When producing these prototypes, we focus on two core aspects: material-function matching (POM for low-noise gears, food-grade ABS for bins) и оптимизация процесса (spiral interpolation for gear teeth, vacuum adsorption for acrylic). By integrating strict quality control from design to testing, we help clients shorten development cycles by 20-25% and mitigate mass production risks. Заглядывая в будущее, we will apply AI-driven parameter optimization to CNC machining, further improving efficiency while maintaining ±0.03mm precision for more reliable pet feeder prototypes.
Часто задаваемые вопросы
- What materials are best for CNC machined pet feeder prototype components, и почему?
The best materials depend on components: ABS/PC alloy for gear boxes (Высокая жесткость, износостойкий); POM plastic for gears (низкое трение, quiet); food-grade ABS/acrylic for food bins (нетоксичный, Легко чистить); aluminum alloy for fixed brackets (коррозионная устойчивость). These materials balance machinability, функциональность, and pet safety.