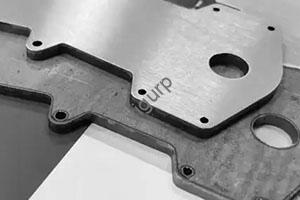
Если вы дизайнер CAD, работающий надОбработка с ЧПУ части, Небольшие ошибки дизайна могут привести к большим проблемам: Сломанные инструменты, Потраченный впустую материал, или детали, которые не подходят. Хорошие новости? Большинство ошибок легко избежать, когда вы узнаете, что искать. Это руководство разрушает 6 Наиболее распространенные процессоры с ЧПУ, с реальными примерами, данные, и пошаговые исправления, чтобы сэкономить время, деньги, и разочарование.
1. Ошибка 1: Проектирование слишком тонких стен
Тонкие стены могут показаться способом спасения материала, но они являются катастрофой для обработки с ЧПУ. Тонкие срезы вибрируют во время резки, разорвать легко, или потерять точность.
Почему это проблема:
Материалы с низким уровнем укорачивания (как алюминий) особенно рискованные. Например, а 0.5 Алюминиевая стена мм будет скручиваться или трещиться, когда инструмент измельчения применяет давление. Даже немного более толстые стены (0.6–0,7 мм) может деформироваться, Поскольку вибрация инструмента изгибает материал.
Ключевые руководящие принципы толщины стенки:
| Материал | Минимальная рекомендуемая толщина | Неофициальный отраслевой стандарт | Риск неудачи (Если слишком тонкий) |
|---|---|---|---|
| Алюминий (6061) | 0.8 мм | 0.794 мм | 70% (скручивание или растрескивание) |
| Сталь (1018) | 1.0 мм | 0.794 мм | 50% (деформация) |
| Пластик (АБС) | 1.2 мм | 0.794 мм | 80% (таяние или разрыв) |
Реальный пример:
Дизайнер создал 0.6 Алюминиевая крошка толщиной для беспилотника. Во время фрезерования, 9 из 10 Кроншеты сломались, потому что вибрация инструмента согнула тонкие стены. Когда они увеличивают толщину до 0.9 мм, Уровень успеха подскочил до 98% - и кронштейн все еще весил меньше, чем 5 граммы (Нет лишних материалов).
Как это исправить:
- Follow the ЧАС:Т (Высота до толщины) соотношение: Держите высоту стены не более 5 раз его толщины (НАПРИМЕР., а 1 стенка толщиной мм должна быть ≤5 мм в высоту).
- Если требуются тонкие стены (НАПРИМЕР., для легкой части), switch to Производство листового металла instead of CNC machining—it’s cheaper and avoids vibration issues.
2. Ошибка 2: Проектирование функций, которые нельзя обработать
Программное обеспечение CAD позволяет рисовать практически любую форму, но машины ЧПУ имеют физические ограничения. Самая распространенная ошибка? ПроектированиеИзогнутые отверстия (отверстия, которые сгибаются или поворачиваются через часть).
Почему это проблема:
Инструменты с ЧПУ движутся по прямым линиям (вдоль оси x/y/z) или фиксированные ротации (A/B/C.). Они не могут следовать изогнутому пути для отверстий - пытаться сделать это либо сломать инструмент, либо оставить неравномерность, Неправильная дыра.
Реальный пример:
Конструктор медицинского устройства добавил изогнутое отверстие в корпус датчика из нержавеющей стали (направить провода). Мельница с ЧПУ не могла разрезать кривую, Итак, команде пришлось отказаться 20 прототипы. В итоге они перепроектировали отверстие в виде двух прямых отверстий, соединенных небольшим каналом - в трудную с ЧПУ к машине.
Как это исправить:
- Избегайте изогнутых отверстий полностью для деталей ЧПУ. Используйте прямые отверстия, или разделите путь на несколько прямых секций.
- If you должен have a curved feature (НАПРИМЕР., Для пользовательской трубы), использовать Электрическая обработка (Эдм) вместо. EDM использует электрические искры для вырезания сложных форм - не требуется прямых путей инструмента.
3. Ошибка 3: Чрезмерное использование допусков
Допуски (допустимые изменения в размере частично) важны для спаривающихся частей (НАПРИМЕР., крышка, которая подходит для коробки). Но добавление плотных допусков к каждой поверхности тратит время и деньги.
Почему это проблема:
- Плотные допуски (НАПРИМЕР., ± 0,001 мм) Требовать более медленные скорости резки, Специальные инструменты, и дополнительные проверки качества - все из которых увеличивают стоимость.
- Большинство машин с ЧПУ не могут даже достичь чрезвычайно жестких допусков. Например, Основная 3-осевая мельница имеет максимальную точность ± 0,01 мм-любая толерантность плотнее, чем невозможно..
Руководящие принципы по допускому типу машины:
| Тип машины с ЧПУ | Типичная точность (Терпимость) | Лучше всего для |
|---|---|---|
| Основная 3-осевая мельница | ± 0,01 мм | Прототипы, не совместные детали |
| Усовершенствованный 5-осевой мельницу | ± 0,005 мм | Аэрокосмические части, плотно прилегающие компоненты |
| Токарный станок с ЧПУ | ± 0,008 мм | Цилиндрические части (болты, валы) |
Как это исправить:
- Only add tight tolerances to спаривающиеся поверхности (НАПРИМЕР., отверстие, где подходит болт). Оставить некритические поверхности (НАПРИМЕР., внешний край кронштейна) с свободными или без допусков.
- Не назначайте численные измерения (как радиус или диаметр) на поверхности, которые не нуждаются в точности. Например, Декоративная выемка не нуждается в терпимости - просто общий размер.
4. Ошибка 4: Проектирование ненужных эстетических особенностей
Заманчиво добавить сложные формы (НАПРИМЕР., 3D Логос, Изогнутые края) Чтобы детали выглядели красиво, но эти функции часто требуют дополнительного времени обработки и удаления материалов.
Почему это проблема:
- Эстетические функции, такие как глубокие гравюры или индивидуальные кривые, нужна 5-осевая обработка (дороже, чем 3-осевая) или несколько изменений инструмента.
- Удаление дополнительного материала для внешнего вида увеличивает лом, например, а 1 кг алюминиевый блок может стать 0.5 кг часть с ненужными сокращениями, тратить 10–20 долларов за часть.
Реальный пример:
Бренд потребительской электроники добавил 3D -выгравированный логотип в заднюю часть алюминиевого телефона.. Требуется логотип 2 дополнительные изменения инструмента и 15 Протокол времени обработки на корпус. Когда они перешли наэлектрополирование (шаг после обработки, который сглаживает поверхность) и простой печатный логотип, Они сокращают время производства 25% и спас $5 в случае.
Как это исправить:
- Просить: «Это функция необходима для функции?” Если не, Пропустите это.
- Используйте пост-обработку для эстетики: Электрополирование (сглаживает поверхности), Анодирование (добавляет цвет), или лазерная гравюра (быстрый, дешевые логотипы) лучше, чем обработка комплексных форм.
5. Ошибка 5: Проектирование слишком глубоких полостей
Полости (Выпущенные разделы) полезны для легких деталей, но инструменты с ЧПУ имеют ограниченную длину резки. Слишком глубокие полости вызывают сбой инструмента или низкое качество.
Почему это проблема:
- Инструменты измельчения работают лучше всего, когда полости в 2–3 раза диаметр инструмента. Например, а 15 ММ инструмент может безопасно разрезать полости до 35 мм глубоко (2.3x его диаметр).
- Более глубокие полости приводят к:
- Отклонение инструмента: Инструмент изгибается под давлением, оставляя неровные стены.
- Настройка чипа: Мусор застрял в полости, царапая часть.
- Поломка инструмента: Инструмент выступает слишком далеко от его держателя и защелк.
Реальный пример:
Дизайнер создал 50 мм глубокая полость в пластиковой части с использованием 15 ММ инструмент (3.3x диаметр инструмента). Инструмент отклонил, Создание стен полости 2 мм толще с одной стороны - разорение детали бесполезно. Они исправили это, уменьшив глубину полости до 35 мм и добавление небольшого выступа (Без потерь в функциональности).
Как это исправить:
- Follow the Правило диаметра инструмента: Сохранить глубину полости ≤3x диаметр инструмента.
- Для более глубоких полостей:
- Используйте более длинный держатель инструмента (Чтобы достичь дна, не изгибаясь).
- Вырезать небольшими приращениями (1–2 мм за раз) Чтобы уменьшить напряжение инструмента.
- Используйте охлаждающую жидкость высокого давления, чтобы промыть чипсы.
6. Ошибка 6: Проектирование отсутствия радиуса для внутренних углов
Инструменты фрезерного с ЧПУ являются цилиндрическими - они не могут сократить острые внутренние углы. Проектирование острых краев заставляет машину использовать меньшие инструменты (помедленнее, дороже) или листья неровных углов.
Почему это проблема:
- Острый внутренний угол требует инструмента с крошечным диаметром (НАПРИМЕР., 1 мм) поместиться в угол. Небольшие инструменты режутся медленно и легко ломаются.
- Даже если вы разработаете острый угол, ЧПУ автоматически оставит небольшой радиус (равна радиусу инструмента)- Так что ваша часть не будет соответствовать дизайну САПР.
Руководящие принципы внутреннего углового радиуса:
| Глубина полости | Минимальный рекомендуемый радиус углового | Необходим размер инструмента |
|---|---|---|
| 10 мм | 3 мм (1/3 глубины) | 6 ММ инструмент |
| 20 мм | 7 мм (1/3 глубины) | 14 ММ инструмент |
| 30 мм | 10 мм (1/3 глубины) | 20 ММ инструмент |
Как это исправить:
- Добавить Угловой радиус to all internal corners in your CAD design. Сделайте радиус немного больше, чем радиус инструмента (НАПРИМЕР., а 6 Инструмент MM нужен 3.5 ММ КУНТЕРС РАДИУС).
- Если вам нужен острый край (НАПРИМЕР., для части, которая вписывается в прямоугольный слот), design an подрез (Небольшой выемка) вместо. Подкраски позволяют инструменту добраться до угла, не оставляя радиуса.
7. Перспектива Yigu Technology на ошибки дизайна с ЧПУ
В Yigu Technology, Мы видели, как каждая из этих ошибок откладывает проекты или тратит деньги. Самый большой вынос? Проектирование для производства сначала. Перед завершением модели САПР, просить: Может ли машина с ЧПУ фактически обрезать это? Это необходимо эта терпимость? Небольшие изменения - например, добавление радиуса углового или упрощение изогнутого отверстия - проведите время и избегайте переделки. Мы часто работаем с дизайнерами на раннем этапе, чтобы рассмотреть планы, Поймать проблемы, прежде чем они станут дорогостоящими проблемами. Выравнивая дизайн с возможностями с ЧПУ, Вы получите детали, которые работают правильно в первый раз.
8. Часто задаваемые вопросы: Общие вопросы дизайна ЧПУ
1 квартал: Какая самая тонкая стена я могу безопасно спроектировать для алюминиевых деталей с ЧПУ?
Придерживаться как минимум 0.8 мм для алюминия (6061). Толковые стены (0.6 мм или меньше) будет вибрировать и сломать во время обработки. Если вам нужно что -то более тонкое, вместо этого используйте листовой металл.
2 квартал: Могу ли я использовать EDM для всех невозможных функций?
EDM работает для сложных форм, таких как изогнутые отверстия или острые внутренние углы, Но это медленнее и дороже, чем с ЧПУ. Используйте EDM только тогда, когда ЧПУ невозможно - для большинства частей, Упрощение дизайна (НАПРИМЕР., Прямые отверстия) лучше.
Q3: Нужно ли добавить допуски на каждую поверхность моей части ЧПУ?
Нет! Добавьте только жесткие допуски к спаривающимся поверхностям (НАПРИМЕР., отверстия для болтов). Некритические поверхности (НАПРИМЕР., вершина кронштейна) могут иметь свободные допуски или вообще не допуски - это время обработки и стоимость.