Na fabricação de produtos de hardware, ser rápido não é útil apenas para competir; é absolutamente necessário. A necessidade de passar de um projeto de computador para um projeto real, parte testável é enorme. Para engenheiros e designers de produtos que trabalham com peças metálicas, esta necessidade cria uma grande desaceleração. Quick sheet metal prototyping is the best solution to this problem, making it possible to create high-quality metal parts in days, não meses. This guide gives you a complete overview of the process, covering the main methods, important things to think about like speed and cost, helpful design tips for easy manufacturing, and a review of the best companies in the market. We will give you the knowledge to speed up your design testing and bring your product to market faster.
What This Process Means
Então, what is rapid prototype sheet metal? No seu coração, it is the group of manufacturing processes used to turn a 3D computer model into a real metal part with the fastest speed and smallest starting cost. Unlike traditional mass-production methods that rely on expensive and time-consuming hard tools like stamping dies, quick prototyping uses tool-free or soft-tooling making techniques. This approach is built specifically for testing a design’s shape, ajustar, and function.
This method is essential for modern product development cycles. It allows engineering teams to hold a real part, test how it goes together, check its strength, and make important design changes before spending the six-figure costs and multi-month wait times of production tooling. The main benefits are clear and powerful.
- Velocidade: The most important benefit is the turnaround time. A design finished on Monday can often become a real part in your hands by Friday, a pace that is impossible with traditional methods.
- Custo-benefício: For small quantities, typically ranging from a single piece to several hundred, rapid prototyping is far more affordable. It removes the very high upfront cost of dies and molds.
- Design Changes: This process helps an agile development workflow. You can quickly make multiple versions of a part, test each one, and improve the design based on real-world feedback, leading to a stronger final product.
- Real Material: Prototyping with 3D printed plastic is useful for early shape checks, but it cannot copy the strength, peso, and heat properties of metal. Rapid prototype sheet metal allows you to test your part in the actual production material, whether it is aluminum, aço, or copper.
Common Making Techniques
Turning a flat sheet of metal into a complex three-dimensional part involves a series of precise manufacturing steps. Understanding these main techniques helps you design more effectively and communicate clearly with making partners. The process generally follows a path of cutting, formando, e acabamento.
Corte: The First Step
The journey begins by cutting a 2D flat pattern from a stock sheet of metal. This pattern is digitally unfolded from your 3D computer model. The two main cutting methods in quick prototyping are laser cutting and waterjet cutting.
- Corte a laser: This is the workhorse of modern sheet metal making. A high-powered, focused laser beam melts, vaporizes, or burns through the material, leaving an extremely clean and precise edge. A jet of gas, like nitrogen or oxygen, clears the melted material away. Laser cutting is extremely fast and accurate, making it ideal for a wide range of materials, including stainless steel, alumínio, and carbon steel, in thin to medium thicknesses.
- Corte por jato de água: This technique uses a highly pressurized stream of water (often mixed with a granular abrasive like garnet) to wear away the material. A key advantage of waterjet cutting is that it is a cold-cutting process. It creates no heat, meaning there is no heat-affected zone that could change the material’s properties. This makes it perfect for cutting thick materials (several inches thick), heat-sensitive alloys, plásticos, compósitos, and materials that produce harmful fumes when lasered.
Formando: Creating 3D Shape
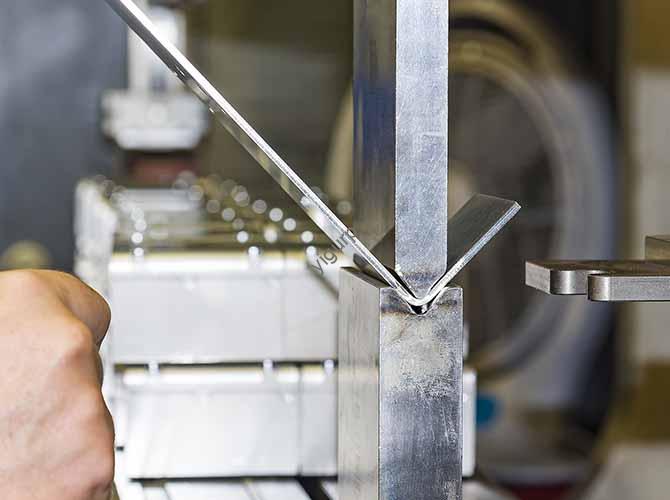
Once the flat pattern is cut, it must be bent into its final 3D shape. This is almost always done using a CNC press brake.
- CNC Bending (Press Brake): A press brake is a machine that forms bends by clamping the sheet metal between a matching punch and die. Um CNC (Controle Numérico Computadorizado) system precisely controls the position of the backgauge (which positions the part) and the depth of the punch’s stroke, allowing for highly repeatable bends at exact angles. Key factors in the design process include the bend radius, which must be appropriate for the material thickness to prevent cracking, and the K-factor, a variable that helps calculate the correct flat pattern dimensions.
Assembly and Finishing
For multi-part assemblies or parts requiring specific surface properties, additional steps are necessary.
- Hardware Insertion: Many designs require threaded features for assembly. Instead of tapping thin metal, which provides minimal thread engagement, manufacturers use specialized machines to press self-clinching fasteners (like PEM nuts, studs, and standoffs) into the part.
- Soldagem: When an assembly cannot be formed from a single piece of metal, individual components are joined together. TIG (Tungsten Inert Gas) welding is often preferred for prototypes due to its precision and clean appearance, while MIG (Metal Inert Gas) welding is faster and also commonly used.
- Acabamento: Finishing processes provide both cosmetic appeal and functional protection. Common options include powder coating for a durable, colored finish; anodizing for corrosion resistance and color on aluminum parts; and plating with materials like zinc or nickel for corrosion protection and conductivity.
| Technique | Melhor para | Velocidade | Precisão | Espessura do material |
| Corte a laser | General purpose, desenhos intrincados | Muito rápido | Alto | Thin to Medium |
| Corte por jato de água | Thick materials, heat-sensitive alloys | Mais devagar | Alto | Very Thick |
| Perfuração CNC | Standard shapes, venezianas, forms | Rápido (for specific designs) | Bom | Thin to Medium |
Understanding Wait Times
When a service is described as “quick,” it is essential to have a clear and realistic understanding of what that means in practice. The speed of delivery is influenced by a combination of design complexity, finishing requirements, and the provider’s own operational capacity.
How Fast is “Rápido”?
For most standard rapid sheet metal prototyping services, typical wait times range from 3 para 7 business days from the moment you place an order to the moment the parts ship. Many providers also offer expedited options for an additional fee, sometimes delivering parts in as little as 24-48 horas. No entanto, several factors can extend this timeline.
- Part Complexity: A simple flat plate with a few holes will be produced much faster than a complex chassis with dozens of bends and features. Each bend requires a separate setup on the press brake, adding to the total production time.
- Quantity: While quick prototyping is ideal for low volumes, there is a difference between producing a single part and a batch of 50. Larger quantities require more machine time and handling, which will be reflected in the wait time.
- Acabamento: Post-processing is often the most time-consuming part of the process. Operations like powder coating, anodização, or plating are typically batched and can add 2 para 4 business days to the total wait time as they require curing or processing time.
- Provider Capacity: The wait time quoted by a provider is directly tied to their current workload. During peak periods, standard wait times may be longer. This is a key reason why getting quotes from multiple providers can be beneficial.
A Look at Tolerances
Precision is just as critical as speed. For rapid prototype sheet metal, it is important to understand standard industry tolerances and to design accordingly. While extremely tight tolerances are achievable, they come at a cost.
Typical industry standard tolerances for features cut with a laser are around ±0.005 inches (0.13milímetros). For bends formed on a CNC press brake, a standard angular tolerance is typically ±1 degree. These tolerances are sufficient for the vast majority of form, ajustar, and function prototypes.
It is crucial to avoid over-tolerancing your parts. If a feature does not require a tighter tolerance for functional reasons, do not specify one. Requesting tighter tolerances than the industry standard often requires special handling, additional quality control steps, and potentially different machinery, all of which increase cost and extend wait times. A good practice is to only call out critical-to-function dimensions on your 2D drawing, leaving all other features to the provider’s standard tolerance capabilities.
Design Tips for Speed and Cost
As makers who have processed thousands of prototype orders, we have identified a clear set of design principles that directly impact manufacturability. Designs that follow these guidelines are not only easier and faster to produce but also significantly more cost-effective. In our experience, designs that follow these principles see an average quote reduction of 15% and are often delivered a day faster.
1. Standardize Bend Radii
Each unique bend radius in a part may require a different tool to be loaded into the press brake. Tool changes take time and add cost. By designing all your bends with a single, consistent inside radius (por exemplo, 0.030″ or 1.0mm is a common standard), you allow the entire part to be formed in a single machine setup.
2. Respect Material Thickness
Metal cracks if bent too sharply. A fundamental rule is to design all bends with an inside radius that is at least equal to the material thickness. Por exemplo, if you are using 0.060″ (1.5milímetros) alumínio, your minimum inside bend radius should be 0.060″. For harder materials or less bendable alloys, this minimum may need to be even larger. Failing to respect this rule is one of the most common reasons for a design being rejected or requiring costly revision.
3. Keep Holes Away from Bends
When metal is bent, the material around the bend line deforms. If a hole is placed too close to a bend, it will be stretched and distorted into an oval shape. A safe rule of thumb is to maintain a distance between the edge of any hole and the start of the bend that is at least four times the material thickness.
4. Use Standard Hole Sizes
While lasers can cut holes of any size, designing with standard hardware and drill bit sizes can sometimes reduce costs, especially if a provider uses punching as a secondary operation. More importantly, using off-the-shelf fasteners is always cheaper than specifying custom ones.
5. Minimize Complex Geometries
Avoid designing features that are extremely small or difficult to access. Tiny tabs can be fragile and hard to handle, and bends that create deep, narrow channels may be impossible to form because the press brake tooling cannot fit inside. Simplify your design wherever possible without compromising its function.
6. Provide Clear Documentation
Always supplement your 3D computer model (in a universal format like .step) with a clear 2D manufacturing drawing (in .pdf format). The 3D model defines the geometry, but the 2D drawing is where you communicate critical information that the model cannot, such as material type, grossura, finish requirements, hardware specifications, and any critical-to-function dimensions that require a specific tolerance. This dual-documentation approach eliminates confusion and prevents costly errors.
Cost Analysis: Prototyping vs. Tradicional
Understanding the cost structure of different manufacturing methods is crucial for effective project budgeting and strategic planning. Quick prototyping and traditional mass-production methods, like stamping, have fundamentally different economic models. The key is to understand the break-even point where one becomes more economical than the other.
- Quick Prototyping Cost Structure: The cost is primarily driven by machine time and material usage. There is little to no upfront setup cost (NRE – Non-Recurring Engineering). This results in a relatively high but stable cost-per-part, regardless of whether you order one part or one hundred parts.
- Traditional Stamping Cost Structure: This method is defined by its massive upfront investment in hard tooling. Creating a set of custom steel dies to stamp a part can cost anywhere from $10,000 acabar $100,000. Once this tooling is made, no entanto, the cost to produce each individual part is extremely low—often just pennies.
This dynamic is best visualized with a cost-per-part versus quantity graph. The line for quick prototyping would be a nearly flat, horizontal line at a moderate cost. The line for traditional stamping would start at an astronomically high cost-per-part for a single unit (the entire tooling cost) and then drop steeply as the quantity increases, eventually crossing below the quick prototyping line.
This crossover point is the break-even volume. For most sheet metal parts, this point occurs somewhere between 1,000 e 5,000 unidades. Below this quantity, quick prototyping is the clear financial winner. Above it, the per-part savings from stamping begin to justify the initial tooling investment.
| Quantity | Prototipagem Rápida (Por peça) | Traditional Stamping (Por peça) |
| 1 | $150 | $20,001 |
| 100 | $145 | $201 |
| 1,000 | $140 | $21 |
| 10,000 | $135 | $3 |
*Observação: Costs are illustrative examples to demonstrate the principle.*
Choosing the Right Provider
The market for quick manufacturing is strong, with several excellent providers offering online quoting and fast turnaround times. Selecting the right partner depends on your specific project needs, orçamento, and priorities. We recommend evaluating potential providers against a consistent set of criteria before making a decision.
Key Selection Criteria
- Quoting Engine: How fast and easy is their online platform? A good provider offers an instant, automated quoting tool that accepts your computer files and provides immediate feedback on price and manufacturability.
- Speed and Wait Time: Check their advertised standard and expedited wait times. Do they align with your project timeline?
- Capabilities and Materials: Does the provider offer the specific materials, espessuras, and secondary finishing processes (like anodizing or powder coating) that your design requires?
- Quality and Tolerance: Do their standard tolerances meet your functional requirements? Look for transparency about their quality control processes.
- Suporte ao Cliente: Is expert engineering support readily available? Para peças complexas, having access to a knowledgeable engineer who can help you optimize your design for manufacturing is invaluable.
Top Prototyping Providers
Here is a review of some of the leading providers in the rapid prototype sheet metal space, highlighting their unique strengths to help you choose the best fit.
| Provider | Key Strength | Ideal User | Instant Quote? | Link |
| Protolabs | Industry-leading speed, automated DFM | Teams needing parts ASAP, willing to pay a premium for speed. | Sim | [https://www.protolabs.com/](https://www.protolabs.com/) |
| Xometry | Massive partner network, wide range of capabilities | Users needing a one-stop-shop for various manufacturing processes. | Sim | [https://www.xometry.com/](https://www.xometry.com/) |
| SendCutSend | Very accessible, great for simpler parts, preços competitivos | Amadores, startups, and designers focused on speed and cost for less complex parts. | Sim | [https://sendcutsend.com/](https://sendcutsend.com/) |
| Fictiv | Managed quality, highly vetted partner network | Teams that require stringent quality control and a more managed experience. | Sim | [https://www.fictiv.com/](https://www.fictiv.com/) |
Protolabs is renowned for its speed. Their highly automated system and interactive Design for Manufacturability (DFM) feedback are best-in-class for quick-turn projects where every hour counts.
Xometry operates on a distributed manufacturing model, connecting customers to a vast network of vetted machine shops. This gives them an enormous range of capabilities and materials, making them an excellent choice if your project involves sheet metal alongside CNC machining, 3Impressão D, and other processes.
SendCutSend has carved out a niche by focusing on accessibility and competitive pricing, particularly for 2D laser-cut parts and simpler bent components. Their straightforward online tool and fast standard wait times make them a favorite among individual makers, artists, and early-stage startups. We found their quoting tool to be one of the easiest to use for quick budget estimates.
Fictiv offers a more managed manufacturing experience. They utilize a curated network of high-quality partners and provide robust quality assurance, making them a strong choice for teams in regulated industries or those with complex parts that require a higher level of project management and quality control. In our experience, Fictiv’s engineering support is particularly helpful for navigating complex designs.
Conclusion
Rapid prototype sheet metal has fundamentally changed the landscape of hardware development. It provides a direct, high-speed path from a digital concept to a tangible, testable metal part, collapsing timelines and enabling a more agile and iterative design process. By understanding the core principles of speed, low-volume cost-effectiveness, and the critical importance of design for manufacturability (DFM), you can unlock its full potential.
The power to innovate faster is now more accessible than ever. By leveraging the techniques, design tips, and provider insights discussed in this guide, you can transform your ideas into high-quality metal prototypes with unprecedented efficiency. Agora, review your design with these tips in mind and get an instant quote from one of the providers above to start your next project.