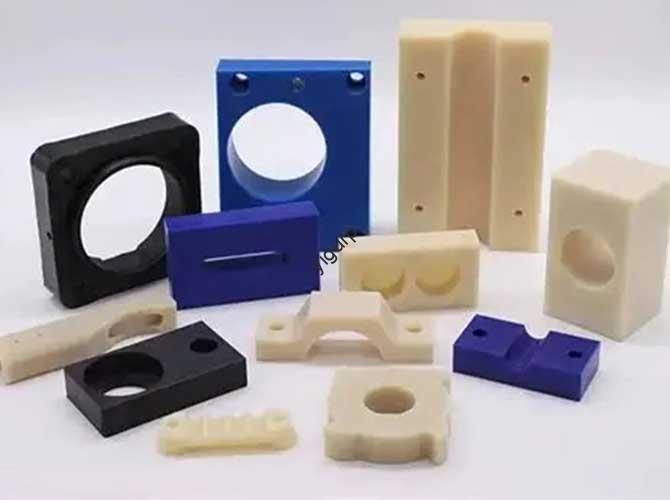
Silicone composite plastic molding parts are specialized components produced by copying plastic parts using silicone molds—a process that balances precision, rapporto costo-efficacia, e flessibilità. A differenza della tradizionale produzione di stampi in metallo, questo metodo sfrutta l’elasticità del silicone per replicare dettagli complessi mantenendo bassi i costi di produzione di piccoli lotti. Questo articolo analizza i principi fondamentali, processo passo dopo passo, vantaggi, limitazioni, and applications of these parts, with clear comparisons and real-world examples to help you determine if they’re suitable for your project.
1. Core Principle of Silicone Composite Plastic Molding
The process relies on silicone’s unique properties to bridge prototype design and plastic part production. Here’s how it works in three key stages:
- Creazione Stampi in Silicone: Primo, UN prototipo (per esempio., 3D-printed resin part, CNC-machined component) is used as a master model. Liquid silicone (mixed with a curing agent) is poured over the prototype and cured—capturing every detail (trame, loghi, geometrie complesse) of the master.
- Plastic Casting: Once the silicone mold is ready, liquid plastic materials (per esempio., polyurethane resin, resina epossidica) are poured into the mold. The mold’s flexibility ensures the plastic fills all corners, even tiny gaps or sharp edges.
- Curare & Sformatura: The plastic cures (a temperatura ambiente o con calore moderato) and hardens. Thanks to silicone’s elasticity, the mold can be easily peeled away from the plastic part—resulting in a replica that matches the original prototype’s structure and details with high accuracy.
Key Advantage of the Principle: Silicone’s ability to “copy and release” eliminates the need for expensive, rigid metal molds. Per esempio, a prototype of a phone case with a raised brand logo will have that logo replicated exactly on every plastic part made from the silicone mold.
2. Step-by-Step Production Process
Creating silicone composite plastic molding parts follows a linear, repeatable workflow—each step critical to ensuring part quality and mold durability.
2.1 Prototype Preparation: The “Master Model” Stage
The prototype defines the final part’s shape and details. Choose a production method based on precision needs and complexity:
| Prototype Production Method | Caratteristiche chiave | Ideale per |
| 3D Stampa (SLA/DLP) | – Alta precisione (±0,05 mm) for intricate details.- Superficie liscia (Ra 0,8–1,6μm) reduces sanding time.- Tempi di consegna rapidi (12–24 hours for small parts). | Parti complesse: electronic device shells (TV remote casings), componenti di gioielleria, and parts with fine textures. |
| Lavorazione CNC | – Altissima precisione (±0,01 mm) for tight tolerances.- Suitable for hard materials (metallo, legna, rigid plastic).- Excellent for parts requiring smooth, superfici piane. | Componenti di alta precisione: staffe automobilistiche, medical device parts, and parts with strict dimensional requirements. |
| Hand Engraving | – Low cost for simple shapes.- Flexible for artistic, one-of-a-kind designs.- No specialized equipment needed. | Simple or decorative parts: custom stationery, small decorative figurines, and low-precision prototypes. |
Per Suggerimento: Regardless of the method, ensure the prototype is clean (no dust, olio, or residue) and smooth—any flaws will be replicated in the silicone mold and final plastic parts.
2.2 Realizzazione di stampi in silicone: The “Negative Template” Stage
This stage transforms the prototype into a reusable mold. Follow these steps for optimal results:
- Mold Frame Setup:
- Choose a frame material (legna, plastica, metallo) large enough to fit the prototype with 5–10mm of space on all sides (for silicone coverage).
- Seal the frame edges with masking tape or acrylic sealant to prevent silicone leakage.
- Silicone Mixing:
- Use a ratio of silicone to curing agent specified by the manufacturer (per esempio., 10:1 for some condensation silicones, 1:1 for additive silicones).
- Mix slowly and thoroughly to avoid air bubbles—uneven mixing causes incomplete curing or weak mold spots.
- Silicone Pouring:
- Pour the silicone slowly over the prototype (tilt the frame to 45° to reduce bubble formation).
- For thick molds (>10mm), utilizzo layered pouring: pour 1/3 of the silicone, wait 30 minutes for bubbles to rise, then add the next layer.
- Opzionale: Utilizzare un vacuum degassing machine (1–2 minutes at -0.1MPa) to remove trapped bubbles—critical for parts with tiny details (per esempio., 0.5mm-wide slots).
- Curare:
- Let the silicone cure at room temperature (20°C–25°C) for 4–24 hours (depends on silicone type and thickness).
- For faster curing, use a low-temperature oven (50°C–60°C) to reduce time by 50% (per esempio., 8 hours → 4 ore).
2.3 Plastic Part Production: The “Replica” Stage
Now use the silicone mold to create the final plastic parts:
- Plastic Material Selection:
Choose based on the part’s end-use (forza, flessibilità, resistenza chimica):
| Plastic Material | Proprietà chiave | Applicazioni ideali |
| Poliuretano (PU) Resina | – Good wear resistance and flexibility.- Fast curing (1–2 hours at 20°C).- Basso costo ($20–40 per kg). | Parti funzionali: TV remote buttons, componenti di giocattoli, and flexible gaskets. |
| Resina epossidica | – High strength and chemical resistance.- Resistente al calore (120°C–180°C after curing).- Low shrinkage (0.5–1%). | Parti strutturali: rivestimento interno automobilistico, electronic device housings, and medical tool handles. |
- Versare & Curare:
- Pour the liquid plastic into the silicone mold—control speed to avoid bubbles (use a small funnel for narrow mold openings).
- Per parti complesse (per esempio., parts with internal cavities), utilizzo sectional pouring: fill one section, wait 10 minuti, then fill the next to ensure full coverage.
- Cure the plastic at room temperature (PU: 1–2 ore; epossidico: 4–6 ore) or use mild heat to speed up curing.
- Sformatura:
- Gently peel the silicone mold away from the plastic part—silicone’s elasticity prevents damage to both the part and mold.
- Trim excess plastic (flash) with a sharp knife for a clean finish.
3. Advantages of Silicone Composite Plastic Molding Parts
This method offers unique benefits for small-batch production and product development:
| Advantage Category | Vantaggi principali | Esempio del mondo reale |
| High-Precision Replication | Cattura piccoli dettagli (0.1mm–0.5mm), including textures, loghi, e geometrie complesse. | A silicone mold replicates the fine “brushed metal” texture on a TV frame prototype—every plastic part has the same texture as the master model. |
| Efficacia in termini di costi | – Silicone mold material costs 50–70% less than metal molds.- No expensive tooling needed for small batches (10–100 parti). | A startup saves \(5,000 by using a silicone mold (costo: \)200) instead of a metal mold (costo: $5,200) produrre 50 test samples of a new smartwatch casing. |
| Inversione di tendenza rapida | From prototype to final parts in 3–7 days (contro. 2–4 weeks for metal molds). | A consumer electronics company needs 20 TV remote prototypes for user testing—silicone composite molding delivers them in 4 giorni, contro. 2 settimane con metodi tradizionali. |
| Flexibility for Customization | Easy to adjust the mold or switch plastic materials for custom parts (per esempio., different colors, durezza). | A jewelry brand changes the color of PU resin in the same silicone mold to produce gold, argento, and black versions of a pendant—no new mold needed. |
4. Limitations to Consider
While highly useful, silicone composite plastic molding parts have constraints that may affect their suitability for some projects:
- Limited Mold Life: Silicone molds last 20–100 cycles (contro. 10,000+ cycles for metal molds). After repeated use, molds wear, deform, or develop tears—especially for parts with sharp edges (per esempio., plastic clips) that scratch the mold.
- Lower Part Performance: Plastic parts made via this method have lower mechanical properties than those from injection molding. Per esempio, epoxy resin parts from silicone molds have 10–15% lower tensile strength than injection-molded epoxy parts—making them unsuitable for high-stress applications (per esempio., car suspension components).
- Low Production Efficiency: Each part requires manual pouring, curare, and demolding—unlike injection molding, which produces 100+ parti all'ora. For batches larger than 100 parti, silicone composite molding becomes slower and more costly than traditional methods.
5. Key Application Fields
Silicone composite plastic molding parts excel in scenarios where small batches, precisione, and speed are prioritized:
5.1 Sviluppo del prodotto & Prototipazione
- Test funzionali: Create test samples for product teams to evaluate fit (per esempio., TV remote buttons fitting into the casing), assemblaggio (per esempio., electronic components fitting into a device shell), e durata.
- Appearance Evaluation: Produce parts with final textures and colors to assess consumer feedback (per esempio., testing different colors of a phone case prototype).
5.2 Produzione a basso volume & Personalizzazione
- Niche Markets: Manufacture custom parts with low demand (per esempio., personalized stationery, small-batch mechanical components for vintage cars).
- Arte & Artigianato: Create decorative items (per esempio., custom candle holders, sculptural replicas) where detail and uniqueness matter more than mass production.
5.3 Reverse Engineering
- Copy legacy parts for out-of-production equipment (per esempio., old TV knobs, vintage radio casings) by using the original part as a prototype to make a silicone mold.
6. Yigu Technology’s Perspective on Silicone Composite Plastic Molding Parts
Alla tecnologia Yigu, we see silicone composite plastic molding as a “bridge” for product development—ideal for turning prototypes into tangible parts fast, without the cost of metal molds. A common mistake we see is clients overusing this method for large batches (200+ parti)—after 100 cicli, mold wear leads to inconsistent parts, increasing rework costs. Il nostro consiglio: Use it for 1–100 parts (prototipazione, small-batch testing) and switch to injection molding for larger volumes. Per esempio, a client making TV interface panels used silicone molding for 50 test parts, then transitioned to metal molds for 1,000+ production units—this balanced speed, costo, e qualità. We also recommend choosing additive silicone (1:1 rapporto) for high-precision parts (per esempio., componenti di dispositivi medici) to avoid shrinkage-related defects.
7. Domande frequenti: Common Questions About Silicone Composite Plastic Molding Parts
Q1: Can I use silicone composite molding for parts that need to withstand high temperatures (per esempio., 150°C)?
A1: SÌ, but choose the right materials. Utilizzo high-temperature resistant silicone (service temp: 200°C–300°C) per lo stampo e heat-resistant epoxy resin (cured temp: 120°C–180°C) for the part. Test a sample first—expose it to 150°C for 24 hours to ensure no deformation. Avoid standard silicone (max temp: 150°C) or PU resin (max temp: 80°C) for high-heat applications.
Q2: How can I extend the life of my silicone mold?
A2: – Clean the mold with mild soap and water after each use (avoid harsh solvents like acetone, which break down silicone).- Apply a thin layer of silicone oil to the mold before pouring plastic—reduces friction and wear.- Store the mold in a cool, dry place (umidità <60%) and avoid folding or stretching it (prevents tears).
Q3: Are silicone composite plastic parts suitable for food-contact applications (per esempio., plastic cups)?
A3: Only if you use food-grade materials. Scegliere food-grade silicone per lo stampo e food-safe PU/epoxy resin (certified by FDA or EU food safety standards). Regular silicone and plastic materials may leach chemicals into food—never use them for food-contact parts. Test the final part for compliance (per esempio., FDA 21 CFR 177.2600 for resin) prima dell'uso.