Se stai trasformando l'idea di un prodotto in realtà, understanding the processo di realizzazione del prototipo is essential to avoid delays, materiali sprecati, e difetti di progettazione. Un prototipo ben eseguito colma il divario tra progetti digitali e prodotti fisici, aiutandoti a testare la funzionalità, affinare l'estetica, e convalidare le idee prima della produzione di massa. Sotto, we break down every key stage of the process, con i dati, utensili, and tips to ensure your prototype meets your goals.
1. Fase di progettazione: Lay the Groundwork with Precise Digital Models
The design phase is where your idea becomes a structured plan—this stage sets the tone for the entire prototype making process. Rushing through design leads to 40% of prototype reworks later, so take time to get it right.
Key Steps in the Design Phase
- 3Modellazione D: Use professional software to create a detailed digital model of your product. The most popular tools include:
- CAD (Progettazione assistita da computer): Ideal for 2D sketches and 3D models of mechanical parts (per esempio., ingranaggi, parentesi).
- SolidWorks: Best for complex 3D designs with moving components (per esempio., a folding chair or a small appliance).
- Fusione 360: Great for startups or small teams—combines 3D modeling, simulazione, and collaboration tools in one platform.
Data spotlight: 85% of professional product developers use SolidWorks or CAD for 3D modeling, as these tools reduce design errors by 35% compared to basic software.
- Revisione del progetto: Gather feedback from engineers, progettisti, and potential users to refine the 3D model. Ask critical questions:
- Does the design meet all technical specifications (per esempio., misurare, peso, compatibilità dei materiali)?
- Are there any hard-to-manufacture features (per esempio., overly thin walls that might break during processing)?
- Will the prototype be easy to test for functionality (per esempio., can buttons be pressed or hinges moved freely)?
Pro tip: Conduct 2–3 design reviews—each review catches an average of 10–15 small flaws that would otherwise ruin the prototype.
2. Selezione dei materiali: Choose the Right Material for Your Prototype Goals
Selecting the right material is make-or-break for your prototype—it affects durability, aspetto, and how well the prototype mimics the final product. The table below compares the most common prototype materials:
| Materiale | Proprietà chiave | Ideale per | Costo (Al kg) | Processing Difficulty |
| ABS | Forte, resistente agli urti, facile da dipingere | Electronics prototypes (per esempio., custodie per telefoni, telecomandi) | \(2.50–)4.00 | Basso (works with CNC and 3D printing) |
| computer (Policarbonato) | Resistente al calore, trasparente, infrangibile | Prototypes needing clarity (per esempio., paralumi, safety goggles) | \(3.80–)5.50 | Medio (requires higher temperatures for 3D printing) |
| Nylon | Flessibile, resistente all'usura, resistente agli agenti chimici | Prototypes with moving parts (per esempio., cerniere, ingranaggi) | \(4.20–)6.00 | Medio (assorbe l'umidità, needs pre-drying before processing) |
| Alluminio | Leggero, forte, resistente alla corrosione | Prototipi in metallo (per esempio., cornici per laptop, small tool bodies) | \(2.00–)3.50 | Medio (works with CNC machining, needs sanding for smoothness) |
How to choose: If your prototype is for a consumer electronic device (per esempio., a wireless speaker), ABS is a great pick—it’s affordable and easy to customize. For a heat-resistant prototype (per esempio., a coffee mug handle), PC or nylon is better.
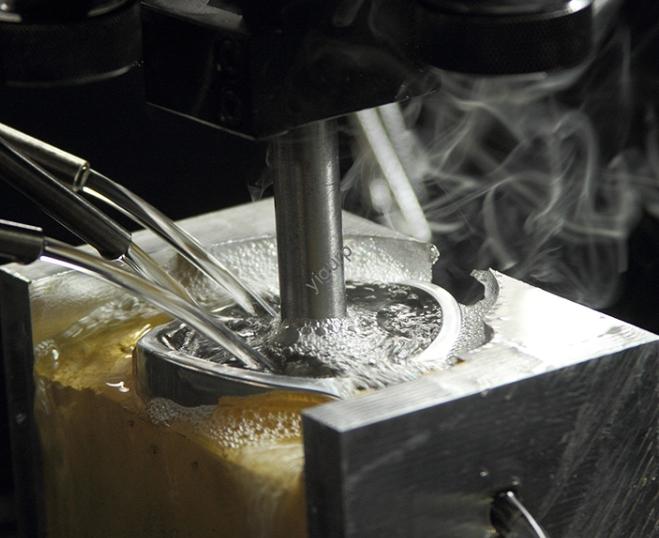
3. Processing Stage: Turn Digital Models into Physical Prototypes
The processing stage transforms your 3D model and chosen material into a tangible prototype. This phase uses a mix of manual and automated techniques to balance precision and flexibility.
Common Processing Methods
- Hand Making: Best for simple, low-cost prototypes (per esempio., a foam model of a furniture design). It involves cutting, incollaggio, and shaping materials by hand with basic tools (per esempio., scissors, carta vetrata, hot glue guns). Hand making is fast (1–2 days for small prototypes) but less precise—tolerances range from ±1mm to ±3mm. It’s ideal for early-stage “proof of concept” prototypes, not functional tests.
- Lavorazione CNC: The most popular method for high-precision prototypes. CNC (Controllo numerico computerizzato) machines use computer code to carve solid blocks of material (plastica, metallo, legna) into the exact shape of your 3D model. Key benefits include:
- Precisione: Tolerances as tight as ±0.01mm—critical for prototypes that need to fit together (per esempio., a phone case and a screen protector).
- Versatilità: Works with all common prototype materials (ABS, computer, alluminio, nylon).
- Velocità: Takes 3–5 days for most prototypes (faster than 3D printing for large parts).
Data note: CNC machining produces 60% of functional prototypes, as it mimics the manufacturing process of final products more closely than 3D printing.
- Hand Grinding: Dopo la lavorazione CNC, utilizzare la carta vetrata (180–600 grana) per smussare i bordi irregolari, remove burrs (small pieces of material left from cutting), and refine the surface. Start with coarse grit (180) to fix large imperfections, then move to fine grit (600) per una finitura liscia. Hand grinding improves the prototype’s aesthetics and prevents scratches during testing.
- Assemblea: If your prototype has multiple parts (per esempio., a toy with a body, ruote, and axles), assemble them with precision. Use appropriate fasteners:
- Viti: For parts that need to be taken apart (per esempio., a prototype laptop for internal testing).
- Adesivi: For permanent bonds (per esempio., gluing a logo to a prototype water bottle).
- Snap Fits: For parts that click together (per esempio., a plastic container lid and body).
Warning: Poor assembly leads to 25% of prototype failures—always test if parts fit snugly but can move (se necessario) before finalizing.
4. Trattamento superficiale: Enhance Aesthetics and Functionality
Surface treatment makes your prototype look and perform like the final product. The right treatment can boost durability, improve grip, or add brand-specific colors—key for user testing and stakeholder presentations.
Most Common Surface Treatments
| Tipo di trattamento | Come funziona | Ideale per | Processing Time |
| Rettifica | Use sandpaper or a grinding machine to smooth the surface (finer than hand grinding). | Prototypes needing a matte finish (per esempio., a tool handle for better grip) | 1–2 ore |
| Spruzzatura | Apply paint or coating with a spray gun. Choose from matte, lucido, or metallic finishes. | Prototypes for aesthetic testing (per esempio., a phone case with a brand color) | 2–3 ore (plus drying time) |
| Galvanotecnica | Depositare un sottile strato di metallo (per esempio., cromo, nichel) on the prototype surface. | Metal prototypes needing corrosion resistance (per esempio., a prototype faucet) | 1–2 giorni |
| Anodizzazione | Create a protective oxide layer on aluminum prototypes (adds color and prevents scratches). | Aluminum prototypes (per esempio., a laptop frame or a bike handlebar) | 1 giorno |
| Silk Screen Printing | Transfer patterns, testo, or logos onto the prototype using a silk screen stencil. | Prototypes needing labels (per esempio., a control panel with “on/off” text) | 3–4 ore |
| Incisione laser | Use a laser to carve permanent designs (per esempio., numeri di serie, loghi) into the surface. | Prototypes needing unique identifiers (per esempio., a medical device prototype) | 1–2 ore |
Pro tip: For user testing, combine 2–3 treatments (per esempio., anodizzazione + serigrafia) to make the prototype feel like a real product—this leads to more accurate feedback.
5. Ispezione e test: Validate the Prototype
Inspection and testing ensure your prototype meets design goals and is ready for the next stage (per esempio., investor pitches, mass production planning). Skipping this step risks moving forward with a flawed design.
Ispezione di qualità
Check the prototype against your original design specs:
- Misurare: Use a caliper or ruler to verify dimensions (per esempio., Is the prototype 10cm long, as designed?).
- Aspetto: Look for scratches, superfici irregolari, or misaligned parts (per esempio., Is the sprayed color consistent across the entire prototype?).
- Materiale: Confirm the correct material was used (per esempio., Is the prototype made of ABS, not a cheaper plastic?).
Standard: A good prototype should meet 95% of the design specs—any deviations should be small and non-impacting (per esempio., a 0.1mm difference in length).
Test funzionali
Test how well the prototype works for its intended use. Examples include:
- For a phone case: Drop it from 1.5 meters to test durability (does it protect a dummy phone inside?).
- For a water bottle: Fill it with water and check for leaks (does the lid seal properly?).
- For a small appliance: Plug it in (if electric) and test its core function (does a prototype blender mix ingredients?).
Data point: 70% of prototypes fail their first functional test—this is normal! Use the feedback to refine the design (per esempio., add more support to a weak part of the phone case).
6. Confezione & Consegna: Protect and Transport the Prototype
Once your prototype passes inspection and testing, package it properly to avoid damage during transportation—whether you’re sending it to a client, a testing lab, or your own team.
Packaging Steps
- Wrap the Prototype: Use bubble wrap or foam to cover the prototype—pay extra attention to fragile parts (per esempio., a transparent PC screen on a prototype device).
- Choose the Right Box: Use a rigid cardboard box that’s 2–3 inches larger than the prototype on all sides. Fill empty space with packing peanuts or crumpled paper to prevent movement.
- Label Clearly: Add labels like “Fragile,” “Handle with Care,” and the destination address. Include a packing slip with details (per esempio., prototype name, number of parts, intended use).
Delivery Tips
- For local delivery (within the same city): Use a courier service (per esempio., FedEx, UPS) with same-day or next-day delivery—this reduces the risk of long-term storage damage.
- For international delivery: Choose a service with tracking and insurance (per esempio., DHL)—international shipping can take 5–7 days, and insurance covers damage or loss.
La prospettiva della tecnologia Yigu
Alla tecnologia Yigu, we see the processo di realizzazione del prototipo as a collaborative journey—each stage relies on the previous one to create a useful prototype. We advise clients to invest time in the design and material selection phases, as these steps reduce reworks later. For functional prototypes, we often recommend CNC machining over hand making, as it delivers the precision needed for accurate testing. We also emphasize surface treatment: a well-finished prototype not only impresses stakeholders but also helps users provide honest feedback. Our team works closely with clients to tailor each step to their product type—whether it’s a small electronics prototype or a large industrial part.
Domande frequenti
- How long does the entire prototype making process take?
It depends on the prototype’s complexity. A simple hand-made prototype (per esempio., a foam cup design) takes 2–3 days. A complex CNC-machined prototype (per esempio., a small appliance with multiple parts) takes 2–3 weeks. In media, most prototypes are completed in 1–2 weeks.
- Can I skip the design review stage to save time?
No—skipping design review often leads to costly reworks. Per esempio, if a design has a hard-to-machine feature, you’ll waste time and material making a prototype that can’t be tested. Design reviews take 1–2 days but save 1–2 weeks of rework later.
- Which surface treatment is best for a prototype that will be user-tested?
Combine spraying (per colore) and silk screen printing (for labels) for most user-tested prototypes. This makes the prototype look like the final product, so users give feedback on real-world use (per esempio., “The logo is hard to read” or “The red color is too bright”). If the prototype is metal, add anodizing for durability during repeated handling.