Se hai mai avuto problemi con dimensioni dei fori irregolari, supporti rotti, or post-printing rework when creating prototypes with multiple holes—for devices like electronics enclosures or medical tools—3D printing multi-hole prototypes is your answer. Questa tecnologia costruisce parti con fori pre-progettati in un unico passaggio, ma come si garantisce la precisione del foro?? Quali materiali funzionano meglio? And how can you fix common flaws? Questa guida risponde a tutte queste domande, helping you create reliable multi-hole prototypes.
What Is a 3D Printed Multi-Hole Prototype?
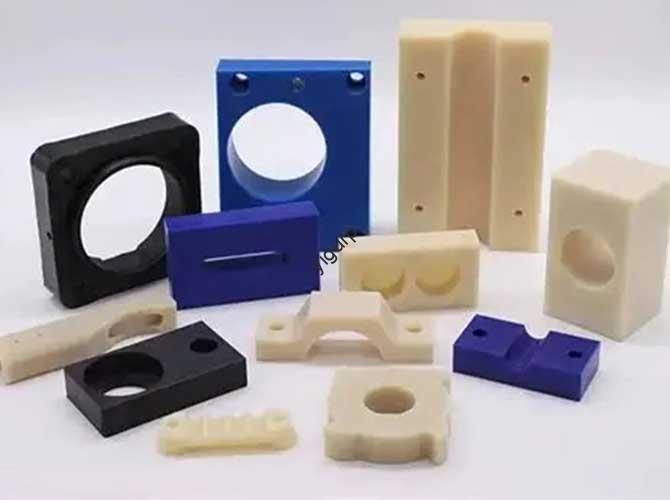
UN 3D printed multi-hole prototype is a test version of a product (per esempio., a handheld device, automotive component) with multiple pre-designed holes, created using additive manufacturing. Unlike traditional prototyping—where holes are drilled after printing (risking cracks or misalignment)—3D printing builds the part and its holes layer by layer, in a single process.
Think of it like a Lego set with pre-made pegs: instead of drilling holes in Lego bricks to connect them (which breaks the brick), the holes are built-in, letting you assemble instantly. For prototypes, this means holes are accurate, coerente, and ready to use—no extra work needed.
These prototypes are ideal for parts that rely on holes for:
- Assemblea (per esempio., viti, bolts)
- Function (per esempio., ventilation, wiring, fluid flow)
- Test (per esempio., fitting sensors or connectors)
Step-by-Step Process for 3D Printing Multi-Hole Prototypes
Creating high-quality multi-hole prototypes follows a linear, repeatable workflow. Below is a detailed breakdown, dalla progettazione alla post-elaborazione:
- Design the Multi-Hole Model in CAD Software
Start with CAD (Progettazione assistita da computer) software (per esempio., SolidWorks, Fusion 360). Here, define critical hole parameters:
- Hole type: Through-hole (goes all the way through) or blind hole (stops inside the part)
- Misurare: Diameter (per esempio., 3mm for screws) and depth (per esempio., 10mm for blind holes)
- Position: Use CAD’s “dimension tool” to place holes evenly (per esempio., 20mm apart for a phone case)
Pro tip: Add a 0.1mm “clearance” to hole size (per esempio., design a 3.1mm hole for a 3mm screw)—this accounts for material shrinkage.
- Optimize the Model for Printing
Adjust the design to avoid common hole issues:
- For FDM printers: Increase the hole’s wall thickness to 1.5mm (thin walls break easily when removing supports).
- For resin printers: Use “support blockers” to keep supports outside buchi (supports inside leave rough surfaces).
- Slice with Hole-Friendly Settings
Import the CAD model into slicing software (per esempio., PrusaSlicer, Cura) and tweak these settings:
- Altezza dello strato: 0.1-0.15mm (thinner layers create smoother hole walls, improving fit).
- Infill density: 60-80% (higher infill around holes adds strength—avoid <50%, which causes hole warping).
- Print speed: 45-55mm/s (slower speed reduces vibration, keeping holes round).
- Print the Prototype
Load the sliced file into your printer:
- For FDM: Use a 0.4mm nozzle (smaller nozzles, like 0.25mm, create finer holes but take longer).
- For resin: Choose a “high-detail” resin (per esempio., Anycubic ABS-Like Resin) to avoid hole deformation.
- Post-Process (If Needed)
Most multi-hole prototypes work without extra steps, but these improve quality:
- Sbavatura: Use a small file to smooth hole edges (removes plastic/resin “strings” from printing).
- Lucidatura: For functional holes (per esempio., fluid flow), sand with 400-grit sandpaper to reduce friction.
3D Printed Multi-Hole Prototypes: Materiale & Printer Comparison
Not all materials or printers perform equally for multi-hole parts. Below is a table to help you choose:
| Tipo materiale | Best Printer Tech | Hole Strength | Ideal Use Case | Sfide comuni & Correzioni |
| PLA | FDM | Low-Medium (good for prototypes) | Non-load-bearing parts (per esempio., decorative enclosures) | Brittle in heat → Solution: Use “tough PLA” for parts exposed to 40°C+ (per esempio., car interiors). |
| ABS | FDM | Medium-High (resiste all'usura) | Load-bearing parts (per esempio., automotive brackets) | Shrinks 3-5% → Solution: Increase hole size by 0.2mm in CAD. |
| PETG | FDM | High (flessibile & waterproof) | Outdoor/wet parts (per esempio., garden tool housings) | Sticks to printer beds → Solution: Use a PEI bed or hairspray. |
| Resin (ABS-Like) | SLA/MSLA | High (liscio & preciso) | Small, parti dettagliate (per esempio., medical device components) | Brittle under impact → Solution: Apply a resin clear coat to add flexibility. |
Real-World Applications of 3D Printed Multi-Hole Prototypes
Multi-hole prototypes solve unique problems across industries. Below are specific examples:
1. Electronics Industry
A startup building a smart thermostat needed a prototype with 5 buchi: 2 for screws (assemblaggio), 2 for wiring (funzione), E 1 for a temperature sensor (testing). They used 3D printed multi-hole prototypes (PETG material, FDM printing). The holes were accurate—screws fit perfectly, and the sensor aligned with the thermostat’s circuit board. This cut prototype iteration time by 40% (contro. traditional drilling).
2. Medical Device Industry
A hospital needed a surgical guide prototype with 8 small holes (0.8mm diameter) to guide drill bits during knee surgery. They used resin 3D printing to create the multi-hole prototype. The holes were so precise that surgeons could practice on a 3D-printed knee model—ensuring no mistakes during real surgeries. Traditional machining would have taken 5 giorni; 3D printing took 12 ore.
3. Automotive Industry
A car manufacturer tested a prototype air vent with 20 small holes (for airflow). They used ABS 3D printed multi-hole prototypes. The team quickly realized the 1mm holes were too small (not enough airflow), so they adjusted the CAD model to 1.2mm and printed a new prototype in 24 ore. With traditional methods, this change would have taken 3 days—delaying the vent’s test launch.
Common Multi-Hole Prototype Problems & Soluzioni
Even with careful design, hole issues can happen. Below are three frequent problems and step-by-step fixes:
Problem 1: Holes Are Too Small (Parts Don’t Fit)
Cause: Material shrinkage (FDM plastic shrinks 1-3%; resin shrinks 2-5%).
Solution:
- Measure the printed hole with a caliper (per esempio., a 3mm designed hole prints as 2.9mm).
- Increase the hole size in CAD by 0.1mm (for FDM) or 0.2mm (for resin) and reprint.
Problem 2: Holes Have Rough Edges (Affects Fit)
Cause: Supports inside holes or low print resolution.
Solution:
- In slicer software, use “support blockers” to exclude supports from holes.
- Reduce layer height to 0.1mm (smoother layers = smoother edges).
Problem 3: Holes Are Misaligned (Won’t Line Up with Other Parts)
Cause: Printer bed not level (shifts the part during printing) or incorrect CAD dimensions.
Solution:
- Level the printer bed (use the printer’s “bed leveling” tool or a piece of paper to check height).
- In CAD, double-check hole positions with the “dimension tool” (per esempio., ensure holes are 20mm apart, not 19mm).
Future Trends of 3D Printed Multi-Hole Prototypes
As 3D printing advances, multi-hole prototypes will become even more versatile. Here are three trends to watch:
- Smart Holes with Sensors: Printers will embed tiny sensors into holes (per esempio., a hole that measures temperature or pressure)—ideal for testing industrial parts.
- Multi-Material Holes: Printers will combine materials (per esempio., a rigid PLA part with flexible TPU holes)—perfect for parts that need holes to stretch (per esempio., phone case charging ports).
- AI-Powered Design: AI will automatically optimize hole size/position based on use (per esempio., suggesting larger holes for airflow, smaller holes for screws)—saving design time.
Yigu Technology’s Perspective on 3D Printing Multi-Hole Prototypes
Alla tecnologia Yigu, we see 3D printing multi-hole prototypes as a key tool for fast, accurate product development. Our FDM printers (per esempio., Yigu Tech F4) have pre-set “multi-hole modes” that optimize slicer settings (layer height, infill) for perfect holes. We also offer a free CAD template library—with pre-designed multi-hole patterns (per esempio., 4-buco, 8-buco) to save users time. For industrial clients, we’ve helped reduce hole misalignment by 70% using our high-precision nozzles (0.3mm) and bed-leveling tech. Multi-hole prototypes aren’t just about holes—they’re about turning ideas into testable, functional products faster.
Domande frequenti: Common Questions About 3D Printing Multi-Hole Prototypes
- Q: Can I print very small holes (per esempio., 0.5mm) in a multi-hole prototype?
UN: SÌ! Resin printers (SLA/MSLA) handle small holes best—they can print 0.3mm holes with high precision. For FDM, use a 0.25mm nozzle and slow print speed (30mm/s) to avoid clogging.
- Q: How many holes can I include in a single prototype?
UN: It depends on size—you can include 50+ small holes (per esempio., 1mm) in a 10x10cm part, as long as holes are at least 1mm apart (prevents wall breakage). For larger holes (per esempio., 10mm), limit to 10-15 per parte.
- Q: Do I need special software to design multi-hole prototypes?
UN: No—most standard CAD software (SolidWorks, Fusion 360) has a “hole tool” to add multiple holes quickly. For beginners, free tools like Tinkercad let you drag-and-drop pre-made holes into your model.