Dans le monde trépidant du développement de produits, comment transformer des idées de design uniques en éléments concrets, pièces fonctionnelles rapidement? La réponse réside souvent dans traitement de pièces non standard de prototype de tôle. Contrairement aux pièces standards disponibles dans le commerce, ces composants personnalisés sont adaptés à des besoins spécifiques, les rendant indispensables pour la validation de la conception, tests fonctionnels, et présentations de marché. Ce guide détaille l'ensemble du processus, met en évidence les principales caractéristiques, et vous aide à naviguer dans le parcours de création de prototypes de tôlerie personnalisés de haute qualité.
1. Que sont les pièces non standard de prototypes de tôlerie?
Avant de plonger dans le processus, clarifions les bases. Prototype de tôlerie pièces non standards sont des composants fabriqués sur mesure dans le traitement de la tôle qui ne respectent pas les normes universelles de taille ou de spécification. Ils sont conçus pour répondre aux exigences uniques d’un client, généralement pour:
- Production en une seule pièce (par ex., un prototype unique pour un nouveau dispositif médical)
- Production en faible volume (par ex., 10-50 unités pour les tests bêta d'une machine industrielle)
- Scénarios spéciaux (par ex., pièces de rechange pour équipements obsolètes sans alternatives standard)
Le tableau ci-dessous les compare aux pièces de tôlerie standard pour mettre en évidence leurs principales différences.:
| Fonctionnalité | Pièces non standard de prototype de tôle | Pièces de tôlerie standard |
| Base de conception | Exigences spécifiques du client | Normes industrielles prédéfinies |
| Volume de production | Faible (de la pièce unique aux petits lots) | Haut (production de masse) |
| But | Validation de la conception, essai, personnalisation | Assemblage courant, usage général |
| Délai de mise en œuvre | Flexible (plus rapide pour les petits lots) | Fixé (aspire à une production de masse) |
| Coût par unité | Plus haut (grâce à la personnalisation) | Inférieur (économies d'échelle) |
2. Le processus étape par étape de traitement des pièces non standard des prototypes de tôle
La création de prototypes de tôlerie personnalisés est un parcours structuré qui allie précision de conception et expertise en fabrication.. Chaque étape s'appuie sur la précédente pour garantir que la pièce finale répond aux besoins fonctionnels et esthétiques.. Voici le linéaire, flux de travail étape par étape:
Étape 1: Phase de conception – Poser les bases
La phase de conception est décisive pour le succès. Cela garantit que la pièce est non seulement fonctionnelle mais également facile à fabriquer.
- 3Modélisation D: Utiliser la CAO (Conception Assistée par Ordinateur) logiciel (par ex., SolidWorks, AutoCAD) pour créer un modèle 3D détaillé. Ce modèle doit correspondre aux exigences exactes du client, comme les dimensions, trous, et les courbes.
- Revue de conception: Un contrôle inter-équipes (créateurs + ingénieurs) évaluer deux facteurs clés:
- Fabricabilité: La conception peut-elle être réalisée avec des outils de tôlerie existants? (par ex., Un pliage à 90 degrés est-il réalisable avec des presses plieuses standard?)
- Fonctionnalité: La pièce fonctionnera-t-elle comme prévu? (par ex., Un support personnalisé supportera-t-il le poids requis?)
Étape 2: Sélection des matériaux & Prétraitement – Choisissez le bon « élément de base »
Le matériau détermine la résistance de la pièce, résistance à la corrosion, et le coût. Voici comment y parvenir:
- Choisissez le bon matériau: Sélectionner en fonction de l'utilisation finale de la pièce. Par exemple:
- Acier inoxydable: Idéal pour les pièces exposées à l'humidité (par ex., composants d'équipement de transformation des aliments) en raison de sa haute résistance à la corrosion.
- Aluminium: Léger et économique, parfait pour les prototypes aérospatiaux ou automobiles.
- Cuivre: Excellent pour la conductivité électrique, utilisé dans les supports de câblage personnalisés.
- Prétraitement des matériaux: Préparez la tôle pour le traitement en:
- Ébavurage: Suppression des bords tranchants des feuilles découpées pour éviter les blessures et garantir un assemblage en douceur.
- Nettoyage: Essuyer l'huile, poussière, ou de la rouille pour améliorer l'adhérence lors du traitement de surface ultérieur.
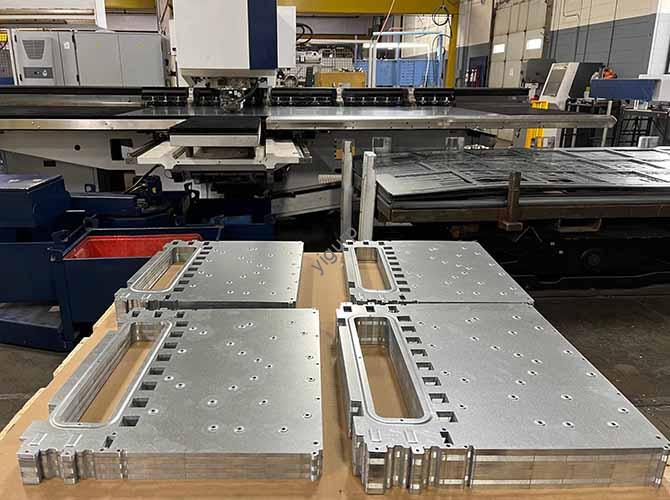
Étape 3: Coupe & Façonnage – Transformez des feuilles plates en formes 3D
Cette étape transforme la tôle brute en la forme de base du prototype.
- Découpe CNC: Utiliser la CNC (Commande numérique par ordinateur) machines de précision. Les méthodes courantes incluent:
- Découpe Laser: Pour des contours complexes (par ex., petits trous ou motifs complexes) avec une grande précision (±0,1mm).
- Perforation: Plus rapide pour les formes simples (par ex., trous carrés ou circulaires) en production à faible volume.
- Pliage & Formation: Utilisez une presse plieuse CNC pour plier la feuille découpée à l'angle souhaité (par ex., 45 degrés pour un prototype en forme de boîte). Le contrôle informatique de la machine garantit des pliages cohérents sur toutes les pièces.
Étape 4: Soudage & Assemblage – Combiner des composants (Si nécessaire)
Si le prototype comporte plusieurs pièces (par ex., un cadre avec une base et des côtés), le soudage et l'assemblage viennent ensuite:
- Soudage: Joignez des composants à l'aide de méthodes telles que MIG (Gaz inerte métallique) soudage pour l'aluminium ou TIG (Gaz inerte de tungstène) soudage pour l'acier inoxydable. L’objectif est de créer une forte, joints sans soudure.
- Assemblée: Assembler les pièces soudées selon la conception. Cela peut impliquer l'ajout de vis, noix, ou des charnières pour garantir que le prototype est facile à démonter (pour tests ou modifications).
Étape 5: Traitement de surface – Améliore la durabilité & Esthétique
Le traitement de surface protège la pièce des dommages et lui donne un aspect professionnel.
- Ponçage & Polissage: Lignes de soudure lisses et bords coupés pour donner à la pièce une finition élégante. Par exemple, un prototype pour un produit de consommation (comme un appareil de cuisine) peut avoir besoin d'un vernis semblable à un miroir.
- Peinture ou placage: Ajouter une couche protectrice:
- Peinture: Utiliser de la peinture en aérosol (par ex., peinture époxy) pour la résistance à la couleur et à la corrosion.
- Placage: Appliquer une fine couche de métal (par ex., chrome pour la brillance ou zinc pour la protection contre la rouille).
Étape 6: Inspection de la qualité – Garantir la perfection
Aucun prototype n'est prêt sans des tests approfondis. Focus sur deux contrôles clés:
- Contrôle dimensionnel: Utilisez des outils comme des pieds à coulisse ou des machines à mesurer tridimensionnelles (MMT) pour vérifier que les dimensions de la pièce correspondent au modèle 3D. Par exemple, si la conception nécessite une longueur de 100 mm, la pièce finale doit être à ±0,5 mm de celle-ci.
- Tests fonctionnels: Testez la pièce dans des conditions réelles. Par exemple:
- Un prototype de charnière personnalisé doit s'ouvrir et se fermer en douceur 1,000 fois sans casser.
- Un prototype de support doit supporter 50 kg (sa charge prévue) pour 24 heures sans se pencher.
3. Pourquoi choisir le traitement des pièces non standard de prototypes de tôle?
Vous pourriez demander: "Pourquoi ne pas utiliser des pièces standards pour gagner du temps et de l'argent?" La réponse réside dans les avantages uniques de la personnalisation:
- Validation de conception plus rapide: Au lieu d'attendre des pièces standards qui ne correspondent pas à votre conception, les prototypes personnalisés vous permettent de tester des idées en quelques semaines (pas des mois).
- Risque réduit: En testant un prototype personnalisé, tu peux corriger les défauts (par ex., une soudure faible ou un angle de pliage incorrect) avant la production de masse, économiser des milliers de dollars en coûts de retouche.
- Adapté à vos besoins: Que vous ayez besoin d'une pièce résistante à la chaleur pour un four ou d'une pièce légère pour un drone, la personnalisation garantit que la pièce fonctionne exactement comme vous en avez besoin.
Le point de vue de Yigu Technology
Chez Yigu Technologie, nous croyons traitement de pièces non standard de prototype de tôle est l'épine dorsale de l'innovation. Beaucoup de nos clients, des startups à Fortune 500 les entreprises s'appuient sur des prototypes personnalisés pour transformer des idées audacieuses en produits prêts à être commercialisés. Notre équipe combine une conception CAO avancée, équipement CNC de haute précision, et un contrôle qualité strict pour fournir des pièces qui répondent même aux exigences les plus complexes. Nous privilégions la flexibilité: que vous ayez besoin d'un seul prototype ou 50 pièces à faible volume, nous ajustons notre processus en fonction de votre calendrier et de votre budget. Pour nous, chaque pièce personnalisée est une chance d'aider les clients à résoudre leurs problèmes et à garder une longueur d'avance sur des marchés concurrentiels.
FAQ
T1: Combien de temps faut-il pour réaliser un prototype de pièce non standard en tôle?
Le délai de livraison dépend de la complexité et du volume. Un prototype simple et monobloc (par ex., un support plat) peut être prêt dans 3-5 jours. Une pièce complexe avec soudure et placage peut prendre 1-2 semaines.
T2: Le traitement des pièces non standard des prototypes de tôlerie est-il coûteux?
Bien que le coût unitaire soit plus élevé que celui des pièces standard, c'est rentable pour les tests. Par exemple, dépenses \(500 sur un prototype pour corriger un défaut de conception \)10,000 en reprise de production de masse.
T3: Quels matériaux sont les meilleurs pour les pièces non standard des prototypes de tôlerie?
Cela dépend de l'utilisation: L'aluminium pour les besoins de légèreté, acier inoxydable pour la résistance à la corrosion, et cuivre pour pièces électriques. Discutez de votre projet avec un fabricant pour choisir le bon.