Dans le développement de produits, que ce soit pour l'aérospatiale, médical, or consumer electronics—CNC plastic prototype parts are the backbone of testing, validation de la conception, et production en faible volume. Contrairement à l'impression 3D, L'usinage CNC offre une précision, des prototypes durables qui imitent les performances du produit final, ce qui en fait un choix idéal pour les équipes qui cherchent à réduire les retouches et à accélérer la mise sur le marché. This guide breaks down everything you need to know about CNC plastic prototyping: from material selection to quality control, with real-world cases, données, and actionable tips for engineers and procurement professionals.
1. What Are CNC Plastic Prototype Parts, and Why They Matter
CNC plastic prototype parts are custom-made plastic components crafted using Computer Numerical Control (CNC) machines. These machines follow pre-programmed designs to cut, moulin, or drill plastic materials—resulting in prototypes that meet tight tolerances (souvent ±0,005 mm) and real-world performance needs.
Key Benefits for Product Teams
- Précision: CNC machining eliminates human error, ensuring prototypes match CAD designs exactly. Par exemple, a automotive sensor housing prototype made with CNC had a dimensional error of just 0.003mm—critical for fitting with metal components.
- Vitesse: For low-volume runs (1–50 pièces), CNC prototyping takes 3–7 days, faster than traditional injection molding (which requires 2–4 weeks for tooling).
- Polyvalence des matériaux: CNC works with nearly all engineering plastics (par ex., ABS, PC, PP, PMMA), so you can test the exact material you’ll use in production.
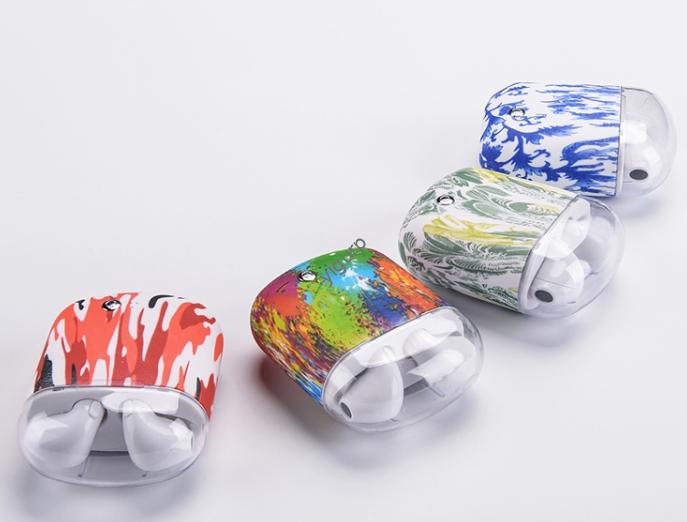
Real-World Impact: A Consumer Electronics Startup
A startup developing a wireless earbud case needed to test 10 prototypes quickly. They choseCNC plastic prototype parts (using ABS) over 3D printing. The CNC prototypes withstood drop tests (1.5m onto wood) and fit the earbuds perfectly—something 3D-printed parts (which had rough surfaces) failed to do. The CNC prototypes also allowed the team to iterate on the case’s hinge design in just 2 jours, cutting their development timeline by 2 semaines.
2. Step-by-Step Process to Create CNC Plastic Prototype Parts
Creating high-qualityCNC plastic prototype parts requires a structured approach. Vous trouverez ci-dessous une répartition détaillée, with tips for avoiding common pitfalls:
2.1 Conception & Programmation: Lay the Groundwork for Success
The first step determines the prototype’s accuracy. Follow these best practices:
- Create a Detailed 3D Model: Use professional software like SolidWorks ou Autodesk Inventor to design the part. Include critical details:
- Tolérances (par ex., ±0.01mm for mating parts)
- Surface finish requirements (par ex., Ra 0.8μm for visible components)
- Cutout locations (par ex., for screws or sensors)
Tip for Engineers: Avoid sharp internal corners—they’re hard to machine and can weaken the part. Use a minimum radius of 0.5mm.
- Generate G-Code: Import the 3D model into CAM software (par ex., Mastercam ou Fusion 360) to create G-code—the language CNC machines understand. For plastic, optimize the G-code to:
- Reduce cutting speed for soft plastics (par ex., PP) pour éviter de fondre.
- Increase feed rate for rigid plastics (par ex., PC) to save time.
Case Note: A medical device company once skipped adding tolerance details to their 3D model. The resulting CNC prototype (a syringe plunger) was 0.1mm too wide—unusable for testing. Fixing the design and re-machining cost them $800 et 3 extra days.
2.2 Sélection des matériaux: Choose the Right Plastic for Your Prototype
Not all plastics work for every application. Below is a comparison of the most common materials forCNC plastic prototype parts, with use cases and key specs:
| Plastic Material | Plage de tolérance | Finition de surface (Râ) | Résistance chimique | Coût (Par kg) | Idéal pour |
|---|---|---|---|---|---|
| ABS | ±0,005–0,01 mm | 0.4–1.6μm | Bien (resists oils) | $3.0–$5.5 | Electronique grand public (par ex., coques de téléphone, remote housings) |
| PC (Polycarbonate) | ±0.003–0.008mm | 0.2–1.2μm | Excellent (résiste aux acides) | $5.5–$8.0 | Aérospatial (par ex., couvercles de capteurs) |
| PP (Polypropylène) | ±0.008–0.015mm | 0.8–2.0μm | Excellent (resists disinfectants) | $2.5–$4.0 | Médical (par ex., syringe housings) |
| PMMA (Acrylique) | ±0,005–0,01 mm | 0.1–0.8μm | Pauvre (reacts with acetone) | $8.0–$12.0 | Transparent parts (par ex., couvertures d'affichage) |
Tip for Procurement: Ask your supplier for a material certificate (par ex., RoHS or FDA compliance) if the prototype will be used in regulated industries (médical, automobile).
2.3 Configuration de la machine & Usinage: Bring the Design to Life
This stage turns raw plastic into a prototype. Here’s how to optimize it:
2.3.1 Choose the Right CNC Machine
- 3-axe CNC: Best for simple parts (par ex., flat housings) with no undercuts. It’s cheaper and faster for basic designs.
- 4-axe CNC: Ideal for parts with rotational features (par ex., a knob with grooves). It adds a rotational axis, réduisant le temps de configuration.
- 5-axe CNC: Pour pièces complexes (par ex., a curved drone component) with undercuts or angled holes. It cuts the part from all sides in one setup, improving accuracy.
Data Point: A contract manufacturer reported that 5-axis CNC reduced machining time for a complex PC prototype by 40% compared to 3-axis—from 8 heures pour 4.8 heures.
2.3.2 Clamp the Material Securely
Use the right clamping method to avoid movement during machining:
- Pour les petites pièces (par ex., a 2cm sensor): Use a vacuum chuck (holds the part without damaging it).
- Pour les grandes pièces (par ex., a 30cm automotive panel): Use mechanical clamps (par ex., vises) with soft jaws to prevent scratches.
Common Mistake to Avoid: Over-clamping soft plastics like PP—this can deform the material, leading to inaccurate prototypes.
2.4 Post-traitement: Refine the Prototype
Après usinage, the part needs finishing to meet quality standards:
- Cleaning: Remove cutting fluids and chips using compressed air (for hard plastics like PC) or a mild detergent (for soft plastics like PP). Avoid harsh chemicals—they can damage the surface.
- Ébavurage: Smooth rough edges using:
- Sandpaper (400–800 grains) pour parties visibles.
- A deburring tool for internal holes or tight spaces.
Exemple: A toy company used 600-grit sandpaper on their ABS prototype (a toy car body) pour obtenir une douceur, kid-safe surface.
- Optional Treatments:
- Peinture: Use plastic-specific paint for aesthetics (par ex., a branded logo).
- Revêtement: Apply a UV-resistant coating for outdoor parts (par ex., a garden sensor housing).
- Polissage: For transparent parts like PMMA—use a buffing wheel to achieve a glass-like finish.
2.5 Contrôle qualité: Ensure the Prototype Meets Standards
Never skip this step—poor quality prototypes lead to bad design decisions. Use these tools and checks:
- Machine de mesure de coordonnées (MMT): Tests dimensional accuracy. Par exemple, a CMM can verify if a hole’s diameter is exactly 5.0mm (as per the design).
- Inspection visuelle: Check for defects like cracks, rayures, ou des surfaces inégales. Use a magnifying glass (10x) pour petites pièces.
- Tests fonctionnels: Test the prototype in real-world conditions:
- For a phone case: Drop it from 1.2m to check durability.
- For a medical tray: Soak it in 70% ethanol to test chemical resistance.
Procurement Tip: Ask your CNC supplier to provide an inspection report (avec les données MMT) to document quality.
3. Yigu Technology’s Perspective on CNC Plastic Prototype Parts
Chez Yigu Technologie, we’ve helped 800+ clients—from startups to Fortune 500 companies—createCNC plastic prototype parts pour 10+ industries. We believe CNC prototyping’s biggest value is its ability to bridge design and production: it lets teams test real materials and fit before investing in expensive injection molds. Our engineers focus on optimizing the design-for-manufacturability (DFM) of each part—for example, suggesting radius changes to reduce machining time or material waste. We also offer fast turnaround (3–5 days for standard parts) and in-house quality checks, ensuring prototypes meet your exact specs. For clients, this means less rework, faster iterations, and lower development costs—key to staying competitive in today’s fast-paced market.
4. FAQ About CNC Plastic Prototype Parts
Q1: How much do CNC plastic prototype parts cost?
Costs vary by size, matériel, et complexité. Un petit, simple part (par ex., a 5cm ABS housing) costs $50–$100. A large, complex part (par ex., a 30cm PC aerospace component) costs $300–$800. Volume discounts apply for 10+ parties (typically 10–15% off).
Q2: Can CNC plastic prototypes be used for low-volume production?
Yes—CNC machining is ideal for low-volume runs (1–100 pièces). Par exemple, a medical device company used CNC to make 50 PP syringe prototypes for clinical trials. It was cheaper than injection molding (which requires $5,000+ for tooling) and faster (7 jours contre. 3 semaines).
Q3: How long does it take to get CNC plastic prototype parts?
Standard lead time is 3–7 days. Pièces simples (par ex., 3-axis ABS housings) take 3–4 days. Pièces complexes (par ex., 5-axis PC components with post-processing) prendre 5 à 7 jours. Commandes urgentes (24–48 heures) are available for an extra 50–100% fee.