If you’re asking what lattice structure additive manufacturing is and how it changes the game for 3D-printed parts, let’s cut to the chase: It’s a technique that uses additive manufacturing (3impresión D) to create parts with a grid-like, interconnected framework—think of the internal structure of a bone or a honeycomb. Unlike solid 3D-printed parts, these lattice designs are lightweight but surprisingly strong, making them ideal for industries where weight, fortaleza, and even flexibility matter (like aerospace, healthcare, or sports gear).
But why does this matter for you? Whether you’re a designer looking to create more efficient parts, an engineer testing new prototypes, or a business owner wanting to cut costs, lattice structures solve key problems: they reduce material use (and waste), lower part weight without sacrificing durability, and even let you control how a part behaves (like absorbing shock or bending). In this guide, we’ll break down everything you need to know—from how lattice structures work to real-world examples, design tips, and the challenges you might face.
What Exactly Is a Lattice Structure in Additive Manufacturing?
Let’s start with the basics to avoid confusion. A lattice structure is a 3D framework made of thin, interconnected struts (the “beams”) and nodes (the points where struts meet). When created via additive manufacturing, this structure isn’t just a decorative design—it’s a functional one. Unlike solid parts, which use material evenly throughout, lattice structures use material only where it’s needed, balancing strength and weight.
Key Terms to Know
To talk about lattice structures confidently, here are a few terms you’ll hear:
- Struts: The thin, rod-like pieces that form the “frame” of the lattice. Their thickness, longitud, and angle all affect the structure’s strength.
- Nodes: The junctions where struts connect. Stronger nodes (p.ej., larger or more rounded) can improve the lattice’s durability.
- Unit Cell: The repeating “building block” of the lattice. Common unit cells include cubes, hexagons (like honeycombs), or more complex shapes like gyroid (a twisting, organic pattern).
- Relative Density: The percentage of the lattice that’s solid material (vs. empty space). A 10% relative density means 90% of the structure is air—this is why lattice parts are so lightweight.
A Simple Example to Visualize
Imagine you’re 3D printing a bracket for a drone. A solid bracket would be heavy (adding extra weight to the drone, which shortens flight time) and use a lot of plastic. A lattice bracket, though, would have a grid-like internal structure. The struts would be placed where the bracket needs to bear weight (like the corners), and the empty space would reduce weight. The result? A bracket that’s 50% lighter than the solid version but just as strong—perfect for keeping the drone flying longer.
Why Use Lattice Structure Additive Manufacturing? 5 Unbeatable Benefits
Lattice structures aren’t just a “cool design trick”—they solve real problems for businesses, designers, and engineers. Here’s why they’re becoming a go-to choice in additive manufacturing:
1. Lightweight Parts Without Losing Strength
This is the biggest advantage of lattice structures. By replacing solid material with a grid, you can cut a part’s weight by 30-70%—but because the struts are placed strategically, the part still holds up to stress. This is a game-changer for industries where weight is critical.
Estudio de caso: Airbus used lattice structure additive manufacturing to create a bracket for its A350 XWB aircraft. The original solid bracket weighed 700 grams; the lattice version weighs just 300 grams. That’s a 57% weight reduction—and when you multiply that by hundreds of brackets per plane, it cuts fuel costs significantly. Even better, tests showed the lattice bracket was just as strong as the solid one, meeting Airbus’s strict safety standards.
2. Reduced Material Use and Waste
Additive manufacturing is already more eco-friendly than traditional methods (since it builds parts layer by layer, not by cutting away material). Lattice structures take this a step further: by using less material, you reduce waste and lower raw material costs.
Data Point: Según un 2024 study by the Additive Manufacturing Research Center, parts with lattice structures use 40-60% less material than solid 3D-printed parts. For a company printing 1,000 plastic parts a month, that’s a savings of \(500-\)1,000 on material costs alone.
3. Better Thermal and Acoustic Insulation
The empty space in lattice structures acts like a buffer—this makes them great for parts that need to insulate against heat or sound. Por ejemplo, a lattice heat shield in a car engine can keep heat away from other components, and a lattice interior panel can reduce road noise in a vehicle.
Ejemplo: Ford Motor Company tested lattice structure door panels for its electric vehicles (vehículos eléctricos). The lattice panels reduced road noise by 15% compared to solid panels—making the EV quieter for drivers. They also weighed 20% less, which helped improve the EV’s battery range.
4. Controlled Flexibility and Shock Absorption
Unlike solid parts (which either bend or break), lattice structures let you “tune” how a part behaves. By adjusting the strut thickness, unit cell shape, or relative density, you can make a part flexible (like a shoe sole that bends with your foot) or rigid (like a machine bracket that doesn’t move). They’re also great at absorbing shock—think of a helmet liner that cushions impact.
Real-World Use: Adidas’s 4DFWD running shoes use lattice structure midsoles, 3D-printed with a hexagonal unit cell. The lattice is designed to compress when you step (absorbing shock) and then spring back (giving you extra push). Runners report 15% more energy return compared to traditional foam midsoles—all thanks to the lattice design.
5. Customization for Specific Needs
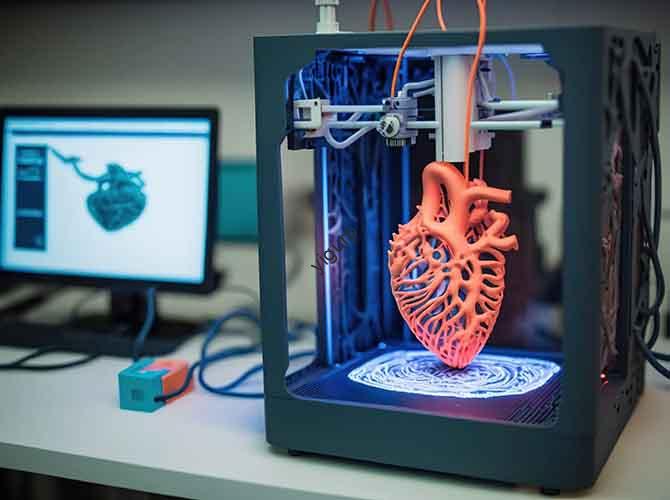
Every part has a unique job—and lattice structures let you customize the design to fit that job. Por ejemplo, a medical implant (like a hip cup) can have a lattice structure that’s dense around the edges (para la fuerza) and less dense in the center (to let bone grow into it, securing the implant). This level of customization is impossible with solid parts.
Healthcare Example: Zimmer Biomet, a medical device company, makes a lattice-structured hip implant. The implant’s lattice has a 60% relative density at the edges (to attach to the pelvis) y 20% in the center (to encourage bone growth). Studies show patients with these implants have a 25% faster recovery time than those with solid implants—because the bone integrates with the lattice faster.
How to Design a Lattice Structure: Key Steps and Considerations
Designing a lattice structure isn’t as simple as adding a grid to a 3D model—you need to think about the part’s purpose, material, and how it will be 3D printed. Here’s a step-by-step guide to get it right:
Paso 1: Define the Part’s Goal
Primero, ask: What does the part need to do? Will it bear weight? Absorb shock? Insulate heat? This determines everything from the unit cell shape to the strut thickness. Por ejemplo:
- If the part needs to be strong and lightweight (like an aerospace bracket), use a cubic or octahedral unit cell (these are stiff and efficient).
- If the part needs to absorb shock (like a helmet liner), use a hexagonal or gyroid unit cell (these compress easily but spring back).
Paso 2: Choose the Right Unit Cell
The unit cell is the “repeat pattern” of the lattice—and different shapes have different properties. Here’s a breakdown of the most common ones:
| Unit Cell Shape | Mejor para | Key Properties | Example Use Case |
| Cubic | Fuerte, piezas rígidas | High stiffness, easy to design | Drone brackets, componentes de la máquina |
| Hexagonal (Honeycomb) | Shock absorption, light weight | Good at distributing stress, flexible | Shoe midsoles, helmet liners |
| Gyroid | Organic, flexible parts | Smooth stress distribution, good for curved surfaces | Implantes medicos (hip cups), sports gear |
| Octahedral | Alta resistencia, low-weight parts | Even stronger than cubic, uses less material | Componentes aeroespaciales, Carcasas para baterías de vehículos eléctricos |
Paso 3: Adjust Relative Density and Strut Thickness
Relative density (how much of the lattice is solid) and strut thickness directly affect the part’s weight and strength. A general rule:
- Higher relative density (p.ej., 50%) = stronger, heavier part (good for load-bearing parts).
- Lower relative density (p.ej., 10%) = lighter, more flexible part (good for insulation or non-load-bearing parts).
Professional Tip: Use simulation software (like ANSYS or Autodesk Fusion 360) to test your design. These tools let you “virtually” stress-test the lattice—you can see where it bends or breaks, and adjust the strut thickness or unit cell shape before printing. This saves time and material (no need to print multiple prototypes).
Paso 4: Pick the Right Material and 3D Printing Method
Not all materials or 3D printing methods work well with lattice structures. Here’s what to consider:
- Materiales: For strong, load-bearing lattices, use metals (titanio, aluminio) or high-strength plastics (nylon). For flexible or low-cost lattices, use PLA or TPU (a flexible plastic).
- 3D Printing Methods: SLS (Sinterización selectiva por láser) is the best for lattice structures—it can print complex, small struts without needing support material. MDF (Modelado por deposición fundida) works for simple lattices but may need supports (which can be hard to remove from small spaces).
Ejemplo: A designer creating a lattice-structured bike seat post would choose nylon (strong but lightweight) and SLS printing (to get clean, support-free struts). If they used FDM, the supports inside the lattice would be nearly impossible to remove, ruining the part.
Where Are Lattice Structure Additive Manufacturing Parts Used? 4 Key Industries
Lattice structures are versatile—they’re used in industries where weight, fortaleza, and customization matter. Here are the sectors where they’re making the biggest impact:
1. Aerospace and Defense
Aerospace companies are obsessed with weight reduction (every gram saved cuts fuel costs) and strength (parts must meet strict safety standards). Lattice structures check both boxes.
Estudio de caso: Boeing used lattice structure additive manufacturing to create a duct for its 787 Dreamliner. The original solid duct weighed 2.2 pounds; the lattice version weighs 0.8 pounds (a 64% reduction). The duct also has better thermal insulation (thanks to the empty space), which helps keep the plane’s cabin temperature stable. Boeing estimates this saves $100,000 in fuel costs per plane per year.
Common Aerospace Uses: Soportes de motor, ducting, componentes satelitales, and interior panels.
2. Cuidado de la salud
In healthcare, lattice structures let doctors create implants that match a patient’s body exactly—and integrate with their natural tissue.
Estudio de caso: A patient in Germany needed a custom jaw implant after cancer treatment. Using CT scans of the patient’s jaw, doctors designed a lattice-structured implant with titanium. The lattice had a 30% relative density, which let bone grow into the struts. The surgery took 2 horas (half the time of a traditional implant surgery), and the patient was able to eat solid food within 3 semanas.
Common Healthcare Uses: Implantes de cadera, jaw implants, coronas dentales, and even prosthetic limbs (lightweight and comfortable for patients).
3. Automotor
Car manufacturers use lattice structures to reduce weight (improving fuel efficiency for gas cars and range for EVs) and improve safety (shock-absorbing parts).
Data Point: Según un 2023 report by the Automotive Additive Manufacturing Association, 60% of EV manufacturers now use lattice-structured parts. Por ejemplo, Tesla uses lattice battery housings in its Model Y—these housings are 40% lighter than solid ones and better at absorbing impact (protecting the battery in a crash).
Common Automotive Uses: Battery housings, paneles de puerta, parachoques (shock absorption), and seat frames (lightweight and comfortable).
4. Sports and Recreation
Sports gear needs to be lightweight (for speed), fuerte (para mayor durabilidad), and flexible (for performance). Lattice structures deliver on all three.
Estudio de caso: Wilson Sporting Goods used lattice structure additive manufacturing to create a tennis racket frame. The lattice has a gyroid unit cell, which makes the frame 20% lighter than traditional frames. It also has better vibration dampening—players report less arm fatigue after long matches. The racket was tested by professional tennis players, who said it improved their swing speed by 5%.
Common Sports Uses: Tennis racket frames, shoe midsoles (Adidas 4DFWD, Nike Flyprint), helmet liners, and bicycle components (seat posts, handlebars).
What Are the Challenges of Lattice Structure Additive Manufacturing?
Lattice structures have huge benefits, but they’re not without hurdles. Understanding these will help you avoid mistakes and get the most out of your designs:
1. Design Complexity and Simulation Needs
Designing a lattice structure isn’t as simple as drawing a grid—you need to optimize the unit cell, strut thickness, and relative density for your part’s goal. This often requires simulation software (which can be expensive, costing \(1,000-\)5,000 per year). For small businesses or hobbyists, this can be a barrier.
Solución: Many 3D printing software tools (like Autodesk Netfabb) now have built-in lattice design features. These tools let you automatically generate lattices and run basic simulations—no advanced engineering degree needed. Some even offer free trials, so you can test before buying.
2. Printing Challenges (Support Material and Precision)
Lattice structures have small, intricate struts—this can make printing tricky. Por ejemplo:
- FDM printers need support material for overhanging struts, but removing supports from small lattice spaces is hard (you might break the struts).
- SLS printers don’t need supports, but if the struts are too thin (less than 0.2mm), the laser might not fuse the material properly, leading to weak parts.
Solución: Use SLS printing for complex lattices (it’s more precise and doesn’t need supports). For FDM, stick to simple lattices with thicker struts (0.5mm or more) to make support removal easier. Also, work with a 3D printing service that has experience with lattices—they can adjust printer settings (like temperature or layer height) to get better results.
3. Cost for High-Volume Production
Lattice structures are great for small batches or custom parts, but they’re slower to print than solid parts (since the printer has to create each strut individually). Para producción de gran volumen (como 10,000 shoe midsoles), this can make lattice parts more expensive than traditional parts.
Data Point: A 2024 cost analysis by Deloitte found that lattice-structured parts cost 20-30% more to produce in high volumes than solid 3D-printed parts. Sin embargo, para lotes pequeños (100 parts or less), the cost difference is minimal—since you save on material.
Solución: Use lattice structures for small batches or custom parts (where the weight/strength benefits justify the cost). For high volumes, consider hybrid designs: use a lattice for the internal structure and a solid outer layer (this reduces printing time while still cutting weight).
4. Quality Control and Consistency
Ensuring every lattice part is consistent (same strut thickness, same relative density) can be hard. Even small changes in printer temperature or material quality can make a lattice part weaker. This is critical for industries like healthcare or aerospace, where part failure can have serious consequences.
Solución: Use in-process monitoring tools (like cameras or sensors) that track the 3D printing process in real time. These tools can detect if a strut is too thin or if the material isn’t fusing properly—and stop the print before the part is ruined. Also, follow standards set by organizations like ASTM International, which has guidelines for testing lattice-structured parts.