Robot prototype making is more than just turning a design into a physical object—it’s a critical bridge between creative ideas and real-world performance. Whether you’re building a small educational robot or a industrial-grade automated arm, following a structured robot prototype making process ensures you catch flaws early, reducir costos, and create a model that truly reflects your final product. In this guide, we’ll break down every step with real-world examples, data, and practical tips to help you succeed.
1. Diseño & Planificación: Lay the Foundation for Your Prototype
Before picking up a tool, thorough design and planning set the stage for a smooth prototype process. This step answers: What will the robot do?How will it fit its use case?What resources do I need?
Key Actions in Design & Planificación
- Create a detailed 3D model: Use software like SolidWorks or Fusion 360 to map every part—from the outer shell to internal gears and sensor placement. Por ejemplo, a team building a delivery robot prototype would need to model the cargo compartment (to ensure it holds 5kg packages) and wheelbase (to fit through standard doorways, ~80cm wide).
- Define use-case requirements: List non-negotiable specs based on how the robot will be used. A manufacturing robot, por ejemplo, needs a load capacity of 10–50kg y un range of motion of 180° for assembly tasks, while a medical robot might prioritize precision (±0,1 mm) over speed.
- Plan timeline & resources: Use a Gantt chart to outline milestones. A small consumer robot prototype (p.ej., a pet-feeding robot) typically takes 4–6 weeks, while a complex industrial prototype may take 3–6 months.
Ejemplo: Design Fail Avoidance
A startup once skipped 3D modeling for a warehouse robot and rushed to production. The prototype’s arm couldn’t reach high shelves—because they forgot to account for the robot’s 1.2m height in the design. Fixing this added 3 weeks to their timeline and $2,000 in rework. A 3D model would have caught this issue instantly.
2. Selección de materiales & Preparación: Choose What Works (Not Just What’s Cheap)
The right materials make or break your prototype’s performance. Your choice depends on strength, peso, costo, and how easy the material is to process.
Common Materials for Robot Prototypes (With Use Cases)
| Tipo de material | Ejemplos | Propiedades clave | Mejor para | Rango de costos (Per kg) |
| Plástica | ABS, PLA | Ligero (0.9–1.2 g/cm³), easy to 3D print | Consumer robots (p.ej., toy robots), 外壳 (outer shells) | \(2–\)8 |
| Rieles | Aluminio, Acero | Alta resistencia, durable | Industrial robot arms, load-bearing parts | \(10–\)30 |
| Alloys | Titanium Alloy | Ligero + fuerte, resistente a la corrosión | Medical robots, aerospace robots | \(50–\)150 |
Material Preparation Steps
- Corte: Use shears (for thin plastics) or a bandsaw (for metals) to trim materials to rough sizes. Por ejemplo, a 3mm aluminum sheet for a robot’s base might be cut from a larger 1m x 2m sheet.
- Tratamiento térmico: Strengthen metals like steel with annealing (heating to 800°C, then cooling slowly) to prevent bending under load. A robot arm made of untreated steel might warp when lifting 20kg—heat treatment fixes this.
- Cleaning: Wipe down plastics with isopropyl alcohol to remove dust (critical for 3D printing) and degrease metals with solvent to ensure paint adheres later.
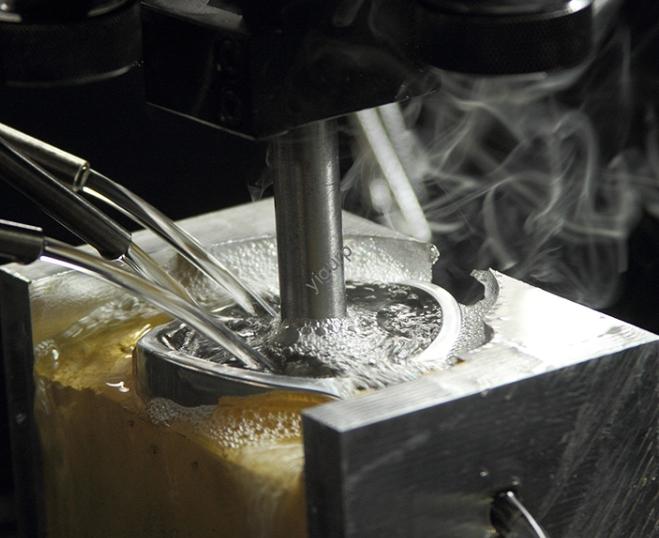
3. Manufacturing Processes: Turn Designs Into Physical Parts
Advanced manufacturing techniques let you create precise, complex parts quickly. The best method depends on your material, part complexity, and timeline.
Top 3 Manufacturing Methods for Robot Prototypes
| Method | Cómo funciona | Mejor para | Time Per Part | Exactitud |
| Mecanizado CNC | Computer-controlled tools carve parts from solid blocks | Metal parts (p.ej., cajas de cambios), componentes precisos | 1–4 horas | ±0,01 mm |
| 3Impresión D | Lays down layers of plastic/metal filament/resin | Formas complejas (p.ej., robot joints), custom shells | 2–12 hours | ±0,1 mm |
| Corte por láser | Uses a high-powered laser to cut/etch sheet materials | Piezas planas (p.ej., robot frames, sensor mounts) | 5–30 minutes | ±0,05 mm |
Ejemplo del mundo real
A robotics company building a agricultural robot used 3D printing for its curved crop-sensing housing (complex shape, volumen bajo) and CNC machining for its metal wheel axles (needs strength for rough terrain). This mix cut production time by 25% compared to using just one method.
4. Asamblea & Pruebas: Ensure Your Prototype Works as Planned
Even the best parts fail if assembled poorly—this step is where you turn parts into a functional robot and catch performance issues.
Assembly Best Practices
- Use precision tools: A torque wrench ensures screws (p.ej., M3 bolts) are tightened to 5 N·m—too loose, and parts rattle; too tight, and plastic parts crack.
- Follow a Bill of Materials (BOM): List every part (p.ej., 4 x motors, 8 x gears, 1 x microcontroller) and assemble in order (p.ej., attach motors to frame first, then connect gears).
- Check fitment: After assembling, move joints by hand to ensure smooth motion. A robot’s wrist joint, Por ejemplo, should rotate 360° without sticking.
Critical Tests for Robot Prototypes
- Motion Performance Test: Measure speed, range of motion, and accuracy. For a robotic arm, test how quickly it can move from Point A to Point B (target: <2 artículos de segunda clase) and if it hits the target within ±0.5mm.
- Electrical System Test: Check wiring for shorts and ensure components like sensors and motors work with the controller. A battery-powered robot should run for at least 4 horas (target runtime) without losing power.
- Load Test: Gradually add weight to test durability. A delivery robot prototype should carry 120% of its target load (p.ej., 6kg if target is 5kg) without breaking.
Ejemplo: Test Failure & Fix
A team’s cleaning robot failed its load test—it stopped moving when carrying a 3kg cleaning tank (target load: 2.5kilos). They discovered the motor gears were too small, so they replaced them with larger, stronger gears. The revised prototype handled 4kg easily.
5. Tratamiento superficial & Optimization: Make It Durable & Ready for Iteration
Surface treatment improves appearance and lifespan, while optimization turns a “good” prototype into a “great” one.
Common Surface Treatments
- Cuadro: Use spray paint (p.ej., acrílico) for plastics to add color and protect against scratches. A consumer robot’s bright red shell might need 2 coats of primer + 2 coats of paint.
- Enchapado: Add a thin layer of chrome or nickel to metals to prevent rust. Industrial robots used in wet environments (p.ej., car washes) benefit from chrome plating.
- Anodizado: Treat aluminum with an electric current to create a hard, colored layer. Medical robots often use anodized aluminum for its sleek, sterile finish.
Optimization Tips
- Reducción de peso: Replace a solid metal part with a hollow 3D-printed one (p.ej., a robot’s leg) to cut weight by 30% without losing strength.
- Cost saving: If a prototype uses expensive titanium, test a cheaper aluminum alloy for non-critical parts (p.ej., the robot’s base vs. its precision gripper).
- Performance boost: Upgrade a slow motor to one with 20% more torque if the robot struggles with heavy loads.
Yigu Technology’s Perspective on Robot Prototype Making
En Yigu Tecnología, we believe the robot prototype making process is the heart of innovation. Too many teams rush to mass production without validating prototypes—this leads to costly recalls. We recommend focusing on two things: 1) Use a mix of 3D printing and CNC machining to balance speed and strength, y 2) Test in real-world scenarios (p.ej., a warehouse robot should be tested on concrete floors, not just lab tables). Our clients who follow this approach reduce prototype iterations by 40% and get products to market faster.
Preguntas frecuentes
- How much does a robot prototype cost to make?
Costs vary by size and complexity: a small consumer robot (p.ej., a toy) costos \(50–\)200, a medium industrial robot (p.ej., a small arm) costos \(500–\)2,000, and a large, complex robot (p.ej., a medical surgical robot) costos \(10,000–\)50,000.
- How long does the robot prototype making process take?
Para prototipos simples: 2–4 semanas (design → manufacturing → testing). For complex prototypes (p.ej., industrial or medical robots): 2–6 meses, including multiple iterations.
- Can I make a robot prototype at home?
Sí! Para pequeños, simple robots (p.ej., a line-following robot), you can use a consumer 3D printer (costo: \(200–\)500), Arduino microcontroller (\(20), and PLA plastic (\)20/kilos). Follow online tutorials to design a basic 3D model and assemble parts.