Cuando se trata de fabricar tornillos (componentes críticos en todo, desde la electrónica hasta la industria aeroespacial), ¿cómo se puede garantizar que cada pieza cumpla con el tamaño estricto?, hilo, y estándares de fuerza? The answer lies in the CNC machining screw process—a computer-controlled workflow that turns raw metal into high-precision fasteners with unmatched consistency. Esta guía desglosa todo el proceso., solves common pain points, and helps you understand why CNC is the top choice for screw production.
1. What Is the CNC Machining Screw Process?
El CNC machining screw process uses computer numerical control (CNC) technology to automate the cutting, organización, and threading of screws. A diferencia de mecanizado manual (which relies on human skill to operate tools), CNC systems follow preprogrammed instructions to produce screws with tight tolerances—often as small as ±0.001 inches.
Think of it like baking cookies with a precise recipe: the CNC program is your “recipe,” and the machine is your oven—consistently turning out perfect results every time. For screws, this consistency is non-negotiable: a poorly sized screw can ruin an electronic device or compromise a building’s structure.
2. The 8-Step CNC Machining Screw Process (Linear Workflow)
Creating a screw via CNC machining follows a clear, repeatable sequence. Skip a step, and you risk defects—so let’s walk through each stage in order:
- Design Modeling with CAD Software: Primero, usar CANALLA (Diseño asistido por computadora) herramientas (p.ej., SolidWorks, autocad) to build a 3D model of the screw. This model includes every detail: thread pitch (p.ej., 2milímetros), head shape (flat, pan, or hex), and length (p.ej., 10milímetros). Without an accurate CAD model, the final screw won’t fit its intended use.
- Data Conversion to Machine-Readable Format: Export the CAD model to an STL or STEP file—formats CNC machines can “understand.” This step bridges the gap between design and manufacturing: if the file is corrupted, the machine will misinterpret the design.
- Programming with CAM Software: Usar LEVA (Fabricación asistida por computadora) software to turn the 3D model into G-code—the language of CNC machines. The G-code tells the machine exactly how to move: tool speed (p.ej., 1,500 RPM), cutting depth, and thread spacing. Por ejemplo, a G-code line might say, “Cut a 2mm thread for 10mm along the metal rod.”
- Raw Material Selection & Preparación: Choose the right material based on the screw’s use. Las opciones comunes incluyen:
- Acero inoxidable: For corrosion resistance (p.ej., outdoor furniture screws).
- Acero carbono: For strength (p.ej., construction screws).
- Acero aleado: For high-stress applications (p.ej., automotive engine screws).
Cut the raw material into rods of the correct length (p.ej., 12mm for a 10mm screw, leaving extra for machining).
- Clamping & Posicionamiento: Secure the metal rod in the CNC machine’s chuck (a clamping device) and align it precisely. Even a 0.005-inch misalignment can make the screw’s thread uneven—so operators use laser sensors to ensure perfect positioning.
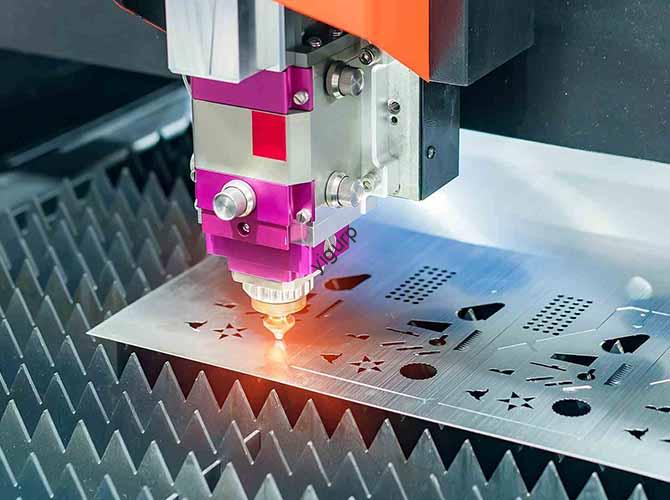
- Mecanizado CNC (Corte, Threading, Organización): The machine executes the G-code, using tools like drills (para agujeros) and taps (for threading) to shape the screw. This stage may include:
- Torneado: Spinning the rod while a tool cuts the head shape.
- Molienda: Carving grooves or slots (p.ej., una cabeza Phillips).
- Threading: Using a tap to cut spiral threads into the rod.
A single CNC machine can produce 500+ screws per hour—10x faster than mecanizado manual.
- Inspección de calidad: Test every batch of screws for key metrics:
- Precisión dimensional (p.ej., is the diameter exactly 5mm?).
- Precisión del hilo (p.ej., does it fit a standard nut?).
- Surface quality (no burrs or scratches).
Inspectors use calipers and thread gauges—if even 1% of screws fail, the batch is reworked.
- Post-Treatment & Refinamiento: Improve the screw’s durability with post-processing:
- Desbarbado: Removing sharp edges (prevents hand injuries during installation).
- Tratamiento térmico: Heating and cooling to strengthen the metal (p.ej., for high-stress screws).
- Enchapado: Adding a layer of zinc or chrome for corrosion resistance (p.ej., bathroom screws).
- Packing & Warehousing: Package 合格 screws in boxes (p.ej., 100 screws per box) and store them in a dry warehouse to avoid rust. Ready for shipment to manufacturers or retailers.
3. Mecanizado CNC frente a. Traditional Manual Machining for Screws
Why choose CNC over manual machining for screw production? Let’s compare the two methods with hard data:
| Factor | Proceso de tornillo de mecanizado CNC | Traditional Manual Machining |
| Exactitud | Tolerances of ±0.001–±0.005 inches | Tolerances of ±0.01–±0.05 inches (depende de la habilidad del operador) |
| Production Speed | 500–1,000 screws per hour | 50–100 screws per hour |
| Consistencia | 99.9% of screws meet standards | 80–90% consistency (varies by operator) |
| Labor Cost | 1 operator monitors 3–5 machines | 1 operator per machine |
| Mejor para | High-volume runs (1,000+ tornillos) or precision parts | Pequeños lotes (100–500 screws) or simple designs |
4. 3 Common Problems in CNC Machining Screw Process (and How to Fix Them)
Even with CNC’s precision, issues can arise. Here are the top pain points and solutions:
| Problema | Cause | Solución |
| Uneven Threads | Misaligned raw material or dull threading tool | Use laser alignment tools and replace taps every 5,000 tornillos. |
| Screw Head Cracks | Too much pressure during turning or low-quality material | Reduce tool pressure by 10% and use certified alloy steel (p.ej., ASTM A325). |
| Rust After Production | Humidity during post-treatment or poor plating | Dry screws in a 60°C oven for 30 minutes and use a 2-layer zinc plating. |
5. Yigu Technology’s Perspective on CNC Machining Screw Process
En Yigu Tecnología, we’ve optimized the CNC machining screw process para 100+ clients—from electronics makers to aerospace companies. The biggest issue we solve? Custom screw production. Many clients need non-standard screws (p.ej., a 3mm thread with a custom hex head), and our CAD/CAM team can turn their design into a production-ready program in 24 horas.
We also use AI-powered inspection tools to cut defect rates to 0.5%—half the industry average. Por ejemplo, a medical device client now produces 10,000 precision screws monthly with our process, meeting FDA standards with zero rejections. As CNC tech advances, we’ll keep making the process faster and more affordable for small-batch orders.
Preguntas frecuentes: Your Top CNC Machining Screw Process Questions Answered
Q1: How long does it take to set up the CNC machining screw process for a new screw design?
A1: For a standard design (p.ej., a 5mm pan-head screw), setup takes 4–6 hours (modelado CAD + G-code programming). Para diseños personalizados (p.ej., unique thread patterns), it may take 1–2 days—but this is still 5x faster than manual machining setup.
Q2: Can the CNC machining screw process handle small batch orders (p.ej., 50 tornillos)?
A2: Sí! CNC’s low setup cost makes it ideal for small batches. A diferencia del moldeo por inyección (lo que requiere moldes costosos), CNC can switch between designs in hours—so 50 screws cost only slightly more per unit than 5,000.
Q3: What’s the most durable material for CNC-machined screws?
A3: It depends on the use. For outdoor or wet environments, acero inoxidable 316 is best (resists saltwater corrosion). For high-stress applications (p.ej., motores), acero aleado 4140 (tratado térmicamente) offers the highest strength—can withstand up to 120,000 psi of pressure.