El éxito de su producto depende de elegir la forma correcta de realizar prototipos.. Para piezas de aluminio, esta elección es muy importante. ¿Está eligiendo el mejor y más asequible método para comprobar su diseño?, prueba como funciona, y lleve su producto al mercado más rápido? Making the wrong choice can lead to spending too much money, missing deadlines, and creating a final part that doesn’t work as needed.
This guide will help remove that uncertainty. We will give you a complete comparison of the three main ways to create aluminum prototypes. Each method has its own place in making products:
- Fabricación sustractiva: Mecanizado CNC, where material is carefully removed from a solid block.
- formando: Fabricación de chapa metálica, where a flat sheet is cut and bent into a three-dimensional shape.
- Fabricación Aditiva: 3Impresión D, where a part is built layer by layer from metal powder.
This guide will give you a detailed comparison, including metal choices, ideas de diseño, and finishing options, to help you make the best decision for your project.
Quick Comparison Matrix
El “best” manufacturing method always depends on your specific project needs. A process that works perfectly for a high-strength structural part will be completely wrong for a simple case. This section gives you a quick overview to help you identify which process is likely the best fit, so you can focus on the most relevant detailed sections that follow. Use this matrix to get oriented before exploring the specific details of each technology.
At-a-Glance Decision Matrix
| Proceso | Mejor para (Solicitud) | Typical Cost | Typical Lead Time | Geometric Complexity | Fortaleza & Actuación | Precision/Tolerance |
| Mecanizado CNC | High-precision functional parts, componentes estructurales, carcasas | Medio-alto | Days to weeks | Alto | Excelente | muy alto |
| Chapa de metal | Cerramientos, paréntesis, panels, chasis, uniform-thickness parts | Low-Medium | Días | Low-Medium | Bien | Medio |
| Impresión 3D de aluminio | Geometrías complejas, lightweighting, canales internos, part consolidation | Alto | Weeks | muy alto | Good-Excellent | Good-High |
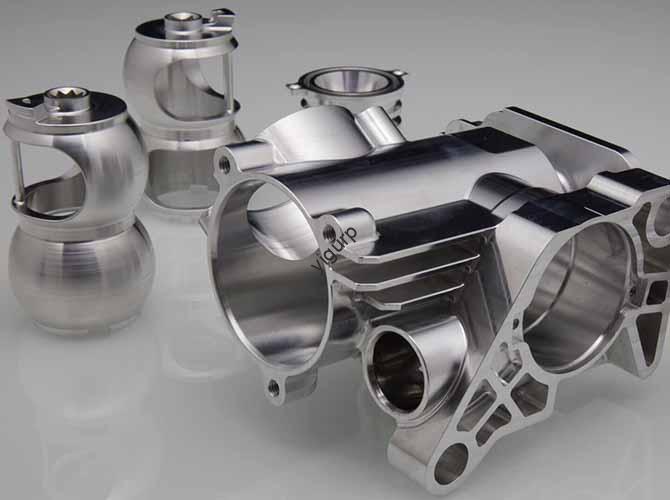
Deep Dive: Mecanizado CNC
For aluminum prototypes that need the highest levels of strength and precision, CNC machining is the industry standard. It is a subtractive process that makes parts with material properties identical to those intended for mass production, making it a valuable tool for functional testing and final design validation.
What is CNC Aluminum Machining?
Control numérico por computadora (CNC) machining starts with a solid block of billet aluminum. Using a CAD model as a guide, computer-controlled cutters—such as end mills and drills—systematically remove material to reveal the final part shape. The two main methods are milling, where a rotating tool moves around a stationary workpiece, y girando, where a stationary tool cuts a rotating workpiece.
Modern machine shops use 3-axis machines for simpler shapes and advanced 5-axis machines, which can move the tool and the part at the same time. This 5-axis capability allows for creating highly complex shapes with fewer setups, improving both accuracy and efficiency.
When to Choose CNC Machining
CNC machining is the preferred method when your project’s success depends on specific material performance and dimensional accuracy.
- Superior Strength & Propiedades de los materiales: Because the part is carved from a solid, wrought block of aluminum, it keeps the full, uncompromised strength and metallurgical characteristics of the alloy. There are no thermal stresses or material phase changes common in other processes.
- Alta precisión & Tolerancias estrictas: CNC machining is unmatched in its ability to hold tight tolerances, often down to ±0.005 inches (±0.125 mm) or better. This is critical for parts that must fit together in an assembly or have precise interfacing surfaces.
- Excellent Surface Finish: Parts can come directly off the machine with a very smooth surface finish (as-machined), which can be further improved with post-processing.
- Wide Alloy Selection: The process works with a vast range of standard aluminum alloys, from the all-purpose 6061 to the high-strength 7075, allowing you to prototype with the exact material intended for production.
Cost and Lead Time Factors
The main cost driver in CNC machining is machine time. The longer a part takes to machine, the more it will cost. Key factors influencing this include part complexity, such as deep pockets, paredes delgadas, and complex curves, which require slower cutting speeds or specialized tooling. The number of setups is also crucial; a part that requires manual re-fixturing to access all six sides will be more expensive than one that can be completed in one or two setups, a key advantage of 5-axis machining.
Typical lead times for standard CNC aluminum prototypes range from 5 a 10 días hábiles, though this can be expedited for simpler parts or extended for highly complex components.
DFM Tips for CNC Aluminum
Designing for manufacturability (DFM) is essential to control costs and ensure a successful outcome. Applying these expert tips will prevent common and costly mistakes.
1. Simplify Geometries: Complejo, free-form surfaces require ball-end mills and extensive machine time. Where possible, favor flat faces and simple curves that can be machined quickly with standard tools.
2. Design with Standard Tool Sizes: Internal corners cannot be perfectly sharp; they will have a radius left by the cutting tool. Designing with standard corner radii (p.ej., 1/8″, 1/4″) allows the use of common tools and avoids the need for secondary processes like EDM.
3. Avoid Deep, Narrow Pockets: A cutting tool’s effectiveness diminishes as its length-to-diameter ratio increases. A good rule of thumb is to keep pocket depths to no more than 4 times the tool’s diameter. Deeper pockets require slower speeds and are prone to tool chatter, reducing surface quality.
4. Design Tolerances Appropriately: Only specify tight tolerances on critical features. Applying a blanket tight tolerance across an entire part dramatically increases machining time and inspection costs. Use looser, standard tolerances for non-critical dimensions.
5. Consolidate Setups: If possible, design your part so that all features can be accessed from one or two sides. This minimizes handling and re-fixturing, which are major sources of cost and potential error.
Deep Dive: Chapa de metal
Sheet metal fabrication is an exceptionally fast and cost-effective method for producing aluminum prototypes, particularly for parts characterized by a uniform wall thickness. It is the go-to process for creating enclosures, paréntesis, panels, and other structural or cosmetic components.
How Prototypes Are Made
The process is fundamentally a two-step operation. Primero, a flat pattern of the part is precisely cut from a sheet of aluminum using a laser cutter, plasma cutter, or waterjet. This 2D shape includes all the necessary holes and cutouts.
Próximo, this flat pattern is moved to a press brake. Aquí, a skilled operator uses a set of punches and dies to systematically bend the sheet along designated lines, forming it into the final 3D shape. Additional hardware like PEM inserts, standoffs, or studs can be pressed into the part to facilitate assembly.
The Ideal Use Case
Sheet metal shines in specific applications where its advantages align perfectly with design needs.
- Cost-Effective for Simple Geometries: For parts like boxes, panels, and brackets, sheet metal fabrication has very low material waste and rapid processing times. The cost per part is significantly lower than for a comparable machined part.
- Lightweight and Strong: Aluminum sheet metal offers an excellent strength-to-weight ratio, making it ideal for applications where weight is a concern, such as in automotive, aeroespacial, y electrónica.
- Rápido cambio de rumbo: Since the primary operations are cutting and bending, the entire process is very fast. Flat patterns can be cut in minutes, and simple parts can be bent quickly, often resulting in lead times of just 3 a 7 días hábiles.
Cost and Lead Time Considerations
Cost is primarily driven by the number of bends and the complexity of the flat pattern. Each bend requires a separate operation on the press brake, adding to the labor time. The material thickness also plays a role, as thicker materials require more powerful machinery and have stricter bending limitations. Tooling is generally inexpensive, especially for standard bends and angles, making it ideal for prototyping and low-volume production.
Essential Design Rules
Following a few key design rules is crucial for creating manufacturable and cost-effective sheet metal parts.
1. Maintain a Uniform Wall Thickness: The entire part is made from a single sheet, so the wall thickness must be consistent throughout. Choose a standard aluminum sheet thickness for your design.
2. Respect Minimum Bend Radii: Every material and thickness has a minimum bend radius it can tolerate without cracking or failing. A safe rule of thumb is to design an inside bend radius that is at least equal to the material thickness.
3. Keep Holes Away from Bends: Placing holes or cutouts too close to a bend can cause them to deform during the forming process. A safe distance is to keep the edge of the hole at least 2.5 times the material thickness plus the bend radius away from the outside of the bend.
4. Account for Bend Relief: When a bend is made on a flange, stress can concentrate at the edge and cause the material to tear. Adding a small cut, or bend relief, at the edge allows the material to form without tearing. The relief should be at least as wide as the material thickness and as deep as the bend radius plus the material thickness.
5. Design a Manufacturable Flat Pattern: The fundamental principle of sheet metal is that the 3D part must be able to be unfolded into a 2D shape without any overlapping surfaces. Always visualize this unfolding process when designing.
Deep Dive: 3Impresión D
Fabricación aditiva, o impresión 3D, has revolutionized prototyping by enabling the creation of parts with geometries that are impossible to produce with traditional methods. For aluminum, this opens up new possibilities for lightweighting, part consolidation, and complex internal features.
The Additive Approach
Unlike subtractive (CNC) or forming (chapa de metal) procesos, additive manufacturing builds a part from the ground up. The process starts with a 3D CAD model, which is digitally sliced into thousands of thin layers. A machine then builds the physical part, capa por capa, by fusing metal powder together. The two most prominent technologies for 3D printing aluminum prototypes are Direct Metal Laser Sintering (DMLS) and Binder Jetting.
Sinterización directa por láser de metales (DMLS)
In the DMLS process, a high-power laser scans across a bed of fine aluminum powder, selectively melting and fusing the particles together based on the CAD data for that layer. After a layer is complete, a new layer of powder is spread over the top, and the process repeats until the part is fully formed.
- Fortalezas:
- Excellent Mechanical Properties: DMLS produces parts that are nearly 100% dense, resulting in strong, functional components with mechanical properties comparable to wrought materials. This makes them suitable for rigorous functional testing.
- Extreme Geometric Freedom: This is the key advantage of DMLS. It excels at creating parts with complex internal channels for cooling, intricate lattice structures for lightweighting, and organic shapes derived from generative design algorithms.
Chorro de aglutinante
Binder jetting takes a different approach. Instead of a laser, an industrial printhead deposits a liquid binding agent onto the bed of aluminum powder, “pegando” the particles together layer by layer. This creates a “verde” part that is fragile. The green part is then removed from the powder bed and placed in a high-temperature furnace. In this sintering step, the binder is burned out, and the metal particles fuse together, causing the part to densify and shrink to its final dimensions.
- Fortalezas:
- Faster and More Cost-Effective for Batches: The printing process itself is very fast, and multiple parts can be nested throughout the entire build volume, making it highly efficient for producing small batches of parts.
- No Support Structures Needed: The surrounding unfused powder supports the part during the build, eliminating the need for the support structures required in DMLS. This significantly simplifies post-processing.
Design Tips for Additive Aluminum
To fully leverage the power of additive manufacturing, you must shift your design mindset.
- Leverage Complexity: Don’t just replicate a design meant for machining. Think about consolidating multiple parts of an assembly into a single, complex component. Use lattices and topology optimization to remove material where it isn’t needed, reducing weight while maintaining strength.
- Design for Orientation: For DMLS, the orientation of the part in the build chamber affects its strength and the amount of support structure needed. Critical features and surfaces should be oriented to achieve the best possible quality.
- Incorporate Self-Supporting Angles: To minimize the need for support structures in DMLS, design overhangs with an angle greater than 45 degrees from the horizontal plane. This reduces post-processing time and cost.
The Critical Choice: Aleaciones
Choosing the right aluminum alloy is as important as choosing the right manufacturing process. The alloy determines the final part’s strength, resistencia a la corrosión, peso, and response to finishing treatments. This guide moves beyond a simple list to provide practical, application-focused advice to help you select the ideal material for your prototype.
6061-T6: The Workhorse
- Profile: This is the most common and versatile aluminum alloy. It offers a fantastic combination of good strength, excelente maquinabilidad, and strong corrosion resistance. Its strength-to-weight ratio is a key reason for its widespread use.
- Mejor para: General-purpose functional prototypes, componentes estructurales, piezas de la máquina, and any application requiring a solid, all-around performer. It is the default choice for most CNC machined prototypes.
- Refinamiento: It is the ideal alloy for anodizing. It produces a clear, coherente, and cosmetically appealing oxide layer, and it readily accepts dyes for a wide range of colors (Type II anodizing).
- Key Data: Resistencia a la tracción: ~45,000 psi (310 MPa); Yield Strength: ~40,000 psi (276 MPa).
5052-H32: The Sheet Metal Specialist
- Profile: Mientras 6061 is strong, it can be prone to cracking when bent at tight radii. 5052 es la solucion. It has slightly lower strength but offers superior formability and workability. Its standout feature is its excellent resistance to corrosion, especially in saltwater environments.
- Mejor para: Any sheet metal prototype that requires extensive forming, such as enclosures with tight bends, chasis, and marine components. It is the standard choice for sheet metal fabrication.
- Refinamiento: It can be anodized for protection, but the finish is typically less decorative and more functional compared to 6061. It is an excellent substrate for powder coating and chem film.
- Key Data: Resistencia a la tracción: ~33,000 psi (228 MPa); Yield Strength: ~28,000 psi (193 MPa).
7075-T6: The High-Strength Champion
- Profile: When absolute strength is the primary requirement, 7075 is the answer. With a strength-to-weight ratio comparable to many steels, it is one of the strongest aluminum alloys commercially available. This performance comes at a higher cost and with lower corrosion resistance compared to 6061.
- Mejor para: High-stress applications where failure is not an option. Common uses include aerospace prototypes, componentes automotrices de alto rendimiento, and durable fixtures or jigs.
- Refinamiento: 7075 can be anodized, but the finish is not as cosmetically consistent as 6061. It is most often specified with a Hardcoat (Tipo III) anodize, which creates an extremely hard, superficie resistente al desgaste, or a chem film for corrosion protection.
- Key Data: Resistencia a la tracción: ~83,000 psi (572 MPa); Yield Strength: ~73,000 psi (503 MPa).
Alloy Selection Summary Table
| Aleación | Key Characteristic | Mejor para | Relative Cost | Anodizing Quality |
| 6061-T6 | All-Purpose, Good Strength | Mecanizado CNC, Structural Parts | Medio | Excelente (Cosmetic) |
| 5052-H32 | Excellent Formability | Chapa de metal, Cerramientos | Low-Medium | Bien (Protective) |
| 7075-T6 | Very High Strength | High-Stress, Aerospace Parts | Alto | Justo (Hardcoat) |
Post-Processing Finishes Guide
A surface finish is rarely just for looks. For aluminum prototypes, it is a critical step that provides corrosion resistance, wear protection, and the desired appearance for a final product. Choosing the right finish ensures your prototype not only looks the part but also performs correctly in its intended environment.
Anodizado (Type II)
- What it is: An electrochemical process that grows a controlled layer of aluminum oxide on the surface of the part. This layer is an integral part of the aluminum and can be dyed in various colors before being sealed.
- Primary Purpose: Provides good corrosion resistance and a durable, cosmetic finish. It is the most common finish for consumer-facing aluminum parts.
- Best on: 6061-T6 produces the most consistent and aesthetically pleasing results.
Hardcoat Anodizing (Tipo III)
- What it is: A similar process to Type II, but performed at lower temperatures and higher currents to create a much thicker, denser, and harder oxide layer. It is typically dark gray or black and not used for decorative purposes.
- Primary Purpose: Superior wear and abrasion resistance. The surface hardness can approach that of case-hardened steel, making it ideal for high-wear functional components.
- Best on: 6061 y 7075 are both excellent candidates for hardcoating.
Alodine (Chem Film / Chromate)
- What it is: A chemical conversion coating that creates a very thin protective layer on the aluminum. It has a distinctive iridescent gold or clear appearance.
- Primary Purpose: Provides excellent corrosion resistance while—critically—maintaining electrical conductivity. It also serves as an excellent primer for subsequent painting or powder coating.
Recubrimiento en polvo
- What it is: A dry-finishing process where a polymer powder is electrostatically applied to the surface of the part. The part is then cured in an oven, causing the powder to melt and flow into a hard, durable skin.
- Primary Purpose: Creates a very tough, impact-resistant finish that is more durable than conventional paint. It is available in a nearly limitless range of colors and textures.
A Practical Decision Framework
With a clear understanding of the processes, materiales, and finishes, you can now synthesize this information into an actionable decision. This framework walks you through the key questions to ask, guiding you to the most logical and effective solution for your specific aluminum prototype.
Your 4-Step Checklist
1. Paso 1: Define Your Part’s Geometry
- Is it a solid, blocky part with pockets, agujeros, and precise features? Start by considering CNC Machining. Its ability to create complex 3D forms from a solid billet is unmatched for this type of part.
- Is it a box, bracket, or panel made of a single, uniform thickness? Start by considering Sheet Metal Fabrication. If the part can be unfolded into a flat pattern, this will almost always be the fastest and most cost-effective method.
- Is it an organic shape with internal channels, a complex lattice, or a design that consolidates multiple pieces into one? Start by considering 3D Printing. Its layer-by-layer approach is the only way to create these otherwise impossible geometries.
2. Paso 2: Define Your Functional Requirements
- Is maximum strength and performance under high stress the top priority? Choose CNC machining with 7075-T6 alloy, or consider DMLS 3D printing for complex, piezas de alta resistencia.
- Do you need good, confiable, all-around strength for functional testing? Choose CNC machining with 6061-T6 alloy. It provides excellent, predictable performance.
3. Paso 3: What is Your Budget and Timeline?
- Do you need it fast and for the lowest possible cost (for simple forms)? Sheet Metal Fabrication is often the winner, with lead times of just a few days for simple brackets and panels.
- Do you have a moderate to high budget to invest in superior precision, fortaleza, or geometric complexity? CNC Machining and 3D Printing are your best options. The cost is higher, but the value is in the performance and design freedom you gain.
4. Paso 4: What Finish Do You Need?
- Do you need a vibrant, cosmetic color for a consumer-facing part? Choose Anodize Type II on a 6061-T6 machined part.
- Do you need maximum durability, resistencia al desgaste, or corrosion protection for a functional component? Choose Hardcoat Anodize (Tipo III) or Powder Coat. If electrical conductivity is also required, choose Alodine (Chem Film).
Conclusion
There is no single “best” method for creating aluminum prototypes. The optimal choice is a strategic decision based on a careful balance of your part’s geometry, its performance requirements, and your project’s budget and timeline. Each process—CNC machining, fabricación de chapa, and 3D printing—offers a unique set of capabilities tailored to different needs.
By using this guide to weigh the trade-offs between these powerful technologies, you are now equipped to select the most effective, eficiente, and economical path for bringing your aluminum design to life.