Prototype injection molding is a specialized manufacturing process that converts 3D-printed prototypes into small-batch injection-molded parts (typischerweise 10–500 Einheiten) um die Machbarkeit des Designs zu validieren, Materialleistung, und Massenproduktionsabläufe. Im Gegensatz zum herkömmlichen Spritzgießen (Der Schwerpunkt liegt auf der Produktion großer Mengen), es priorisiert Flexibilität, Kosteneffizienz, und schnelle Iteration – was es für Branchen wie Konsumgüter von entscheidender Bedeutung macht, Automobil, und Elektronik. In diesem Artikel wird der Kernarbeitsablauf erläutert, material/tool choices, troubleshooting tips, and real-world applications to help teams bridge the gap between prototypes and mass production.
1. What Are the Core Objectives of Prototype Injection Molding?
Every step in the process serves specific goals that directly reduce risks in mass production.
| Objective | Beschreibung | Real-World Example |
| Design Validation | Confirm if the prototype’s structure (z.B., dünne Wände, Unterschneidungen) is compatible with injection molding and if parts assemble without interference. | Testing if a 3D-printed horse-shaped ornament Prototyp (with a 1.5mm thin wall and 2° draft angle) can be injected without warping or incomplete filling. |
| Material Performance Testing | Verify if the chosen injection molding material (z.B., ABS, PC) matches the prototype’s intended function (Stärke, Flexibilität, Aussehen). | Checking if ABS plastic (used for the horse ornament) retains its impact resistance (no cracking when dropped from 1m) after injection molding. |
| Process Parameter Optimization | Identify optimal injection molding settings (Temperatur, Druck, Zeit) to avoid defects (Blitz, Schwindung) in mass production. | Adjusting the horse ornament’s injection pressure from 80MPa to 100MPa to eliminate “lack of material” in the ornament’s legs. |
| Kosten & Cycle Time Estimation | Gather data (mold costs, part production time) to forecast mass production budgets and timelines. | Using prototype data to estimate that mass-producing 10,000 horse ornaments will cost \(2/Einheit (vs. \)15/Einheit für Prototypen). |
2. What Is the Step-by-Step Prototype Injection Molding Workflow?
The process follows a linear, repeatable sequence—each stage builds on the previous one to ensure quality and consistency.
2.1 Schritt 1: Vorläufige Vorbereitung (Lay the Foundation)
This stage defines requirements and optimizes the prototype to avoid injection molding defects.
2.1.1 Prototype Optimization for Injection Molding
3D-printed prototypes often need design tweaks to fit injection molding constraints:
| Optimierung | Reason | Specification Example |
| Add Draft Angles | Prevents parts from sticking to the mold during demolding. | 1°–3° draft angle on all vertical surfaces (z.B., the horse ornament’s body sides). |
| Adjust Wall Thickness | Avoids uneven cooling (causing shrinkage) oder unvollständige Füllung. | Mindestwandstärke: 1mm (ABS/PC); maximum variation: ≤50% (z.B., 1.5mm wall → no sudden jumps to 3mm). |
| Optimize Parting Surfaces | Ensures clean mold separation without damaging part appearance or strength. | Place parting surfaces along non-visible edges (z.B., the horse ornament’s belly, not its face). |
| Design Gate Positions | Reduces weld marks (weak points) and ensures uniform melt flow. | Use side gates for large parts (horse ornament’s base) or point gates for small, detailed features (horse’s ears). |
2.1.2 Material Selection Guide
Choose materials based on the prototype’s function, Aussehen, and compatibility with injection molding:
| Material | Schlüsseleigenschaften | Ideale Anwendungen |
| ABS | Hohe Festigkeit, gute Zähigkeit, leicht zu färben. | Strukturteile (horse ornament bodies, electronic device shells). |
| PC (Polycarbonat) | Transparent, schlagfest, hitzebeständig (bis 120°C). | Präzisionsteile (clear light covers, Automobilkomponenten). |
| PA (Nylon) | Abriebfest, chemikalienbeständig, flexibel. | Funktionsteile (Getriebe, Scharniere, toy joints). |
| PMMA (Acryl) | High transparency (92% Lichtdurchlässigkeit), glänzendes Finish. | Dekorative Teile (clear ornament details, Vitrinen). |
Critical Note: Ensure the material’s shrinkage rate matches the 3D-printed prototype (z.B., ABS has a 0.5%–0.8% shrinkage rate—reserve this in mold design to avoid dimensional 偏差).
2.1.3 Formenbau & Auswahl
Molds for prototype injection molding prioritize cost and speed over high-volume durability:
| Mold Type | Am besten für | Kostenspanne | Vorlaufzeit |
| Soft Molds (Silicone/Aluminum) | Kleine Chargen (10–100 Einheiten), komplexe Formen (Unterschneidungen). | \(1,000–)5,000 | 3–7 Tage |
| Semi-Hard Molds (P20 Steel) | Mittlere Chargen (100–500 Einheiten), hohe präzision (±0,05 mm). | \(5,000–)15,000 | 7–14 Tage |
| Hard Molds (H13 Steel) | Large prototype batches (500+ Einheiten) or pre-mass production tests. | \(15,000–)50,000 | 14–21 Tage |
Mold Key Features:
- Kühlsystem: Add water channels to reduce cycle time (z.B., 15-second cooling for the horse ornament vs. 30 seconds without cooling).
- Auswurfmechanismus: Use ejector pins (für einfache Teile) or push plates (for complex shapes like the horse’s curved body) to ensure smooth demolding.
2.2 Schritt 2: Mold Processing & Tryout Preparation
Turn the mold design into a physical tool and prepare for injection testing.
2.2.1 Mold Manufacturing Methods
Choose a processing method based on mold material, Komplexität, und Präzisionsanforderungen:
| Method | Am besten für | Präzision | Beispiel |
| CNC-Bearbeitung | Aluminum/steel molds with simple-to-medium complexity (z.B., horse ornament bodies). | ±0,01 mm | Cutting a P20 steel mold for the horse ornament using a 5-axis CNC machine. |
| Elektrische Entladungsbearbeitung (EDM) | Molds with complex surfaces or hard materials (z.B., H13-Stahl). | ±0,005 mm | Creating the horse ornament’s detailed facial features (eyes, mane) in a carbide mold. |
| 3D-Printed Molds | Low-batch, komplexe Teile (z.B., horse ornaments with internal cavities). | ±0,1 mm | 3D printing a silicone mold for 10–20 horse ornament prototypes (schnell, niedrige Kosten). |
2.2.2 Tryout Preparation
- Mold Assembly: Secure mold components (Hohlraum, Kern, cooling system) and check for alignment (no gaps between parting surfaces).
- Maschineneinrichtung: Install the mold on an injection molding machine (5–50 tons, suitable for small batches); calibrate clamping force (10%–20% higher than injection pressure to prevent flash).
- Vorheizen: Heat the mold to the material’s recommended temperature (z.B., ABS: 60°C–80°C; PC: 80°C–100°C) to reduce shrinkage.
2.3 Schritt 3: Spritzguss (Core Production Stage)
Optimize parameters and execute injection to produce defect-free parts.
2.3.1 Critical Parameter Settings
Parameter values vary by material—use the table below as a starting point and adjust based on trial results:
| Parameter | ABS (Horse Ornament Example) | PC (Precision Parts) | PA (Funktionsteile) |
| Fasstemperatur | 200°C–240°C (Futterzone: 200°C; Düse: 240°C) | 260°C–300°C | 230°C–270°C |
| Formtemperatur | 60°C–80°C | 80°C–100°C | 40°C–60°C |
| Einspritzdruck | 80–120MPa | 100–150MPa | 70–110MPa |
| Holding Pressure | 50%–80 % des Einspritzdrucks (z.B., 60MPa for 100MPa injection) | 60%–90 % des Einspritzdrucks | 40%–70 % des Einspritzdrucks |
| Injektionszeit | 2–5 seconds (depends on part size: 3 seconds for a 50g horse ornament) | 3–8 seconds | 2–6 seconds |
| Abkühlzeit | 10–20 Sekunden (15 seconds for the horse ornament) | 15–30 Sekunden | 8–15 Sekunden |
2.3.2 Mold Testing & Fehlerbehebung
Start with low-speed, low-pressure trials to identify and fix defects:
| Common Defect | Grundursache | Lösung |
| Lack of Material | Insufficient injection volume/pressure; narrow gates. | Increase injection pressure by 10%–20%; widen gates from 1mm to 1.5mm. |
| Flash (Excess Plastic) | Mold parting surface not tight; clamping force too low. | Formoberflächen reinigen; increase clamping force by 10%–15%. |
| Shrinkage/Bubbles | Inadequate holding time; mold temperature too low. | Extend holding time by 2–3 seconds; raise mold temperature by 10°C–20°C. |
| Weld Marks | Multiple melt flows merging; gate position poorly placed. | Add a secondary gate; increase barrel temperature by 10°C–15% to improve melt flow. |
2.3.3 Kleinserienfertigung
Once parameters are stable (no defects in 5–10 consecutive parts), start small-batch production:
- For multi-cavity molds (z.B., 2 cavities for horse ornaments), ensure uniform filling across all cavities.
- Record production time per part (z.B., 30 seconds/unit for the horse ornament) to estimate mass production cycle times.
2.4 Schritt 4: Nachbearbeitung & Qualitätsprüfung
Refine parts to meet design standards and validate performance.
2.4.1 Nachbearbeitungsschritte
| Schritt | Zweck | Beispiel (Horse Ornament) |
| Gate Trimming | Remove excess plastic from gate positions; sand edges to avoid sharpness. | Cut off the gate (on the horse’s base) with a utility knife; sand with 400-grit sandpaper. |
| Cleaning | Remove oil, Trümmer, or mold release agent. | Wischen Sie die Teile mit Isopropylalkohol ab; use ultrasonic cleaning (40°C, 10 Minuten) for detailed features (horse’s mane). |
| Secondary Processing | Enhance appearance or functionality. | – Sprühen: Apply matte black paint to the horse’s body.- Lasergravur: Add a brand logo to the horse’s base.- Montage: Attach movable legs (injected separately) with metal pins. |
2.4.2 Quality Inspection Checklist
| Inspection Type | Method | Acceptance Standard |
| Maßgenauigkeit | Use digital calipers/3D scanners to measure key dimensions. | Deviation ≤±0.1mm (z.B., horse ornament height: 100mm ±0.1mm). |
| Aussehen | Sichtprüfung (naked eye + 10x magnifying glass). | No defects: Blitz, Kratzer, discoloration, or bubbles. |
| Mechanische Leistung | Impact test (drop from 1m); tensile test (für Stärke). | ABS parts: No cracking after impact; tensile strength ≥40MPa. |
| Assembly Fit | Test if parts assemble with other components (z.B., movable legs). | Legs snap into body without forcing; rotate 360° smoothly. |
3. What Are the Key Precautions to Avoid Failures?
3.1 Material & Mold Compatibility
- Match Material to Mold: Soft molds (silicone/aluminum) work best with low-temperature materials (ABS, PA); hard molds (H13-Stahl) are required for high-temperature materials (PC, PPS). Using PC with a silicone mold will melt the mold.
- Account for Shrinkage: Add shrinkage allowances to the mold design (z.B., 0.5% for ABS—design the horse ornament mold at 100.5mm to get a 100mm final part).
3.2 Cost Control
- Choose the Right Mold: For batches ≤100 units, use soft molds (\(1,000–)5,000) to save 70% vs. hard molds. For batches ≥500 units, hard molds become cost-effective (niedrigere Stückkosten).
- Minimize Iterations: Test 3D-printed prototypes thoroughly (z.B., check wall thickness, draft angles) before mold making—each mold rework costs \(500–)2,000 and adds 3–5 days to lead time.
3.3 Timeline Management
- Plan for Trials: Allocate 2–3 days for mold testing and troubleshooting (even with well-optimized prototypes).
- Coordinate with Suppliers: Share prototype designs with mold makers 1–2 weeks in advance to avoid delays in mold processing.
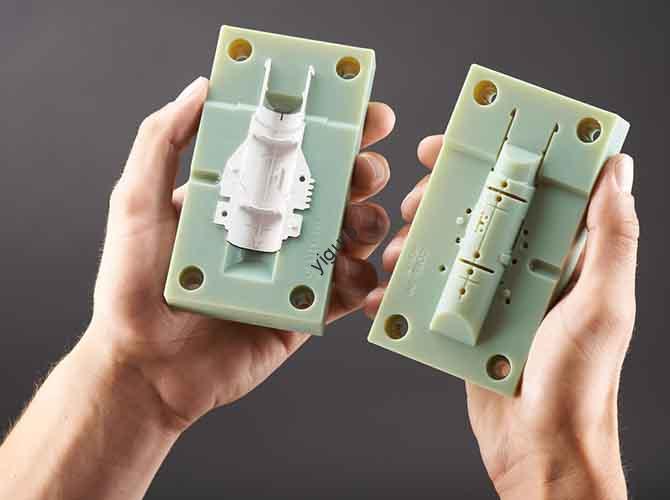
4. What Is a Real-World Example: Horse-Shaped Ornament Prototype Injection Molding?
Let’s apply the workflow to a common consumer product: a 100mm-tall horse-shaped ornament.
- Vorläufige Vorbereitung:
- Prototype Optimization: Add 2° draft angles to the horse’s body; adjust wall thickness from 1mm to 1.5mm (ABS-compatible).
- Materialauswahl: Choose ABS (schlagfest, leicht zu malen).
- Formenbau: Use a single-cavity aluminum mold ($2,000) with a side gate (on the horse’s base) and cooling channels in the legs.
- Mold Processing & Tryout:
- CNC machine the aluminum mold (3 Tage); assemble and install on a 10-ton injection molding machine.
- Preheat the mold to 70°C (ABS recommended temperature).
- Spritzguss:
- Parameters: Barrel temperature 220°C, injection pressure 100MPa, holding pressure 70MPa, injection time 3 Sekunden, Abkühlzeit 15 Sekunden.
- Fehlerbehebung: Initial trials show “lack of material” in the horse’s ears—increase injection pressure to 110MPa and widen the gate to 1.5mm.
- Nachbearbeitung & Inspektion:
- Trim gates, sand edges, and spray matte black paint.
- Inspect: Maßhaltigkeit (100mm ±0.1mm), Keine Mängel, and legs assemble smoothly.
- Ergebnis: 50 defect-free horse ornaments produced in 2 days—ready for market testing.
Die Perspektive von Yigu Technology
Bei Yigu Technology, we see prototype injection molding as a “risk reducer” for product teams. Too many clients skip this step and jump to mass production—only to discover their horse ornament’s thin walls warp or their mold gates leave ugly marks, costing \(10k–\)50k in reworks. Our approach: We help clients optimize prototypes for injection molding (z.B., adjusting draft angles) and choose cost-effective molds (aluminum for small batches). Zum Beispiel, we helped a client cut horse ornament prototype costs by 40% by using a shared aluminum mold (instead of a custom steel mold) and optimized injection parameters to eliminate shrinkage. Prototype injection molding isn’t an extra expense—it’s the fastest way to ensure mass production runs smoothly, on time, and on budget.
FAQ
- Can prototype injection molding use the same molds as mass production?
Rarely—prototype molds (aluminum/silicone) are designed for small batches (10–500 Einheiten) and have shorter lifespans (1,000–10,000 shots). Mass production uses steel molds (100,000+ shots) für Haltbarkeit. Jedoch, prototype mold designs can be modified for mass production (z.B., adding cavities to a single-cavity prototype mold).
- How much does prototype injection molding cost for a small batch (50 Einheiten) of horse-shaped ornaments?
Total cost: \(3,500–)5,000. Breakdown: Schimmel (\(2,000–)3,000), Material (ABS: \(50–)100), Arbeit (\(500–)1,000), und Nachbearbeitung (\(500–)800). This is 70% cheaper than producing 50 units via 3D printing (\(15/unit vs. \)50/Einheit).
- **