Making hardware prototypes is the process of creating physical, metal-based models to verify a product’s design, Struktur, und funktionale Machbarkeit – entscheidend für die Erkennung von Fehlern vor der Massenproduktion. Im Gegensatz zum 3D-Druck aus Kunststoff/Harz (bei dem die Geschwindigkeit im Vordergrund steht), Der Schwerpunkt liegt auf Hardware-Prototyping Materialeigenschaften (Stärke, Temperaturwiderstand) Und Präzisionsverarbeitung (CNC -Bearbeitung, Stempeln). In diesem Artikel wird der Arbeitsablauf Schritt für Schritt beschrieben, Material-/Prozessauswahl, Qualitätsprüfungen, und reale Anwendungen, um Teams durch die erfolgreiche Prototypenerstellung zu führen.
1. Was sind die Kernziele bei der Herstellung von Hardware-Prototypen??
Vor dem Start, clarify your objectives—they will shape every decision from material selection to processing methods.
| Ziel | Beschreibung | Real-World-Anwendungsfall |
| Funktionale Überprüfung | Testen Sie, ob der Prototyp wie beabsichtigt funktioniert (Z.B., load-bearing, Montagepassung). | A CNC-machined aluminum bracket for a drone—check if it supports the drone’s weight without bending. |
| Appearance Confirmation | Ensure the prototype matches design aesthetics (Farbe, Oberflächenbeschaffung). | A stainless steel smartphone frame—verify if the anodized matte finish aligns with brand guidelines. |
| Montageprüfung | Validate how the prototype fits with other components (Z.B., Schrauben, Anschlüsse). | A copper electronic connector—test if it plugs into a circuit board securely. |
| Materialvalidierung | Confirm the chosen metal performs in real-world conditions (Z.B., Korrosionsbeständigkeit). | A 316 stainless steel marine sensor housing—check if it resists saltwater damage. |
2. Was ist der Schritt-für-Schritt-Workflow zur Herstellung von Hardware-Prototypen??
Der Prozess verläuft linear, detail-driven sequence—skipping any step risks costly reworks.
2.1 Designphase: Legen Sie das Fundament
- Bedarfsanalyse: Define key requirements:
- Material needs (Z.B., aluminum alloy for lightweight, Edelstahl für Korrosionswiderstand).
- Dimensionsgenauigkeit (±0.05mm for precision parts like gears; ±0.1mm for general parts like brackets).
- Oberflächenbehandlung (Überzug, Sprühen, Anodisierung) und Nachbearbeitung (Fadenlöcher, Rillen).
- 3D Modellierung & Zeichnung: Verwenden Sie die CAD -Software (Solidworks, Und NX, Autocad) zu erstellen:
- A 3D model of the prototype.
- 2D engineering drawings marked with Toleranzen (Z.B., ± 0,05 mm) Und Oberflächenrauheit (Ra 1.6~3.2 for normal processing; Ra 0.8 for high gloss).
2.2 Material & Prozessauswahl: Passend zu Ihren Zielen
Choose materials and processes based on your prototype’s purpose, Komplexität, und Volumen.
2.2.1 Materialauswahlanleitung
| Material | Schlüsseleigenschaften | Ideale Anwendungen |
| Aluminiumlegierung (6061, 6063) | Leicht, Einfach zu maschine, niedrige Kosten. | Shells, Struktureile (Drohnenrahmen, Laptop -Gehäuse). |
| Edelstahl (304, 316) | Korrosionsbeständig, stark. | Präzisionsteile, Außenausrüstung (marine sensors, medizinisches Werkzeuggriff). |
| Copper/Brass | Hervorragende Leitfähigkeit, heat dissipation. | Elektronische Anschlüsse, Kühlkörper (phone charging ports, CPU coolers). |
| Carbon Steel/Alloy Steel | Hohe Stärke, Tragenresistent. | Load-bearing mechanical parts (Getriebe, Buchsen, Kfz -Klammern). |
2.2.2 Processing Method Selection
| Verfahren | Am besten für | Beispiel |
| CNC -Bearbeitung | Hochvorbereitete, Komplexe Formen (Kurven, Themen, Rillen). | A 6061 aluminum drone propeller hub with intricate threading. |
| Stamping/Sheet Metal | Dünnwandige Teile (≤3mm thick) like shells or brackets. | A 304 stainless steel laptop chassis (cut via laser, bent into shape). |
| Metall 3D -Druck (Slm) | Complex structures unachievable with CNC/stamping. | A titanium medical implant with internal lattice structures. |
| Welding/Assembly | Combining multiple components (Z.B., Scharniere, snap structures). | Welding two aluminum brackets to form a car seat frame. |
2.3 Produktion: Bauen Sie den Prototyp auf
Below are the most common production processes (CNC machining and stamping) with key steps:
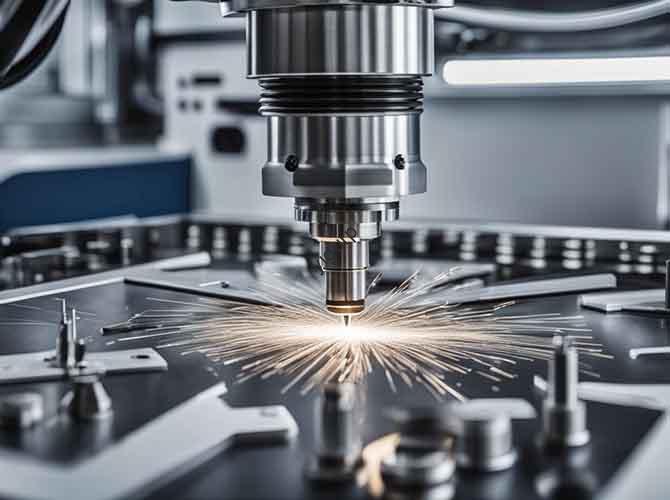
2.3.1 CNC -Bearbeitung (for Precision Parts)
- Programmierung & Werkzeugwegplanung: Generate G-code from the 3D model; set cutting parameters (Drehzahl, Futterrate, Tiefe des Schnitts). Choose tools (flat cutter for flat surfaces, ball cutter for curves) — carbide inserts work best for steel.
- Spannen & Tool Setting: Fix the metal billet to the CNC table; use a dial indicator to ensure perpendicularity. Calibrate the tool’s starting position with a tool setter to avoid deviations.
- Rauen & Fertig:
- Rauen: Überschüssiges Material schnell entfernen (large diameter tools, hohe Vorschubgeschwindigkeit); leave 0.5~1mm allowance.
- Fertig: Refine the surface (small diameter tools, niedrige Vorschubgeschwindigkeit) to meet design tolerances/roughness.
- Enttäuschung & Reinigung: Use files/sandpaper to remove burrs; clean with an ultrasonic cleaner to eliminate oil/debris.
2.3.2 Stamping/Sheet Metal (for Thin-Walled Parts)
- Schimmeldesign & Plate Cutting: Design blanking/bending/stretching molds; cut the sheet metal (1~3mm thick) with a laser cutter or wire EDM.
- Stamping Molding: Use a punch to shape the metal (Blanking, Biegen, Dehnung); add secondary molding/hot pressing for complex surfaces.
- Schweißen & Montage: Weld (argon arc, Laser) or rivet parts together; sand welds and check for waterproof/airtight tightness if needed.
2.4 Oberflächenbehandlung: Enhance Function & Ästhetik
Surface treatments protect the prototype and match final product looks:
| Behandlung | Verfahren | Vorteile |
| Sprühen | Sandblasting → Primer → Drying → Top Coat → Baking | Benutzerdefinierte Farben (piano black, matte gray); Kratzerfestigkeit. |
| Elektroplierend | Chemical Degreasing → Pickling → Nickel/Chrome Plating → Polishing | Glänzendes Finish; Korrosionsbeständigkeit (ideal for stainless steel/copper). |
| Anodisierung (Aluminium) | Electrolytic oxidation to create a dense oxide film | Color options (Schwarz, Silber); improved wear/corrosion resistance. |
| Silk Screen/Laser Engraving | Silk screen: Print text/logos with epoxy ink; Laser: Engrave serial numbers/QR codes | Rückverfolgbarkeit; brand identification. |
2.5 Qualitätsinspektion: Ensure It Meets Standards
Skip inspection, and you risk missing flaws that derail production. Use these tests:
- Dimensionale Inspektion: Verwenden Sie eine Koordinatenmessmaschine (CMM) or micrometer to check key dimensions against design tolerances.
- Funktionstests: Simulate real use — test assembly fit, moving part fluency (Scharniere, Folien), and load-bearing capacity.
- Visuelle Inspektion: Überprüfen Sie auf Kratzer, Dellen, or color aberrations; use a gloss meter to verify finish (highlight, matt).
3. What Are Common Problems & Lösungen?
Auch bei sorgfältiger Planung, issues arise. Here’s how to fix them:
| Problem | Grundursache | Lösung |
| Machining Deformation | Uneven material allowance or stress release during cutting. | Optimize tool paths for uniform allowance; pre-treat blanks with annealing (heat treatment to reduce stress). |
| Poor Surface Roughness | Worn tools or incorrect cutting parameters. | Replace tools every 50~100 parts; adjust rotational speed (increase for smoother surfaces) und Futterrate (decrease for precision). |
| Welding Defects (Porosität, non-fusion) | Improper welding parameters or unstable weldment positioning. | Optimize current/voltage; secure parts with a fixture during welding. |
4. What Are the Advantages & Einschränkungen?
Weigh these to decide if hardware prototyping fits your project:
Vorteile
- Material Realism: Eigenschaften (Stärke, Leitfähigkeit) match mass-produced metal parts — no surprises later.
- Hohe Präzision: Erreicht enge Toleranzen (± 0,05 mm) for complex parts like gears or medical components.
- Ästhetische Vielseitigkeit: Multiple surface treatments (Anodisierung, Überzug) simulate final product looks.
Einschränkungen
- Hohe Kosten: CNC machining or stamping molds can cost \(1,000~ )5,000 — more than 3D printing.
- Longer Cycles: Takes 1~2 weeks (vs. 3~7 days for plastic 3D printing), Besonders für komplexe Teile.
- Small-Batch Inefficiency: Per-unit cost drops with mass production, but stays high for 1~10 prototypes.
5. What Are Real-World Application Scenarios?
Hardware prototyping is used across industries to solve specific challenges:
- Mechanical Equipment: Test precision parts like gears (for fit) or bushings (für Verschleißfestigkeit).
- Unterhaltungselektronik: Validate aluminum alloy heat sinks (zur Wärmeissipation) or stainless steel phone brackets (für Haltbarkeit).
- Medizinprodukte: Check ergonomics of surgical instrument handles (Edelstahl) or compatibility of implant components (Titan).
- Automobil: Verify assembly of lightweight aluminum interior parts or corrosion resistance of stainless steel exterior trims.
Perspektive der Yigu -Technologie
Bei Yigu Technology, we see making hardware prototypes as a “design insurance policy.” Too many clients rush to mold opening without validating metal prototypes—only to discover their aluminum bracket bends under load or their stainless steel part corrodes. Unser Ansatz: We work with teams to select the right material (Z.B., 6061 aluminum for drones, 316 Edelstahl für Meeresteile) and optimize CNC parameters to cut lead times by 30%. Zum Beispiel, we helped an automotive client fix a welding defect in their bracket prototype in 3 Tage, avoiding a $10k mold rework. Investing in hardware prototypes isn’t expensive—it’s cheaper than fixing mass production failures.
FAQ
- Can we use 3D printing (Plastik) instead of hardware prototyping for metal parts?
No—plastic prototypes can’t replicate metal’s strength or conductivity. Zum Beispiel, a plastic drone bracket may seem to fit, but a metal one could bend under real flight loads. Hardware prototyping ensures material performance matches your needs.
- How long does making a hardware prototype take?
Es hängt von der Komplexität ab: A simple CNC-machined aluminum bracket takes 5~7 days; a complex stamped stainless steel part with anodizing takes 10~14 days. This is longer than plastic 3D printing but critical for accuracy.
- What’s the most cost-effective material for hardware prototypes?
Aluminiumlegierung (6061/6063) is the cheapest and easiest to machine—ideal for functional tests or non-corrosive environments. Edelstahl (304) costs more but is worth it for outdoor or medical applications needing corrosion resistance.