Wenn Sie jemals mit schnellem Prototyping oder Small-Batch-Produktion gearbeitet haben, Sie sind wahrscheinlich begegnet Silikonformen. Diese vielseitigen Tools sind wichtig, um genaue Repliken von Prototypen zu erstellen, Kunstwerke, und industrielle Teile. Aber wie bei jedem Herstellungsprozess, working with silicone molds comes with its own set of challenges—from short mold lifespans to surface defects. In diesem Leitfaden, we’ll walk you through the complete production process, address common problems, and provide practical solutions to help you achieve better results.
Understanding Silicone Molds: Grundlagen und Vorteile
Before diving into the production process, let’s clarify why silicone molds are so popular in manufacturing. Silikonformen are flexible, heat-resistant tools used to replicate prototypes or existing objects with high precision. Sie werden aufgrund ihrer einzigartigen Eigenschaften besonders im schnellen Formen geschätzt:
- Ausgezeichnete Elastizität: Sie können feine Details erfassen, ohne empfindliche Prototypen zu beschädigen.
- Kein Draft -Winkel erforderlich: Im Gegensatz zu starren Formen, Silikonformen benötigen keinen Draftwinkel (eine leichte Neigung) Teile freigeben, Erhaltende dimensionale Genauigkeit.
- Einfache Spaltbarkeit: Sie können als einzelnes Stück gegossen werden und dann entlang vorgelöster Linien geschnitten werden, um das Originalmodell zu entfernen.
- Kosteneffizienz: Ideal für kleine Produktionsläufe (Typischerweise 10–30 Teile pro Form), sie perfekt für Tests oder begrenzte Veröffentlichungen machen.
Silikonformen werden in Branchen weit verbreitet verwendet, einschließlich Spielzeugherstellung, Kunstreproduktion, Architekturmodellierung, und Prototyping von medizinischen Geräten. Ihre Fähigkeit, Präzision und Flexibilität auszugleichen.
Schritt-für-Schritt-Silikonformproduktionsprozess
Die Erstellung einer hochwertigen Silikonform erfordert sorgfältige Vorbereitung und Liebe zum Detail. Hier ist eine Aufschlüsselung des Standardprozesses:
1. Vorbereitung der Meisterform
Der erste Schritt ist die Vorbereitung des Meisterform- Das ursprüngliche Objekt, das Sie replizieren möchten.
- Reinigen und trocknen Sie die Masterform gründlich, um Staub zu entfernen, Öl, oder Trümmer. Alle Unvollkommenheiten über den Meister werden in der endgültigen Form erscheinen.
- Glätten Sie die Oberfläche bei Bedarf. Für glänzende Oberflächen, Polieren Sie den Meister; Für strukturierte Oberflächen, Stellen Sie sicher, dass die Muster klar und intakt sind.
- Wenden Sie einen Release -Agenten an (wie Erdölgelee oder spezialisiertes Spray) Um die Silikonfreisetzung vom Meister zu unterstützen. Für glatte Meister:
- Tauchen Sie ein sauberes Tuch in Erdölgelee und tragen Sie gleichmäßig auf.
- Lass es für sitzen 30 Minuten, um die Absorption zu ermöglichen.
- Wischen Sie Überschüsse mit einem trockenen Tuch ab, bis die Oberfläche scheint.
2. Einrichten des Formrahmens
Das Silikon enthalten, Sie benötigen einen Rahmen:
- Verwenden Sie Holzbretter oder Plastikblätter, um einen Behälter um die Masterform zu bauen. Der Rahmen sollte mindestens 3–4 mm größer sein als der Meister auf allen Seiten.
- Versiegeln Sie Lücken mit Ton oder Klebeband, um ein Silikonleckage zu verhindern. Der Ton sollte eine enge Dichtung bilden, ohne die Masteroberfläche zu beschädigen.
- Stellen Sie sicher.
3. Mischen des Silikons
Die richtige Mischung ist für die Schimmelpilzqualität von entscheidender Bedeutung. Befolgen Sie diese Schritte:
- Messen Schimmel -Silikonkautschuk (Typischerweise 500–1000 Gramm für kleine Formen) in einen sauberen Plastikbehälter.
- Fügen Sie das CHREINGENTEN. Zum Beispiel, mischen 2 Gramm aus dem Aushärten mit 100 Gramm Silikon.
- Rühren Sie unregelmäßige Richtung ein, um zu vermeiden, dass Luftblasen erzeugt werden. 3–5 Minuten gründlich mischen.
- Wenn das Silikon zu dick ist, Fügen Sie eine kleine Menge Silikonverdünnung hinzu (3–5% by volume) and mix well.
- Degas the mixture unter Vakuum (-0.1Mpa) for 1–3 minutes to remove trapped air. This step is crucial for smooth molds—skip it, and you’ll get bubbles on the surface.
4. Pouring and Curing the Silicone
Now it’s time to create the mold:
- Pour the silicone slowly onto the highest point of the master mold. Let it flow naturally to ensure even coverage.
- Use a paintbrush to spread silicone into hard-to-reach areas (like crevices or intricate details).
- Apply at least three layers of silicone, each about 1mm thick. Warten Sie, bis jede Schicht heilt, bevor Sie die nächste hinzufügen.
- Betten Sie eine Schicht Gaze oder Netz zwischen den zweiten und dritten Schichten ein, um die Form zu stärken. Vermeiden Sie Glasfasertuch, was zu Delaminierung führen kann.
- Lassen Sie das Silikon 10 bis 15 Stunden bei Raumtemperatur heilen. Die volle Aushärtung dauert 24 Stunden für maximale Stärke.
5. Die Form beenden
Einmal geheilt, Die Form braucht endgültige Details:
- Entfernen Sie den Rahmen und schneiden. Verwenden Sie eine scharfe Klinge und schneiden Sie langsam, um das Rennen zu vermeiden.
- Reinigen Sie die Form mit milder Seife und Wasser, um Rückstände zu entfernen.
- Erstellen Sie einen Stützmantel mit Gips oder Glasfaser, um zu verhindern, dass die flexible Silikonform während des Gebrauchs verzerrt.
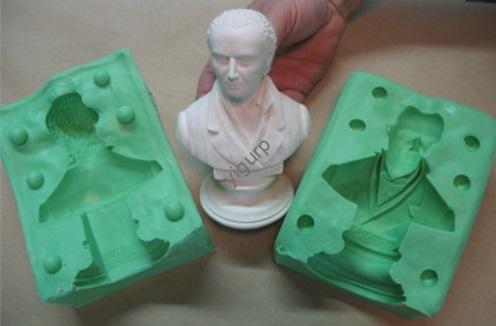
Häufige Arten von Silikonformen und deren Anwendungen
Silikonformen gibt es in verschiedenen Stilen, jeweils für bestimmte Projekte geeignet. So wählen Sie den richtigen Typ aus:
| Schimmelpilztyp | Am besten für | Produktionsmethode | Schlüsselvorteil |
| Schimmelpilzpinsel | Komplizierte Details, große Objekte | Geschichtete Anwendung mit Pinsel | Erfasst feine Texturen und Unterschnitte |
| Schimmel eingießen | Glatt, einfache Formen | Silikon, das direkt über den Meister gegossen wurde | Schnellere Produktion, minimale Arbeit |
| Split Form | Komplexe 3D -Objekte | Zwei getrennte Hälften sind miteinander verbunden | Einfaches Entfernen großer oder detaillierter Teile |
| Infusionsform | Klein, zarte Elemente | Silikon in einen versiegelten Rahmen gegossen | Verhindert Schäden an fragilen Meistern |
Zum Beispiel, Wenn Sie eine detaillierte Skulptur replizieren, Eine Pinselform würde am besten funktionieren. Für einen einfachen Telefonkofferprototyp, Eine Gussform ist schneller und effizienter.
Fehlerbehebung bei Problemen mit häufigen Silikonformproblemen
Sogar erfahrene Hersteller haben Probleme mit Silikonformen. Hier sind Lösungen für die häufigsten Probleme:
1. Kurzformlebensdauer (Niedriger Umsatz)
Problem: Ihre Schimmelpilze bricht oder verformt sich nach nur wenigen Verwendungen.
Ursachen:
- Zu viel Silikonöl hinzugefügt, um die Viskosität zu reduzieren (zerstört die molekulare Struktur).
- Mit der falschen Härte Silikon verwenden (Hochhärte für kleine Details wird spröde; Niedrige Härte für große Teile verschmelzen).
- Schlechte Heilung aufgrund eines falschen Katalysatorverhältnisses.
Lösung:
- Passen Sie die Härte der Silikonhärte Ihres Projekts an: 20–30 Ufer A für kleine Details, 40–50 Ufer A für größere Teile.
- Silikonöl auf 5–10% der Mischung begrenzen.
- Verwenden Sie das empfohlene Katalysatorverhältnis (1.5–2,5%)- Übertreiben Sie es nicht, um die Heilung zu beschleunigen.
2. Schimmelbrennen
Problem: Die Silikonschimmelverfärbungen, schmilzt, oder entwickelt eine klebrige Oberfläche nach dem Gießen.
Ursache: Eine exotherme Reaktion aus Harzhärten erzeugt Wärme (bis zu 180 ° F/82 ° C.), was die Form schädigt, wenn sie zu lange bleibt.
Lösung:
- Demold -Harzteile innerhalb 3 Minuten des Heilens.
- Verwenden Sie hitzebeständiges Silikon, das für Harzgießen formuliert ist.
- Fügen Sie einen Kühlschritt zwischen den Abgüssen hinzu, um die Formtemperatur fallen zu lassen.
3. Oberflächenprobleme: Klebrige oder klebrige Form
Problem: Die Silikonform bleibt auch nach der vollen Aushärtungszeit klebrig.
Ursache: Kondensations-Cure-Silikon basiert auf Feuchtigkeit, um zu heilen. Wenn das Silikon während der Produktion übertrocknet war, Es kann nicht genug Feuchtigkeit aus der Luft aufnehmen.
Lösung:
- Beachten Sie die Form leicht mit Wasser und lassen Sie sie für sitzen 24 Std..
- Lagern Sie Silikon in einer kontrollierten Feuchtigkeitsumgebung (40–60% Feuchtigkeit) Vor dem Gebrauch.
- Überprüfen Sie die Ablaufdaten - altes Silikon kann unsachgemäß heilen.
4. Schlechte Zugfestigkeit und Tränenfestigkeit
Problem: Die Form reißt leicht beim Entfernen von Teilen.
Ursache: Übermäßiger Silikonöl verdünnt die Mischung, schwächende molekulare Bindungen.
Lösung:
- Silikonöl auf reduzieren 5% Max, oder es vollständig beseitigen.
- Fügen Sie eine Verstärkungsschicht hinzu (Gaze oder Mesh) während der Produktion.
- Verwenden Sie ein hochwertiges Silikon mit besserem Tränenwiderstand (look for tear strength >20 kN/m).
5. Fettige Rückstände auf Schimmelpilzoberfläche
Problem: Ein fettiger Film erscheint auf der Form, Übertragung von Teilen übertragen.
Ursache: Billig Mineralöl anstelle von reinem Silikonöl verwenden (Mineralöl verbindet sich nicht mit Silikon und lauert aus).
Lösung:
- Verwenden.
- Reinigen Sie neue Formen mit Isopropylalkohol vor dem ersten Gebrauch.
- Vermeiden Sie minderwertige Silikonmarken, die Ecken mit Zusatzstoffen schneiden.
6. Oberflächenunfälle (Markierungen, Streifen)
Problem: Die Form hat sichtbare Linien, Rauheit, oder ungleiche Textur.
Ursachen:
- Die Meisterform war nicht richtig poliert.
- Release Agent wurde ungleichmäßig angewendet.
- Luftblasen während des Gießens gefangen.
Lösung:
- Polieren Sie den Meister vor dem Formteil einen glatten Finish.
- Release Agent in dünn auftragen, sogar Schichten.
- Degas Silikon gründlich unter Vakuum (-0.1MPA für 7–8 Sekunden).
Best Practices zur Maximierung von Silikonformleistung
Um das Beste aus Ihren Silikonformen herauszuholen, Folgen Sie diesen Experten -Tipps:
- Wählen Sie das richtige Silikon: Passen Sie Härte und Viskosität mit Ihrem Projekt an. Die Arbeit mit hoher Detail benötigt Silikon mit niedrigem Viskosität; Große Teile brauchen höhere Härte.
- Sauberkeit aufrechterhalten: Staub, Öl, oder Trümmer des Meisters werden die Form ruinieren. Arbeiten Sie in einer sauberen Umgebung und tragen Sie Handschuhe.
- Steuerungsbedingungen steuern: Heilung bei 70–80 ° F. (21–27 ° C.) mit 40–60% Luftfeuchtigkeit für optimale Ergebnisse.
- Schimmelpilze ordnungsgemäß aufbewahren: Halten Sie ungenutzte Formen in einer Kühle, Trockener Ort vor dem direkten Sonnenlicht. Staub sie mit Talk.
- Formen drehen: Wenn Sie mehrere Teile produzieren, Wechseln Sie zwischen 2 bis 3 Formen, um eine Überhitzung zu verhindern und die Lebensdauer zu verlängern.
Perspektive der Yigu -Technologie
Bei Yigu Technology, Wir glauben, dass Silikonformen die Brücke zwischen Prototyp und Produktion sind. Die richtige Schimmelherstellung kombiniert Kunst und Wissenschaft - die richtigen Materialien zu veranlassen, Mastering -Härtungszeiten, und Fehlerbehebung proaktiv. Wir empfehlen, in qualitativ hochwertige Silikon in hochwertigem Silikon zu investieren und die Oberflächenvorbereitung zu priorisieren. Durch die Befolgung präziser Prozesse und dem passenden Schimmelpilztyp zu den Projektanforderungen, Hersteller können konsistent erreichen, Hochwertige Ergebnisse mit längerer Schimmeldienerlebensspannung.
FAQ
1. Wie viele Teile können normalerweise eine Silikonform erzeugen?
Die meisten Silikonformen ergeben 10 bis 30 Teile, bevor sie Verschleiß zeigen. Mit richtiger Sorgfalt (Richtige Härte, Minimales Öl, und kontrollierte Heilung), Einige hochwertige Formen können bis zu 50 Teile, Besonders für einfache Formen.
2. Kann ich eine Silikonform wiederverwenden, nachdem sie kleine Tränen entwickelt hat??
Kleinere Risse können mit Silikondichtmittel repariert werden, Dies kann jedoch die Detailgenauigkeit beeinflussen. Für kritische Teile, Ersetzen Sie die Form, sobald die Tränen anscheinend Mängel in Gussteilen vermieden werden.
3. Was ist der Unterschied zwischen Kondensations-Cure- und Additionshärtungs-Silikonformen?
Kondensations-Cure-Silikon ist billiger und heilt mit Feuchtigkeit, kann aber leicht schrumpfen. Additionshärte-Silikon heilt schneller bei Hitze, hat minimaler Schrumpfung, und ist besser für hochpräzisen Arbeiten, kostet aber mehr. Wählen Sie basierend auf Ihren Budget- und Genauigkeitsanforderungen.